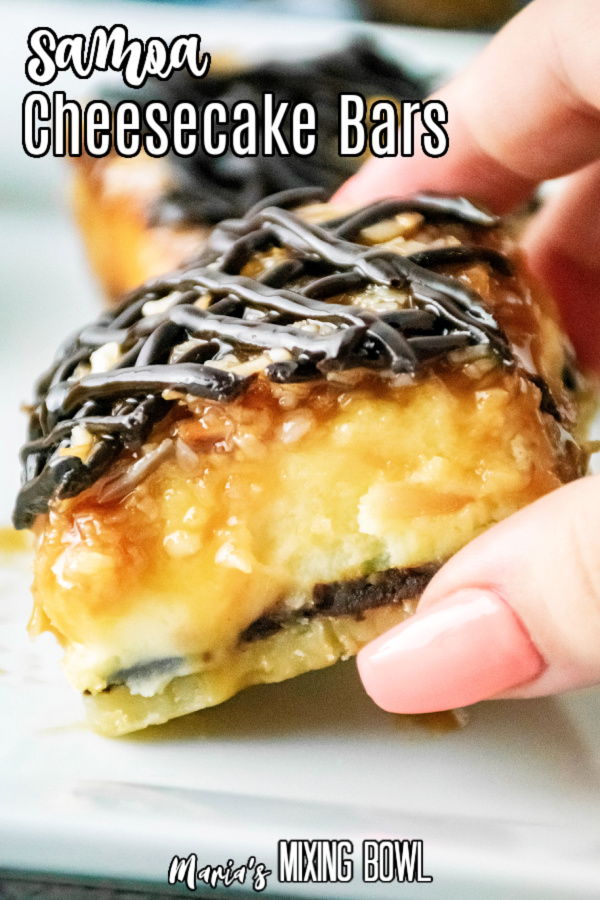
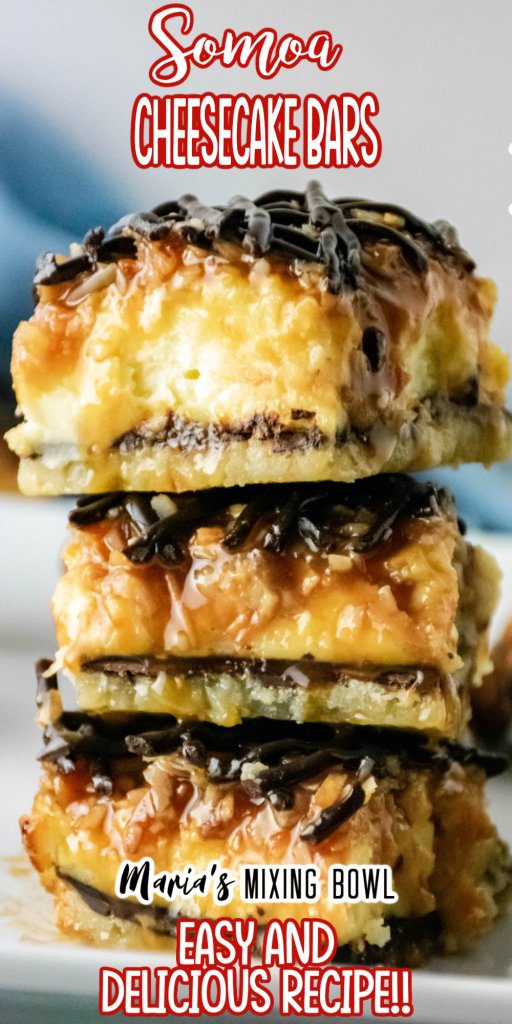
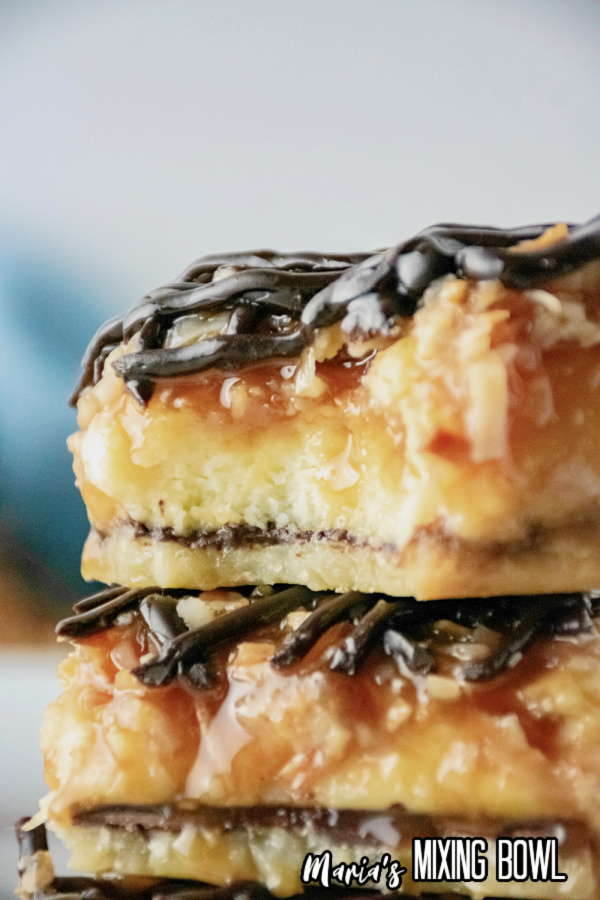
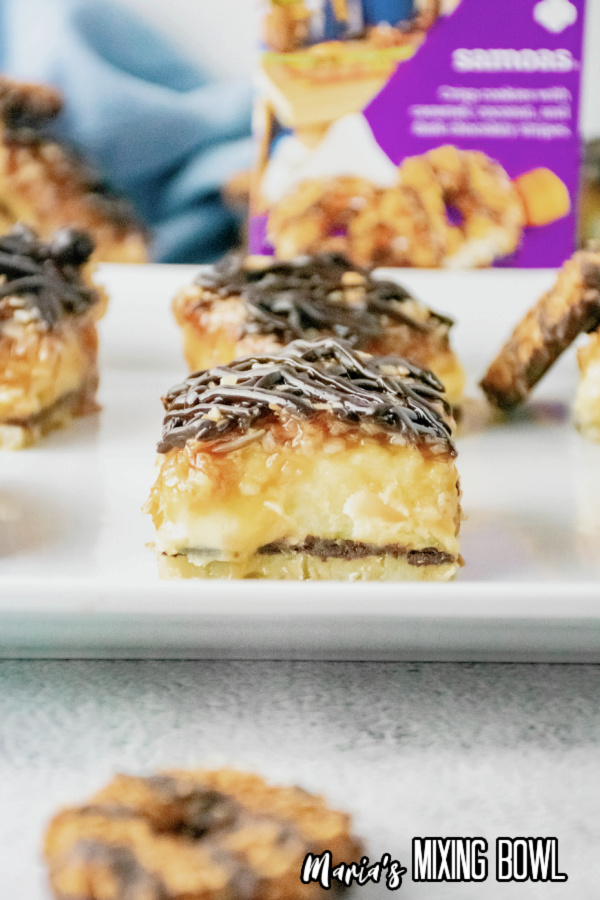
Samoa Cheesecake Bars
These delicious Samoa Cheesecake Bars are a sweet and tangy treat you’ll adore. A shortbread crust is topped with cheesecake and a coconut and dark chocolate sauce to die for.
If you’re a regular reader, you know that we love making cheesecake in all its many forms. From no-bake to mini, traditional, and cheesecake bars, if it has cheesecake, we’ve probably made it. One of our favorite cheesecake treats to make when we want something to really knock everyone’s socks off is these Samoa cheesecake bars. We love to serve them at parties, potlucks, and for dessert “just because”.
Samoa Cheesecake Bars
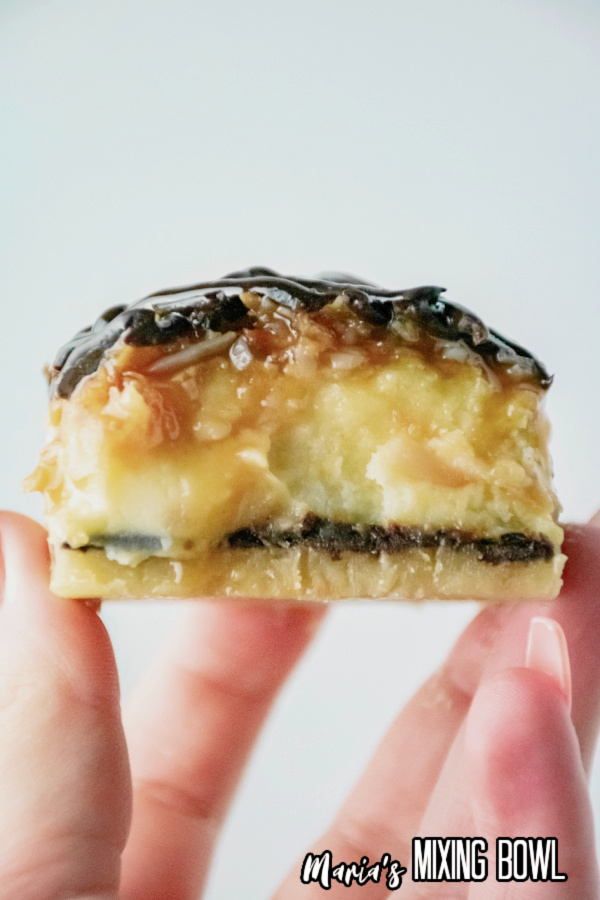
These cheesecake bars combine the sweetness of shortbread, the sweet and tanginess of cheesecake, and a topping made of coconut, caramel, and dark chocolate. It’s a super-rich, decadent dessert that ticks all the boxes and leaves every single tastebud and sweet tooth in your mouth satisfied. It’s the kind of dessert that leaves you fully satisfied with only one piece. But you still eat another one…
Samoa Cheesecake Bars Ingredients
You only need a few simple ingredients to make these tasty cheesecake bars. You’ll have most of the ingredients in your kitchen already, and the ones you don’t are all easily found at your local grocery store.
For the Crust
- Unsalted butter – room temperature
- Granulated sugar
- Baking powder
- Salt
- All-purpose flour
- Milk
- Vanilla
- Dark chocolate chips
For the Filling
- Cream cheese – room temperature
- Granulated sugar
- Vanilla extract
- Eggs
- Marshmallow fluff
For the Topping
- Sweetened coconut flakes
- Caramel sauce
- Dark chocolate chips
- Heavy whipping cream
**See the recipe card at the end of the post for quantities.
Samoa Cheesecake Bars Instructions
As a fully homemade baked cheesecake dessert, this recipe has several steps. However, when you break them down, it really is a relatively simple recipe.
Step 1: Make the Crust Dough
Cream butter and sugar together until smooth using a hand or stand mixer. Then add the baking powder and salt and mix. next, add the flour 1/4 cup at a time, mixing between each addition until all ingredients are combined. Finally, add the milk and vanilla extract and mix until fully incorporated.
Step 2: Chill the Dough
Form the dough into a ball and place it on a piece of plastic wrap. Then flatten it into a disc and tightly wrap it in the plastic wrap. Chill in the refrigerator for an hour.
Step 3: Bake the Dough
Remove the dough from the refrigerator and let it sit for 5 minutes. Then, gently press the dough down into the bottom of a prepared 9×9 cake pan to create an even layer. Bake for 6 minutes at 350 degrees.

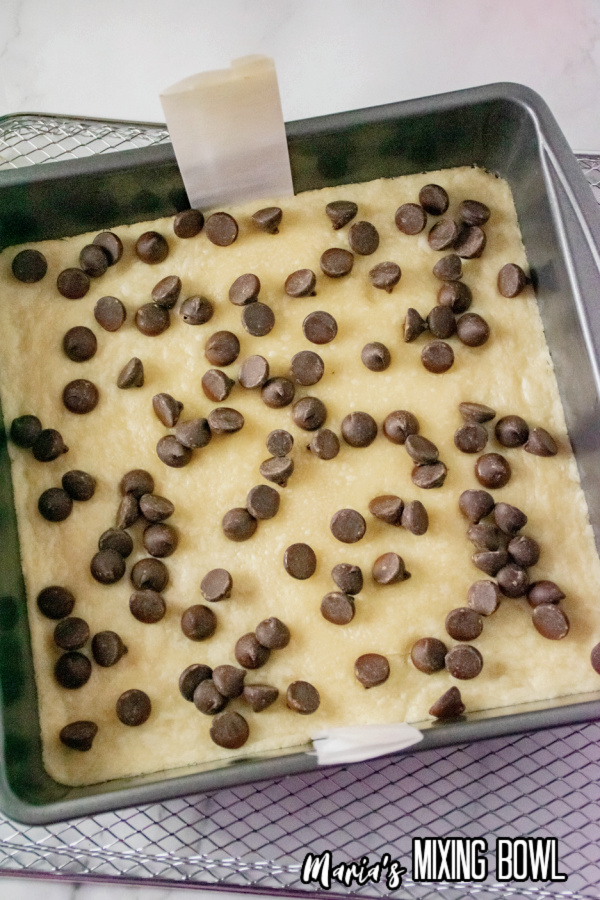
Step 4: Add Chocolate Chips and Bake Again
Remove the dough after 6 minutes and evenly distribute dark chocolate chips over the crust. Then place it back in the oven for 5 minutes. Then, remove the crust from the pan, evenly spread the chocolate over the crust with a spatula, and leave the oven at 350 degrees for the cheesecake.
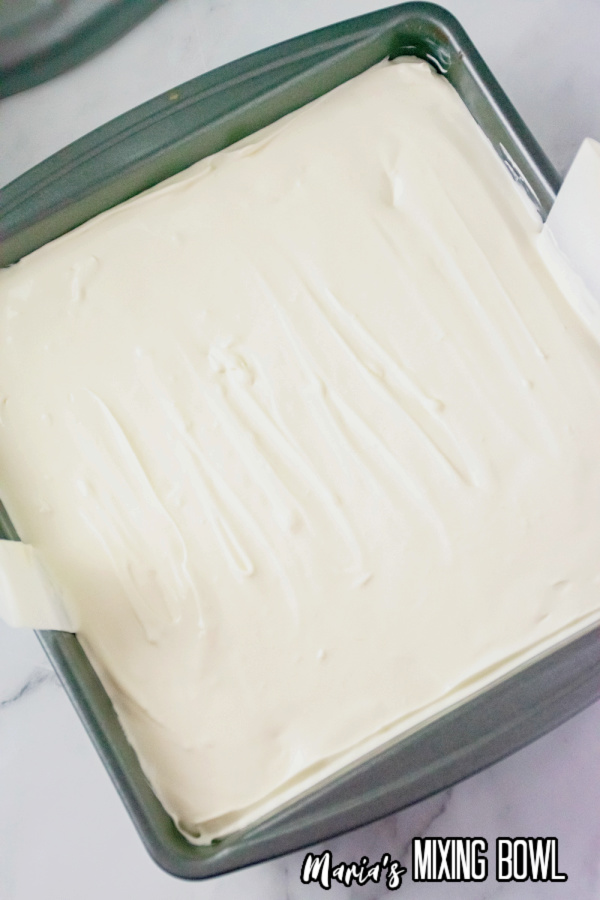
Step 5: Make the Filling
Beat cream cheese and sugar in a large mixing bowl until creamy and smooth. Then, add the vanilla extract and eggs, mixing again. Finally, add the marshmallow fluff and mix until well incorporated.
Step 6: Bake at 350
Pour the filling over the chocolate-covered crust, evenly distributing it. Then, bake at 350 for 20 minutes.
Step 7: Bake at 200
After 20 minutes, turn the temperature down to 200 degrees and bake for another 30 minutes or until the center is set. DO NOT open the oven door.
Step 8: Cool the Cheesecake
When the cheesecake is finished baking, turn the oven off and allow it to sit for 10 minutes. Again, DO NOT open the oven door. After 10 minutes, remove the cheesecake from the oven and place it on a wire rack. Allow it to come to room temperature.
Step 9: Toast the Coconut
Place the coconut in an even layer on a baking sheet and bake for 6 minutes at 350 degrees. Remove the coconut from the oven, mix it around, and bake it for another 4 minutes. When finished, remove the baking sheet from the oven and let the coconut oil for 5 minutes.
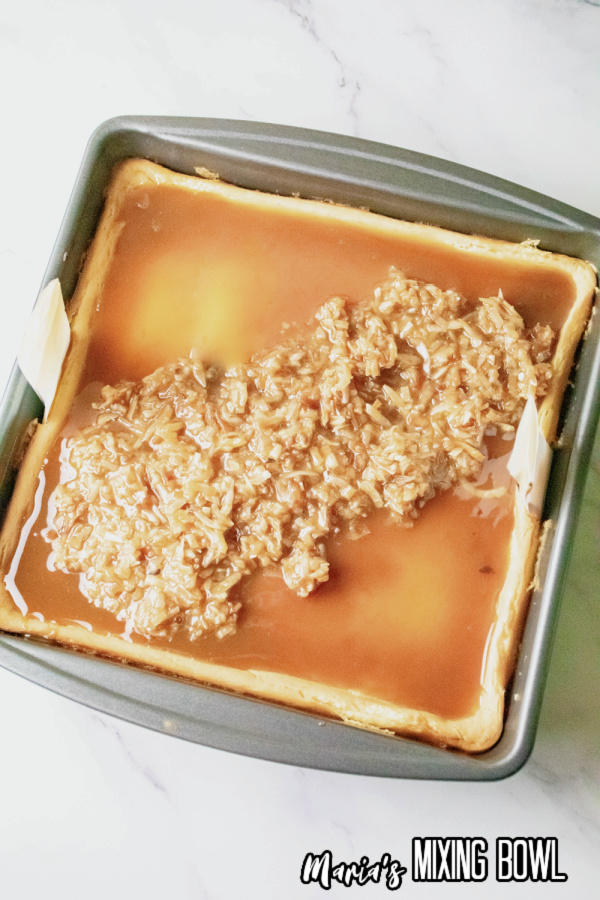
Step 10: Make the Coconut Caramel Mixture
When the coconut is cool, place it in a bowl and add 1 cup of caramel sauce, mixing until fully combined. Then pour the mixture over the cheesecake, distributing it evenly, and set it aside.
Step 11: Make the Dark Chocolate Topping
Add 1/2 cup of dark chocolate chips and the heavy whipping cream to a microwaveable bowl. Then, microwave for a minute and mix until smooth.
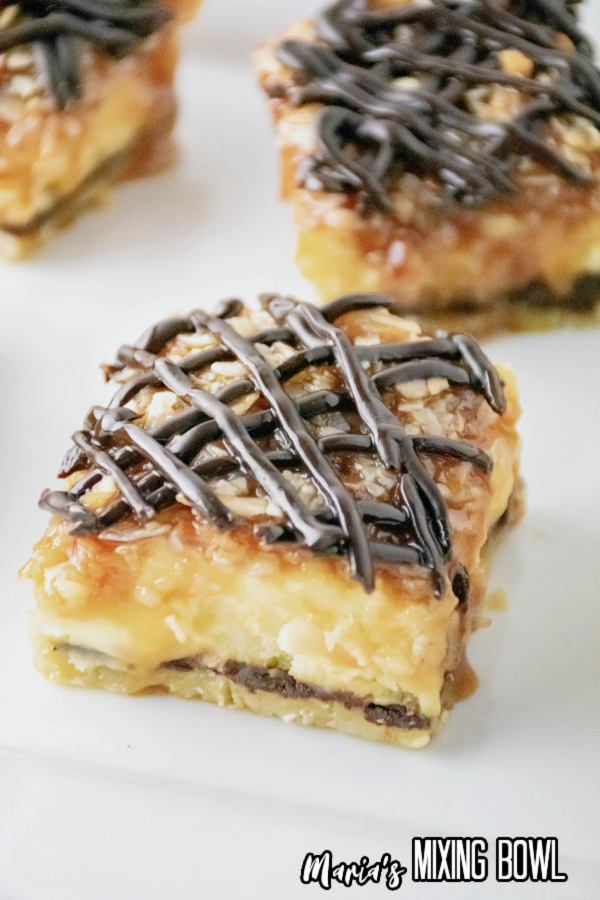
Step 12: Top and Chill
Drizzle the chocolate mixture over the coconut topping. Then drizzle the remaining caramel sauce over all. Chill the cheesecake for at least 3 hours. Then, cut into squares and serve cold.
Hint: NEVER open the oven door. That’s the biggest tip to remember. Don’t open the door and your cheesecake won’t crack.
Equipment
You’ll only need a few simple pieces of kitchen equipment to make this recipe.
- Measuring cups and spoons
- Mixing bowls
- Hand or stand mixer
- Soon
- Spatula
- Baking dish
- Baking sheet
PIN IT!!
Samoa Cheesecake Bars Tips
This is a relatively simple recipe to make, but there are some key tips here that are imperative to follow to make the best cheesecake bars possible.
NEVER Open the Oven Door – Don’t open the oven door until you’re ready to remove the cheesecake for the final time to let it cool. It’s imperative to leave it closed so the cheesecake doesn’t crack.
Full Softened Cream Cheese – Be sure your cream cheese is fully softened to get the smooth creamy texture you need for this recipe.
Mixers are Your Friend – Using a hand or stand mixer will make this recipe much easier and faster.
Samoa Cheesecake Bars Storage
Store this cheesecake in an air-tight container in the refrigerator for up to a week. For longer storage, you can freeze it for up to a month.
More Cheesecake Recipes
If you love cheesecake, then we have some recipes that we think you’ll be excited about.
Reese’s Cheesecake Brownie Bars
Samoa Cheesecake Bars FAQ
If you have questions about this recipe, then read one. The following FAQ answers the most commonly asked questions about cheesecake.
Is baked or no-bake cheesecake better?
Neither is better than the other. They’re just different. Baked cheesecake is creamier and smoother than no-bake cheesecake. On the other hand, no-bake cheesecake is a lot easier to make and has its own delicious, silky flavor.
Where was cheesecake invented?
Unlike the popular myth, the cheesecake wasn’t actually invented in New York. Rather, the ancient Greeks first made the earliest known cheesecake around the 5th century.
How long is baked cheesecake good?
Baked cheesecake will last for up to a week in the refrigerator or up to 1 month in the freezer.
Try These Delicious Samoa Cheesecake Bars
These Samoa cheesecake bars are so good, and they’re less work than you might think. When you break down the recipe into steps, you’ll immediately see that it’s fairly simple to make and it is so, so decadent. Try it once, and you’ll find yourself making it again and again.
MORE RECIPES YOU WILL LOVE:
Chocolate Crinkle Cookies
Lemon Bars
Amish Sugar Cookies
Chocolate Cosmic Brownie Cake
Snickers Poke Cake
Samoa Cheesecake Bars
Ingredients
Shortbread Crust
- ½ cup Unsalted butter- room temperature
- ¼ cup Granulated sugar
- ⅛ tsp. Baking powder
- ¼ tsp. Salt
- 1 cup All-purpose flour
- 1 Tbsp. Milk
- ¼ tsp. Vanilla
- ½ cup Dark Chocolate Chips
Filling
- 16 oz. Cream Cheese- room temperature
- ¼ cup Granulated sugar
- 1 tsp. Vanilla extract
- 2 Eggs
- 1 cup Marshmallow fluff
Topping
- 1¾ cup Sweetened coconut flakes
- 1¼ cup Caramel sauce
- ½ cup Dark chocolate chips
- 3 Tbsp. Heavy whipping cream
Instructions
Shortbread Crust-
- In a stand mixer or with a hand mixer, cream the butter and sugar together until smooth.
- Once smooth, add in the baking powder and salt. When mixed, add in the flour ¼ cup at a time mixing in between each increment.
- The dough will appear crumbly once all the flour is mixed in. Add in the milk and vanilla extract, mix until fully incorporated.
- Once the dough is finished, form it into a ball shape and place on a piece of plastic wrap.
- Flatten the ball into a disc shape, tightly wrap the disc in the plastic wrap and place in the refrigerator to chill for an hour.
- Once chilled, set the dough out for 5 minutes.
- Preheat the oven to 350 degrees Fahrenheit. In a prepared 9×9 cake pan, place the dough in the bottom of the pan.
- Create an even layer across the bottom of the pan with your hands by pressing down the dough.
- Place in the oven and bake for 6 minutes. Once the 6 minutes are up, leave the oven set at 350 degrees and remove the crust.
- Evenly distribute the dark chocolate chips over the crust and place back in the oven for 5 minutes.
- Once finished, remove the pan, and leave the oven set at 350 degrees for the cheesecake.
- Using a spatula, evenly spread the melted chocolate across the top of the crust and set aside.
Filling
- In a large mixing bowl, place in the cream cheese and granulated sugar. Beat until creamy and smooth.
- Once creamy, add the vanilla extract and eggs. Once mixed, add the marshmallow fluff. Mix until well incorporated.
- Pour the filling over the crust and evenly distribute it. Place in the oven and bake for 20 minutes.
- Once the 20 minutes are up, without opening the door, turn the temperature down to 200 degrees and bake for another 30 minutes or until the center is set.
- Once the baking is complete, turn the oven off and allow the cheesecake to sit in the oven for 10 minutes.
- Remove from the oven and place on a wire rack and allow to come to room temperature.
- Once at room temperature prepare the topping.
- Preheat the oven to 350 degrees.
- Start by placing the coconut in an even layer on a baking sheet. Place in the oven and bake for 6 minutes.
- Once the 6 minutes are up, mix the coconut around and bake for another 4 minutes.
- Once finished, take out of the oven, and allow to cool for 5 minutes. Once cooled, place the coconut into a bowl.
- Add in 1 cup of the caramel sauce over the coconut and mix until the coconut is fully coated.
- Pour the caramel and coconut mixture on top of the cheesecake and distribute evenly and set aside.
- In a microwave safe bowl, add in the ½ cup dark chocolate chips and heavy whipping cream.
- Microwave for 1 minute and mix until smooth. Drizzle the chocolate over the coconut topping.
- Follow with drizzling the remaining ¼ cup caramel sauce over the coconut topping.
- Place the cheesecake in the refrigerator for at least three hours to fully set.
- Once chilled, cut into 12 squares and serve cold.
Notes
Disclaimer
Any nutritional data I provide is an approximation and actual dietary information can vary based on ingredients and proportion sizes.


Can’t print this unfortunately
Try your computer. I have no problems printing it