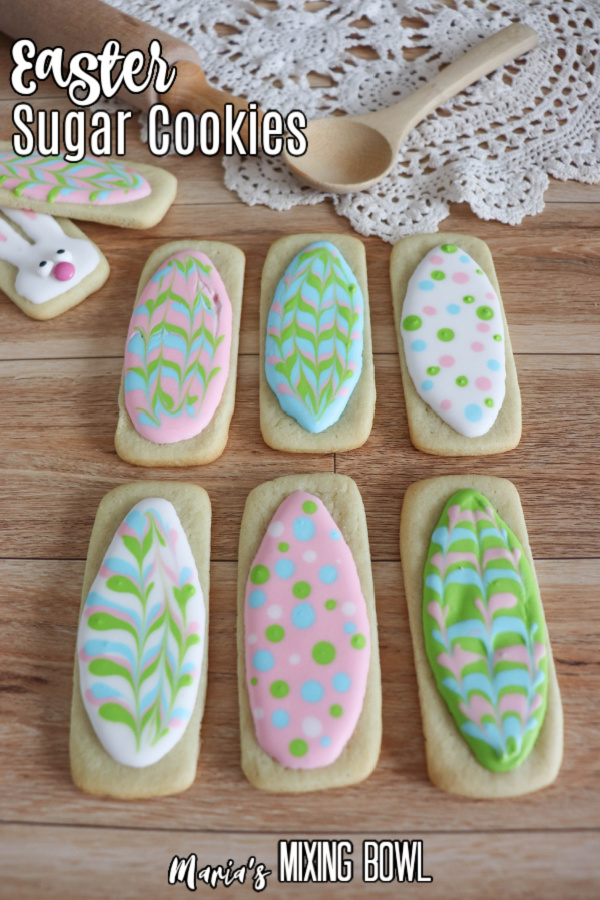
Easter Sugar Cookies

These easy Easter Sugar Cookies are so delicious and so pretty. Combining the classic flavor of iced sugar cookies with adorable Easter-themed designs, they’re perfect for the coming holiday season.
Sugar cookies are such a classic. They’re easy and delicious, and they just seem to fit any occasion. Over the years, we’ve made sugar cookies for snacking, every holiday season, parties, potlucks, and more. There’s never a wrong occasion for them. Now, we’re sharing one of our favorite variations – Easter cookies. These cookies are delicious and adorable, making the perfect treat to bring to any Easter celebration.
Easter Sugar Cookies
These cookies are absolutely delicious and ridiculously adorable. Their classic flavor and fun icing designs make them a must-have this season. Delicious rectangular sugar cookies are decorated with an easy icing made to look like giant colored eggs. They’re so much fun to serve, and they’re even more fun to eat. Every bite is full of that sweet, mellow sugar cookie flavor and a blast of sweetness from the fun icing topping.
They’re also incredibly easy to make! This is a semi-homemade recipe that uses refrigerated sugar cookie dough, so there’s no need for mixing and measuring. In addition, the royal icing is also simple. Together, this makes for a recipe that will have you in and out of the kitchen in no time.
Easter Sugar Cookies Ingredients
It only takes a few simple ingredients to make these cookies. You’ll only need pre-packaged sugar cookie dough and a handful of other ingredients that you can easily find at your local grocery store.
For the Cookies
- Pillsbury refrigerated sugar cookie dough
- All purpose flour
For the Icing
- Powdered sugar
- Meringue powder
- Room temperature water
- Gel food coloring
**See the recipe card at the end of the post for quantities.
Easter Sugar Cookies Instructions
Making these delicious cookies is just as easy as gathering up your ingredients. It only takes a few simple steps to make them. Even the frosting is simple once you get the hang of it.
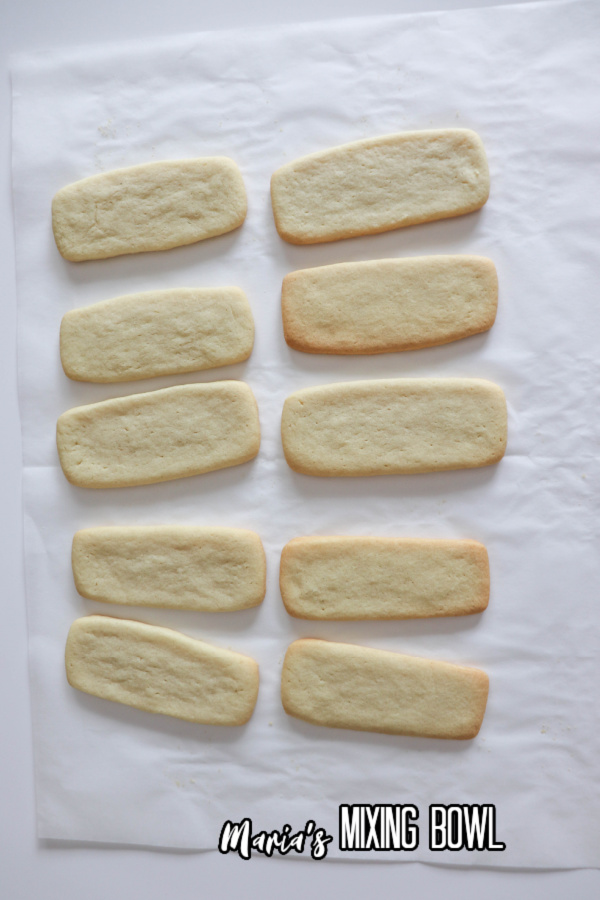
Step 1: Make the Cookie Dough
Combine the refrigerated cookie dough and flour. Roll into 1/4-inch thickness and cut into 1/3″ x 3″ rectangles.
Step 2: Bake
Bake the cookies at 350 degrees for 8 minutes or until the edges start to brown.
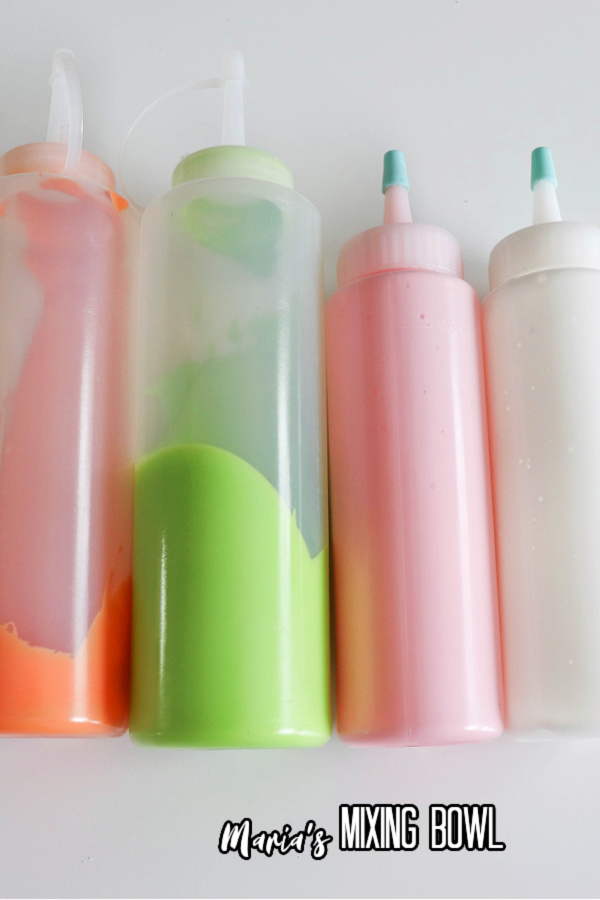
Step 3: Make the Icing
Combine the sugar and meringue powder in a stand mixer. Then, add 8 tablespoons of water and beat on low for one minute using the whisk attachment. Continue to add water 1 tablespoon at a time until the icing slowly drizzles from the whisk when lifted.
Finally, separate the icing into small mixing bowls and add your desired food coloring and mix well. Then, transfer the icing into piping bags or icing bottles.
Step 4: Decorate the Cookies
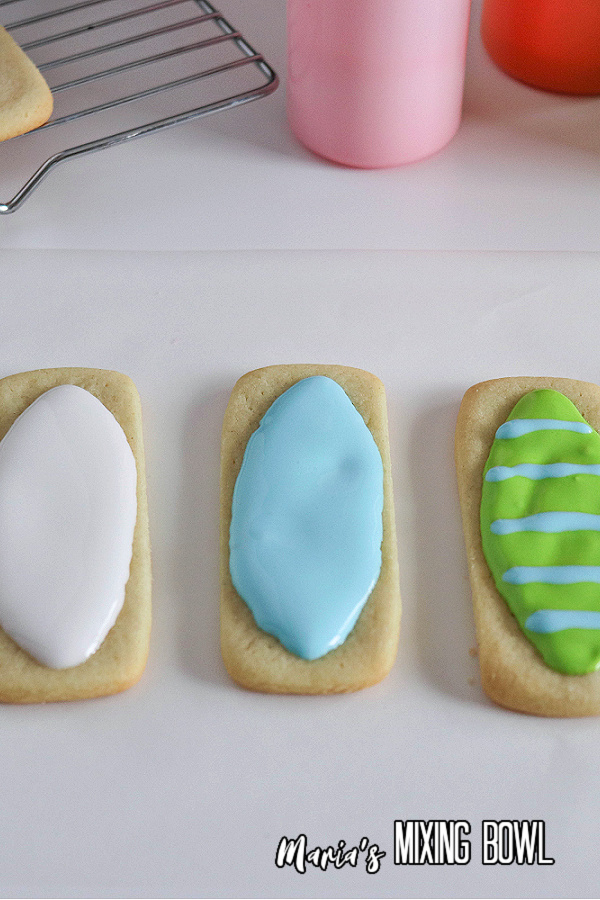
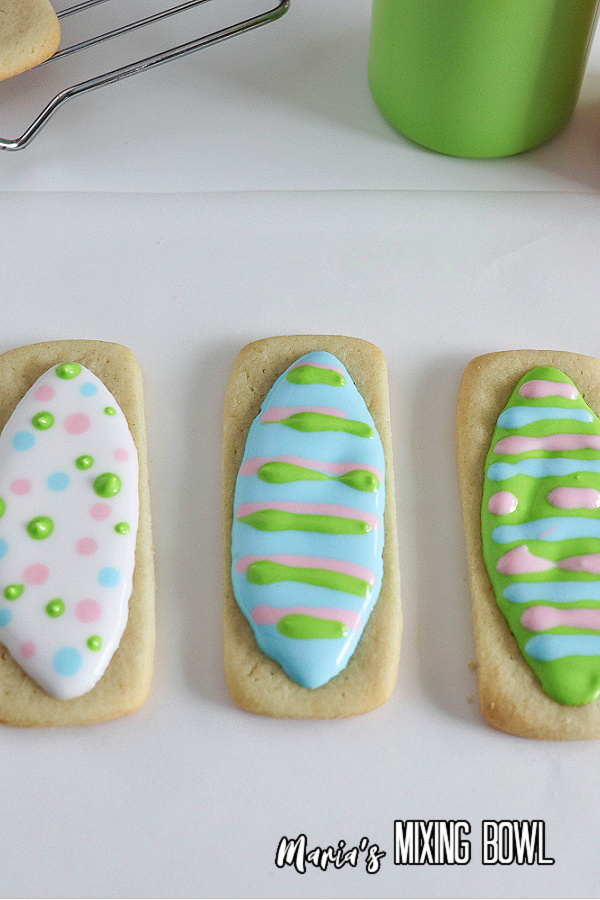
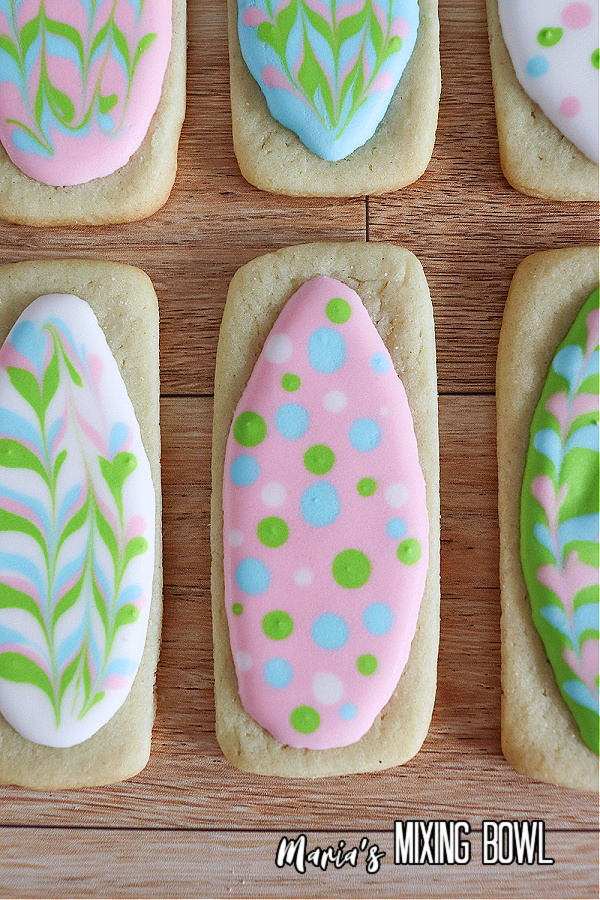
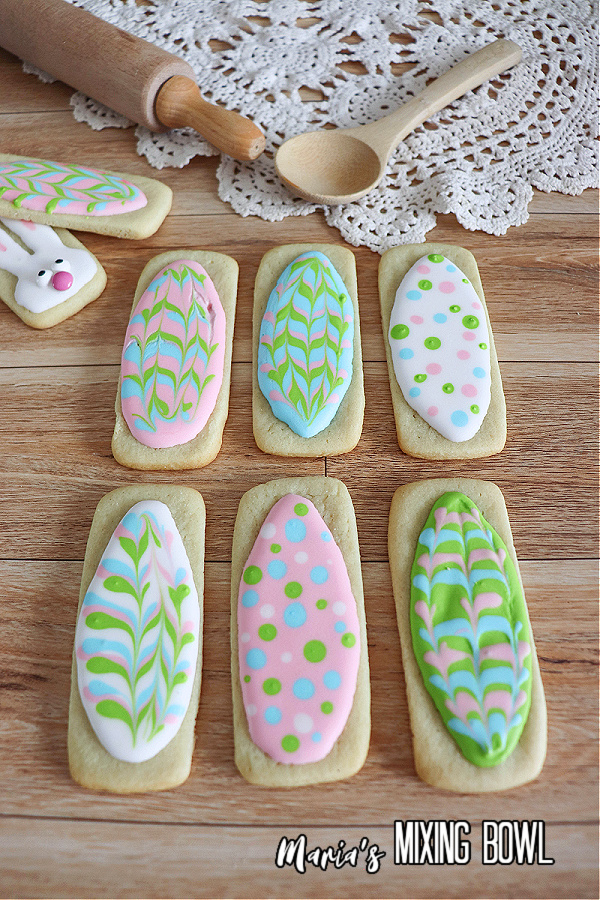
Make an outline around the edge of your desired design – I used an egg shape – and then fill the middle. After that, make your designs as follows.
Polka Dots: While the flooded icing area is still wet, add dots of different colored icing.
Hearts: While the flooded icing area is still wet, add dots of different colored icing, then drag a toothpick through each dot to create a heart.
Zig-Zag Design: While the flooded icing area is still wet, add stripes of different colored icing, then drag a toothpick through the stripes.
Sprinkles: Add sprinkles to the icing while it’s still wet.
Candy: Glue candy pieces to the cookies using a drop of icing.
Edible Marker Designs: Allow the icing to completely dry for at least 4 hours, then create the design of your choice.
Hint: For involved designs, icing bottles work better than piping bags.
Equipment
There’s really nothing to this recipe, so you’ll only need a handful of simple kitchen equipment to make it.
- Measuring cups and spoons
- Stand mixer
- Small bowls
- Piping bags or icing bottles
- Cookie sheet
PIN IT!!

Storage
You can store these cookies at room temperature in an air-tight container in single layers with wax paper between each layer for up to a week. For longer storage, freeze these cookies for up to 3 months in an air-tight, freezer-safe container or heavy-duty freezer bags.
Easter Sugar Cookies Tips
While this is a super easy recipe, we do have some tips to help you make them the best they can be. These tips specifically address the royal icing, so be sure to give them a ready.
Adjusting the Icing: If the icing is too firm after mixing, add a bit more water. If it’s too thin, add more sugar.
Icing Bottles: You can use piping bags or icing bottles, but we prefer icing bottles. They make fine work easier.
Plenty of Drying Time: Give your royal icing at least 4 hours of drying time to ensure it’s completely set and ready for eating.
More Easter Recipes
‘Tis the season for Easter treats, and we have some more Easter recipes that we think you’ll love.
Carrot Cake White Hot Chocolate Bombs
Easter Sugar Cookies FAQ
If you have questions about these Easter sugar cookies, then we have answers. The following FAQ answers the most commonly asked questions about sugar cookies.
Where do sugar cookies come from?
Modern-day sugar cookies descend from crumbly, buttery cookies originally made in the mid-1700s by German protestant settlers in Nazareth, Pannsylvania.
Why do they call it royal icing?
The earliest reference to this icing goes back as far as the 1600s. It became known as royal icing when it was used to coat and decorate Queen Victoria’s wedding cake in 1840.
Why do you outline first when using royal icing?
This icing is very thin. The outline creates a border to hold the icing in place in the desired shape. Without an outline, the icing will just slide all over your cookies.
Can I use a homemade sugar cookie recipe for these cookies?
You sure can. We just like to make it easier on ourselves sometimes.
Why is royal icing so popular for cookies?
It dries hard, making it perfect for decorating cookies. The cookies are stackable, and the icing stands up to transportation.
How long will these cookies last?
They’ll keep for up to a week at room temperature in an air-tight container or up to 3 months in the freezer in an air-tight, freezer-safe container or heavy-duty freezer bag.
Try These Easy Easter Sugar Cookies
These delicious sugar cookies are as tasty as they are adorable. What’s even better is how easy they are to make! Using refrigerated sugar cookie dough and an easy royal icing, these cookies come together quickly, so they’re perfect for a last-minute Easter treat. Give these Easter sugar cookies a try, and we know you’ll love them.
MORE RECIPES YOU WILL LOVE:
Oreo Chip Cookies
Copycat DoubleTree Chocolate Chip Cookies
Air Fryer Peanut Butter Cookies
Bourbon Buttercream Sugar Cookies
Triple Chocolate Cookies
Easter Sugar Cookies
Ingredients
For the Cookies:
- 2 packages Pillsbury refrigerated sugar cookie dough
- 1/2 cup all purpose flour
For the Royal Icing:
- 4 cups powdered sugar
- 3 tablespoons meringue powder
- 8-12 tablespoons room temperature water
- Gel food coloring
Instructions
For the Cookies:
- Combine dough and flour. Roll to ¼” thickness. Cut out ½” x 3” rectangles. Bake at 350 for 8 minutes or until the edges start to brown.
For the Royal Icing:
- In a stand mixer combine sugar and meringue powder. Add 8 tablespoons of water, using the whisk attachment, beat for 1 minute on low. Continue to add water one tablespoon at a time until the icing slowly drizzles from the whisk when lifted.
- Once prepared – if the icing is too hard, add more water. Too runny, add more icing sugar.
- Separate the icing into small mixing bowls and add desired food coloring. Mix well. Scoop the icing into piping bags or icing bottles.
Decorating instructions:
- Line around the edge of the design with icing and fill the middle. Use a toothpick to poke bubbles or direct icing into holes. Allow each design area to dry before moving on. The icing should completely dry, at room temperature for at least four hours, before adding piping details to the top.
- Polka Dots: before the flooded area dries, add dots of different colored icing.Hearts: before the flooded area dries, add dots of different colored icing, drag a toothpick through each dot, creating a heart.Zig zag design: before the flooded area dries, add stripes of different colored icing and then drag a toothpick through the stripes.Sprinkles: before the flooded area dries, add sprinkles.Candy: glue to the cookie with a drop of icing.Edible marker: before using on the icing, allow the icing to completely harden for at least four hours.
Disclaimer
Any nutritional data I provide is an approximation and actual dietary information can vary based on ingredients and proportion sizes.


