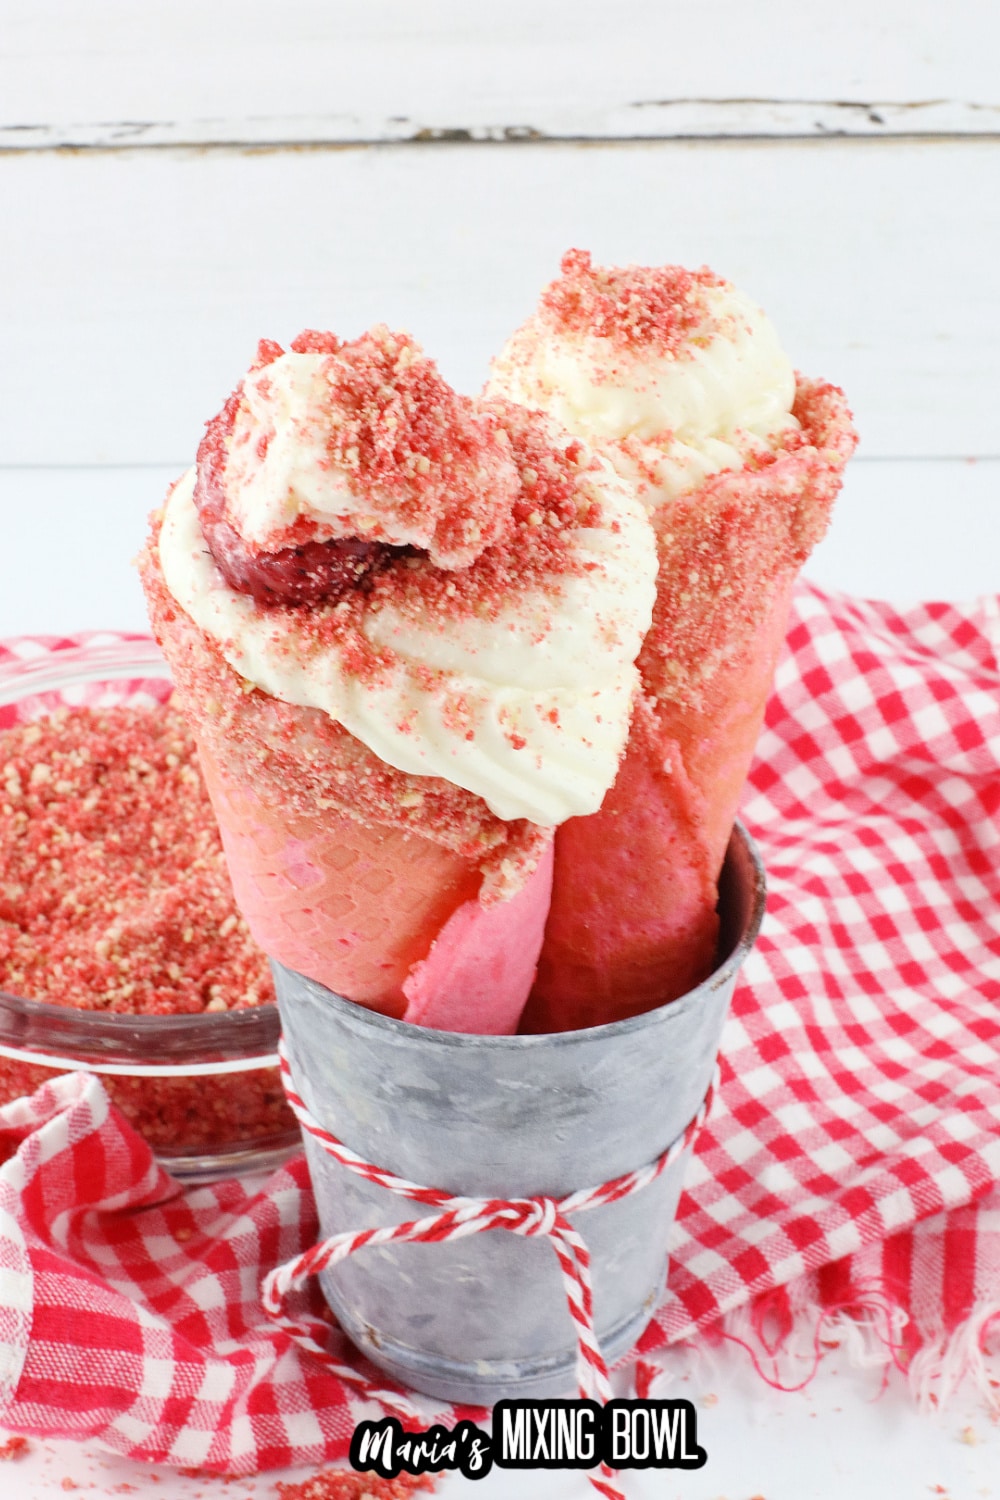
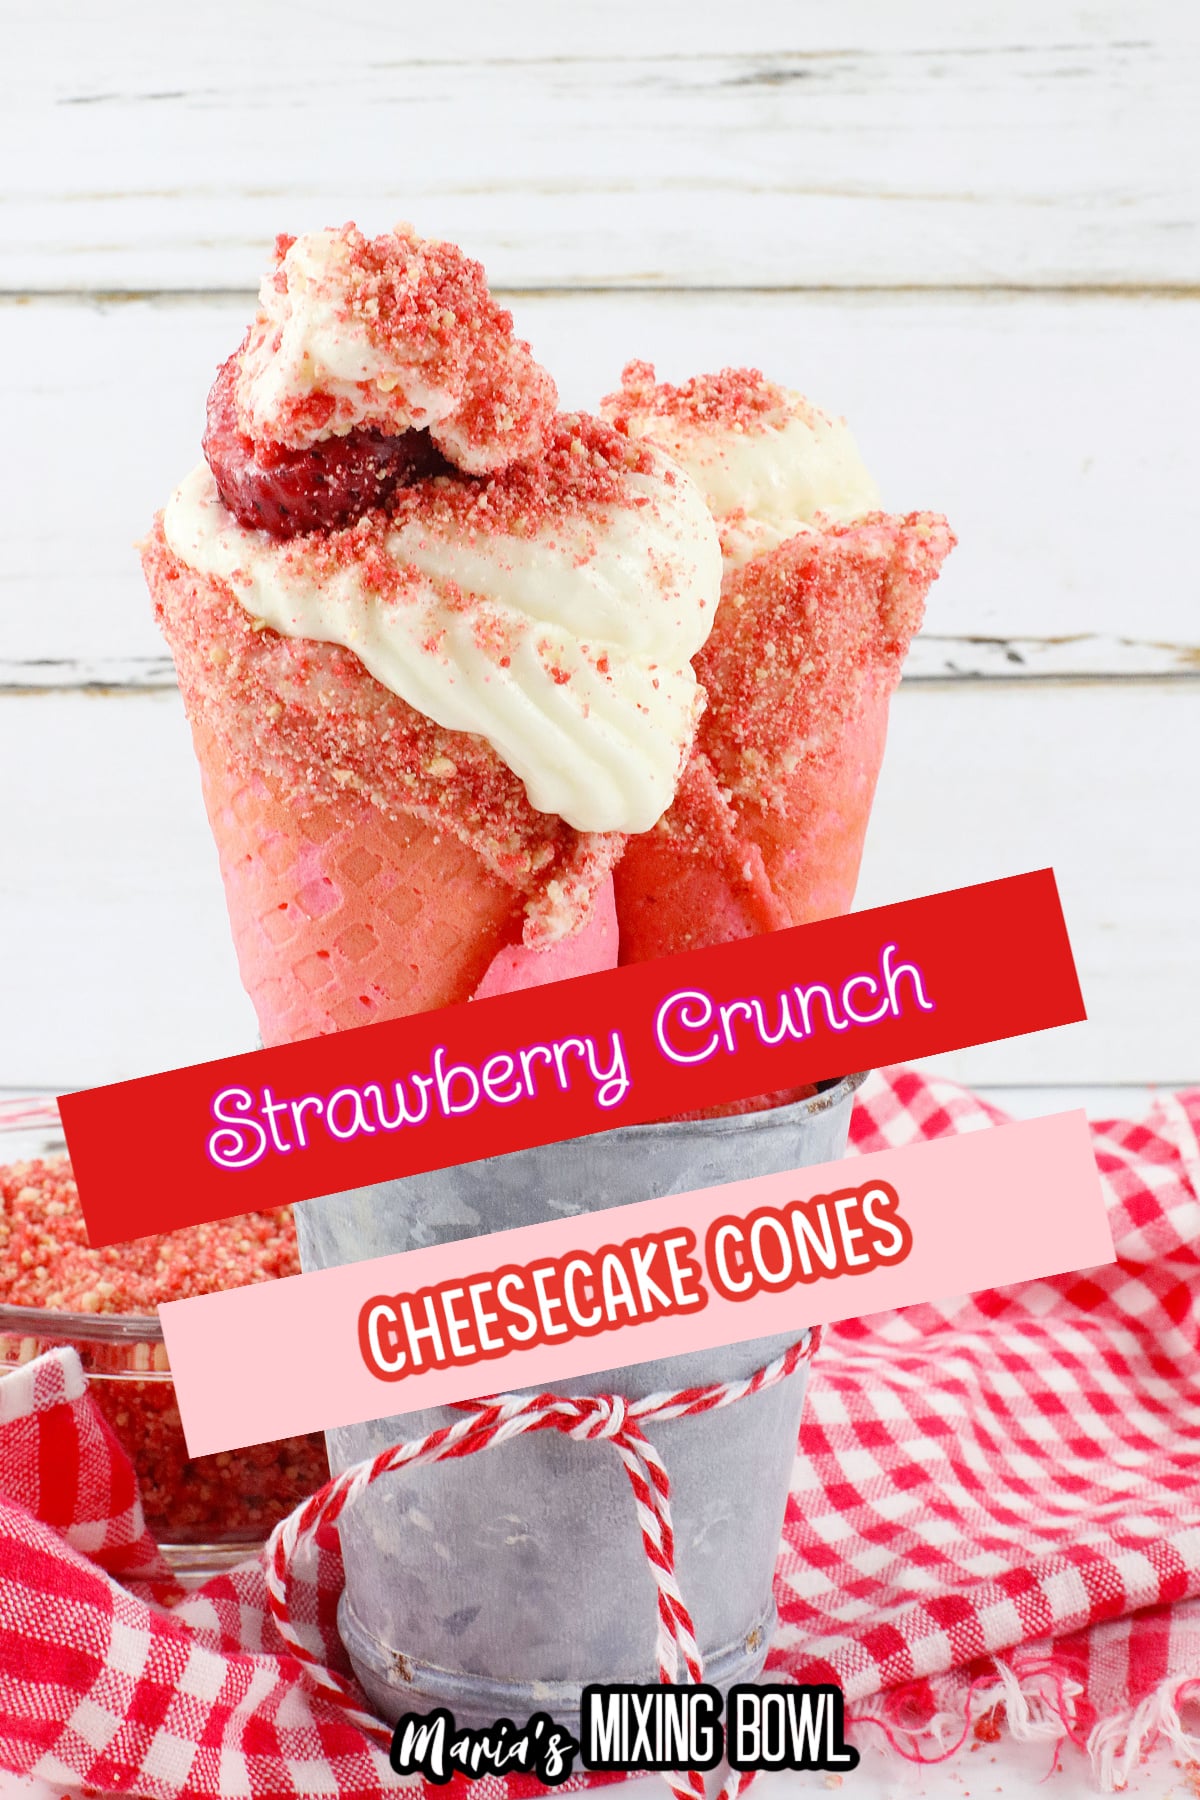
Strawberry Crunch Cheesecake Cones

These Strawberry Crunch Cheesecake Cones are filled with a creamy, tart strawberry cheesecake filling and topped with a homemade strawberry crunch topping for a delicious treat that’s perfect for summer.
They make excellent party snacks, too! Enjoy these delicious cones at your next get-together with friends and family. While they do take a little effort to make, I promise you the results are worth all the effort that you put in.
Plus, you can’t go wrong with a dessert that combines two of our favorite flavors – strawberries, and cheesecake! The strawberry crunch topping adds an extra layer of deliciousness and texture to this already delectable treat.
Table of contents

❤️ Why You’ll Love This Recipe
- These Strawberry Crunch Cheesecake Cones are a delicious and easy treat for any occasion.
- They look impressive, yet they’re simple to make.
- Plus, the combination of creamy cheesecake and crunchy strawberry topping is simply irresistible!
🛒Ingredients
These ingredients are so easy to find and prepare! So, make a trip to your local grocery store to grab the supplies that you need and get ready to enjoy the most delicious treat ever!
Cheesecake layer
- Cream Cheese
- Heavy Cream
- Sugar
- Powdered Sugar
- Vanilla
- Pinch of Salt
Waffle Cones
- Flour
- Salt
- Eggs
- Sugar
- Butter
- Milk
- Neon Hot Pink Food Coloring Gel
Strawberry Crunch
- Golden Oreo’s
- Strawberry Jello
- White Chocolate – for dipping
See the recipe card at the bottom of the post for the full list of ingredients and amounts.
🔪 How to Make Strawberry Crunch Cheesecake Cones
Making these strawberry crunch cones takes a little bit of effort but I promise you they are well worth the effort that you put into them. So, follow the directions below and you will have a delicious summer-inspired dessert in no time at all.
Step 1: Preheat the waffle cone maker
Plug in the Waffle Cone maker, and the light will come on when ready.
Step 2: Meanwhile make the batter
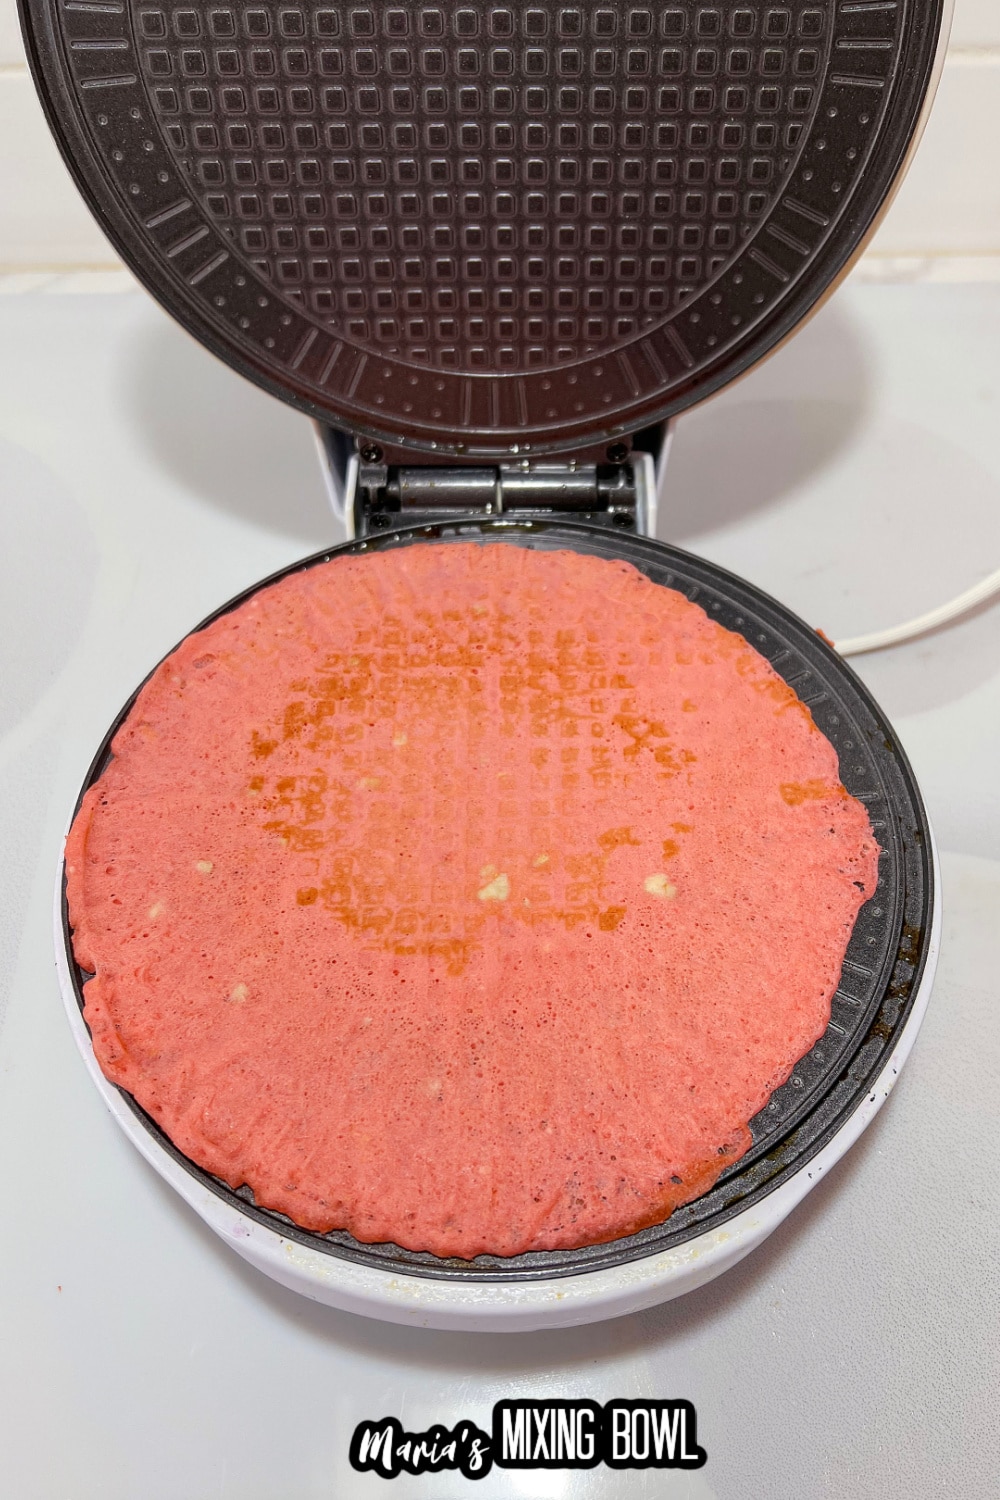
Mix together, Flour, and Salt in a small bowl, and set aside. Whisk together the Eggs, and Sugar for one minute. Add the Flour mixture, Butter and Milk, and stir well to combine. Add the Hot Pink Food Coloring Gel, and stir well to blend. (If the Batter isn’t a bright pink, add a few more drops at a time, and stir, until you get the desired shade of Hot Pink).
Step 3: Make the waffle cones
Scoop 1/4 cup of the batter and pour it into the center of the Waffle Cone maker. Close the Waffle maker, and set a timer for 2 minutes. Use a Silicone Spatula to remove Waffle Cone, and IMMEDIATELY shape the warm Waffle Cone in a Waffle Cone Stand. You simply overlap the edges of the round cone, shape it into a Waffle Cone shape, and place it in the stand to cool, and harden.
Step 4: Make the strawberry crunch
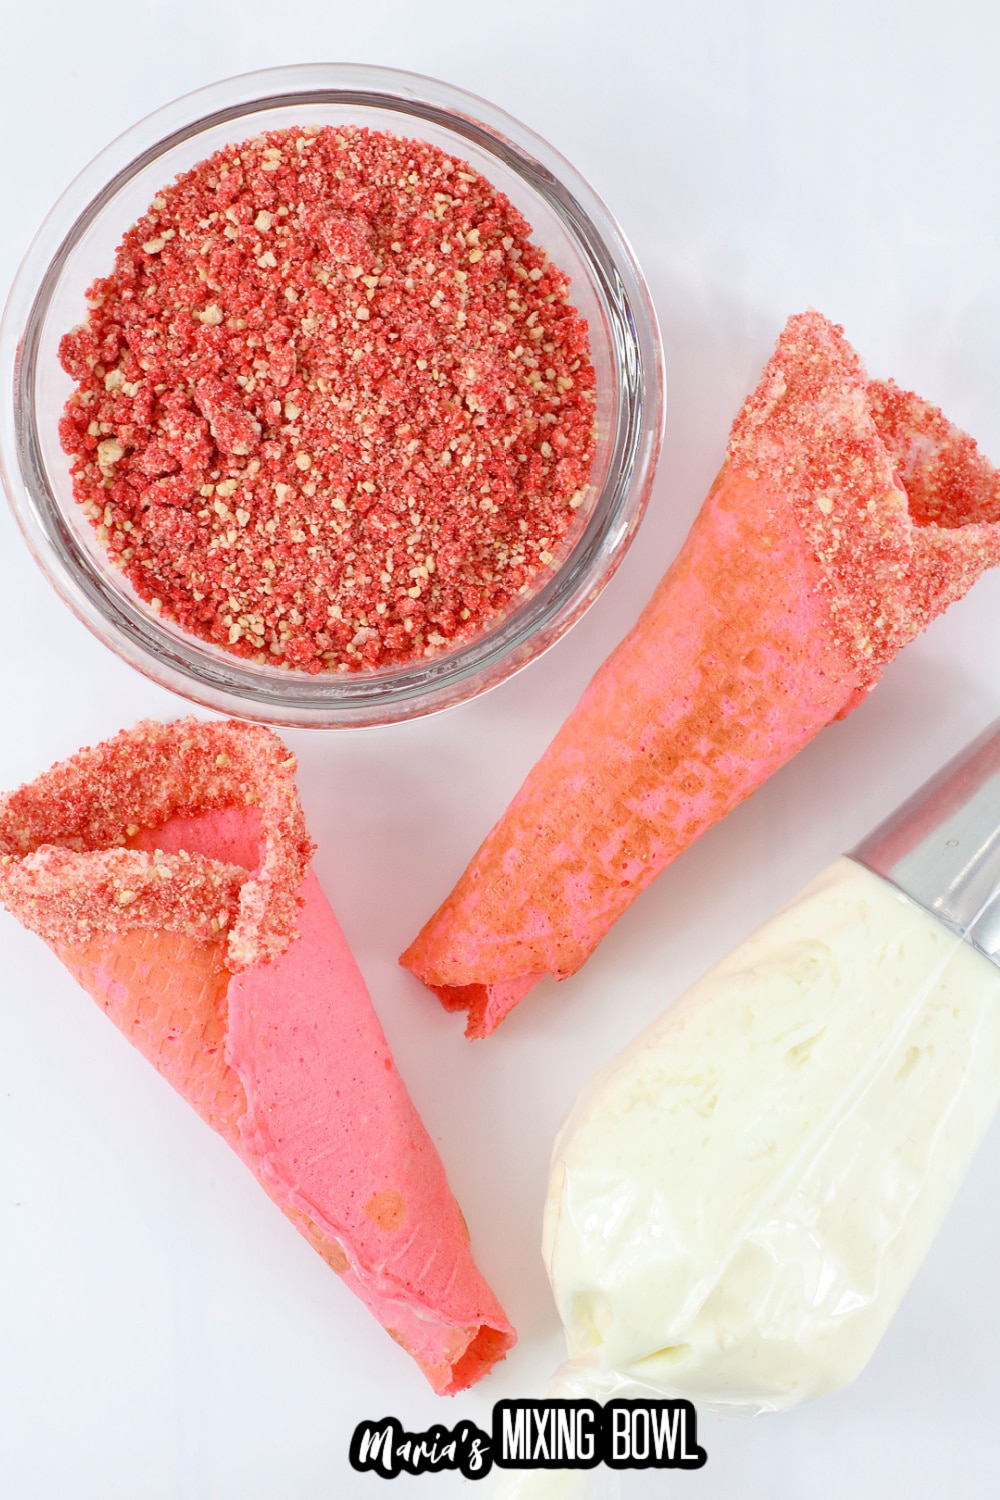
In a Food Processor, or Blender, place the Oreo Cookies, and the Strawberry Jello, and pulse the Cookies into crumbs, mixing with the Jello, to make the Strawberry Crunch. Place the Strawberry Crunch in a bowl and set it aside.
Step 5: Make the chocolate and dip the cones
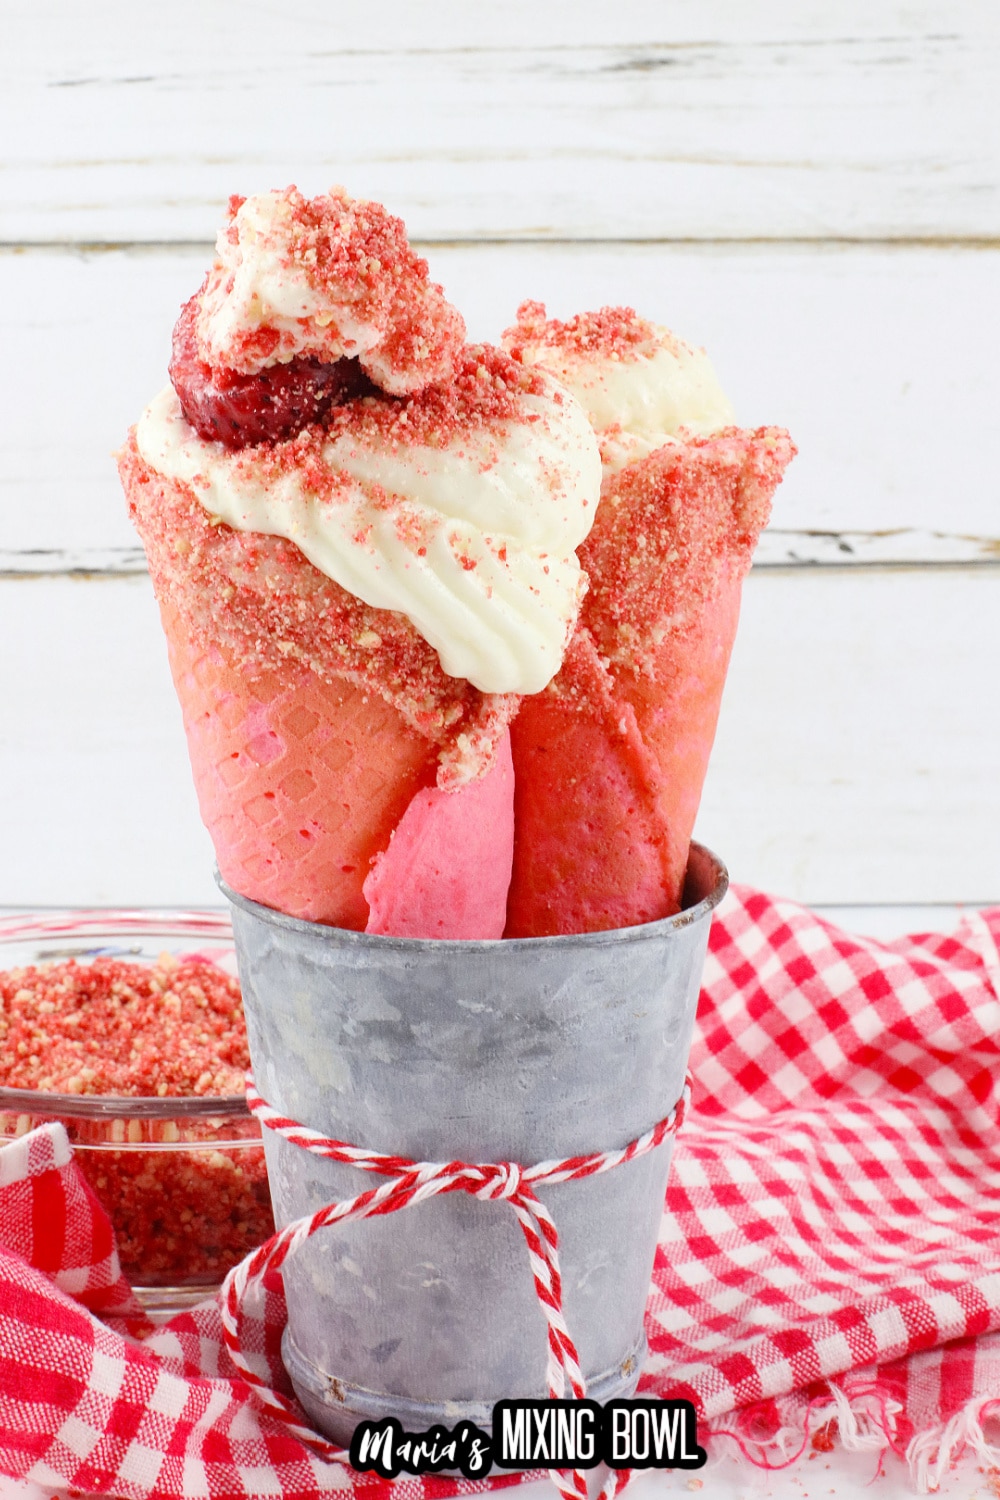
When the Cones are cool, melt the White chocolate in the Microwave, in a small shallow dish. Dip the tops of the Cones in the melted White Chocolate, then dip in the Strawberry Crunch, and lay on Parchment paper to set/dry. When Crunch is set around the Cones, fill with the filling.
Step 6: Make the cheesecake filling
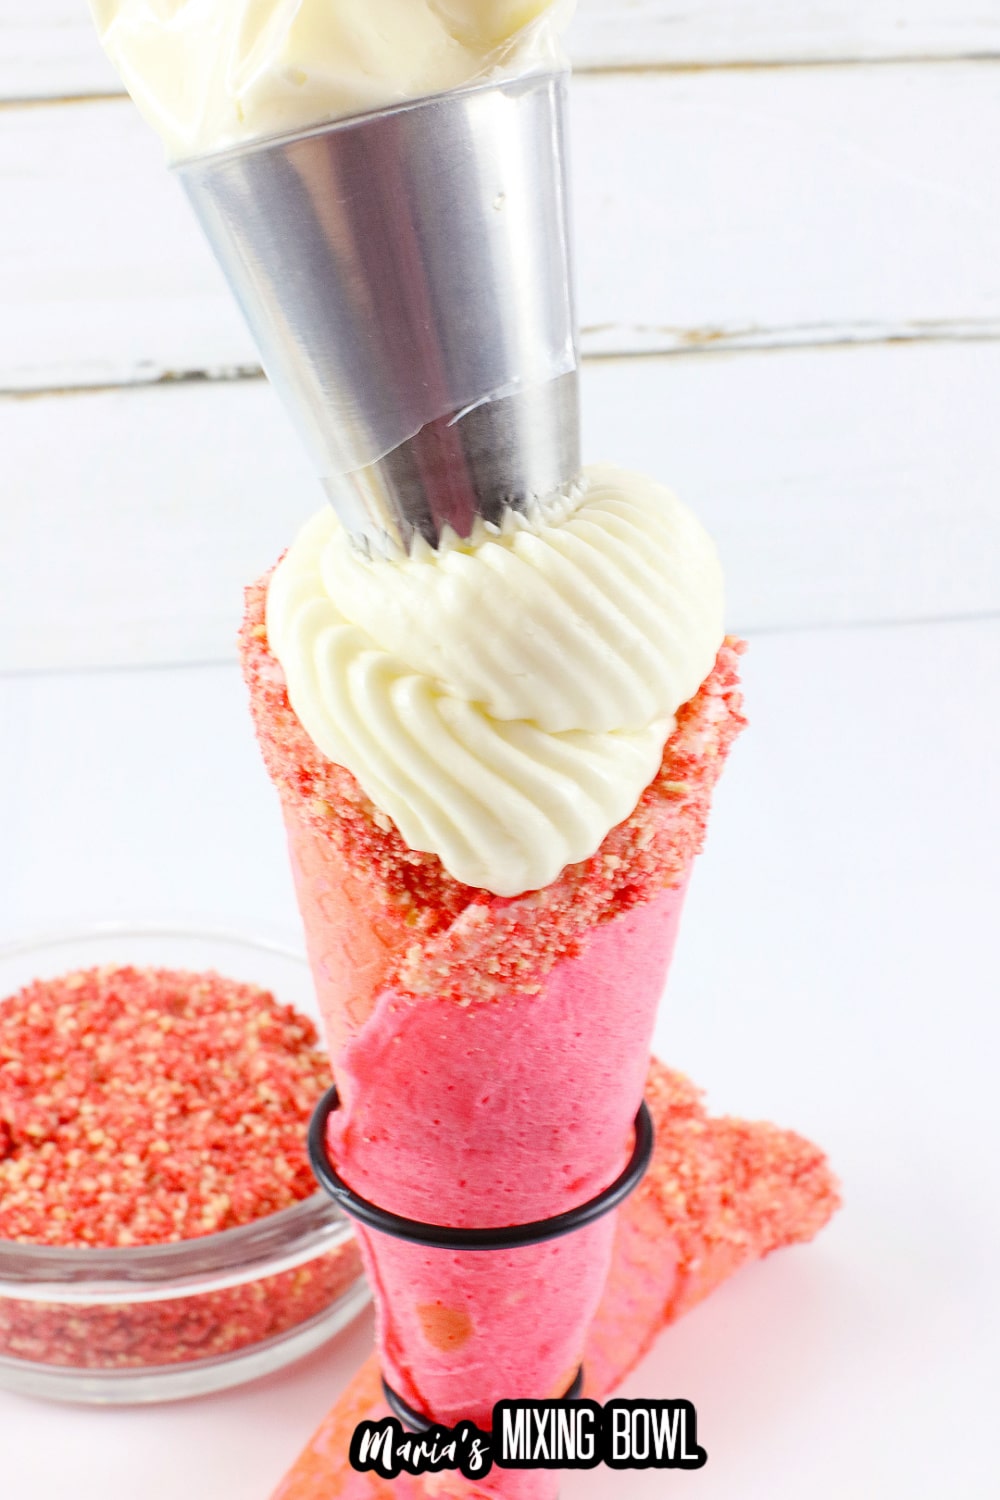
In the Mixing Bowl of a Stand Mixer, add the Heavy Cream, 1/2 cup of Sugar, and Vanilla, and mix with the Whisk attachment until the Cream is thick, and stiff peaks have formed, about 2 to 3 minutes on high speed. When the Cream is whipped, add the Cream Cheese, Powdered Sugar, and pinch of Salt, and mix until blended, and thick.
Step 7: Fill the cones
Place the Tip in a Pastry Bag, and fill the bag with the Filling. When all the Waffle Cones have been made, cooled, and hardened, pipe the filling into the Waffle Cones, filling the cone. Place a Strawberry in the center of the filling, and sprinkle the top with the Strawberry crunch. Serve, and Enjoy!
📝Variations
Do you want to change up this recipe and make it your own? Here are some ways that you can do that!
- Use different flavored jellos like raspberry or blackberry for the topping.
- Substitute Oreo cookies with graham cracker crumbs for a less sweet version.
- Add sprinkles on top of the cones for an extra burst of color and sweetness.
- Swap out regular white chocolate with dark or milk chocolate for a richer flavor.
If you love strawberry crunch desserts then next time you may want to give this Strawberry Crunch Poke Cake a try. It’s another easy dessert that is perfect for summer.
🥄 Equipment
For this recipe, you will need a few pieces of kitchen equipment. I purchased my waffle cone maker and stand online, however, you can pick up one at your local big box store if they have them.
The following are affiliate links. We are a participant in the Amazon Services LLC Associates Program, an affiliate advertising program designed to provide a means for us to earn fees by linking to Amazon.com and affiliated sites.
- Mixer
- Waffle Cone Maker
- Waffle Cone Stand
- Pastry Bag
- Pastry Tip
- Silicone Spatula
- Food Processor – or Blender
- Parchment Paper
🥫 Storage
These cones are best enjoyed right away however you can store them in an airtight container for up to 4 days. You will need to store the cones and the filling separately. The filling will need to be stored in the fridge. The cones are best stored at room temperature.
💭 Tips
Here are a few tips that you can use to ensure that this recipe turns out perfectly for you every time that you make it.
- Make sure that your waffle cone maker is preheated before pouring in the batter.
- If you don’t have a food processor or blender to make the strawberry crunch you can use a freezer bag and a rolling pin instead to crush up the Golden Oreos.
- Make sure that you add the crunch topping to the chocolate while it is still wet, otherwise, it will not stick.
⁉️ FAQ
Do you have questions about this recipe? Here are the answers to the most commonly asked questions.
You can make the cones, and the cheesecake filling in advance but I recommend that you do not assemble them until you are ready to serve them to prevent them from becoming soggy.
Yes, you can absolutely use dark or milk chocolate instead of white.
Absolutely! Just switch out the Strawberry Jello for your favorite flavor and you will have a unique dessert in no time at all.
📌 PIN IT!!
🍽 More Strawberry Recipes
Do you enjoy strawberry desserts, try these delicious recipes:
🧾Recipe Card
Want to make this recipe? Print the recipe card below, or pin this recipe, so you can find it later.
Strawberry Crunch Cheesecake Cones
Equipment
- Mixer
- Waffle Cone Maker
- Waffle Cone Stand
- Pastry bag
- Pastry Tip
- Silicone Spatula
- Food Processor or Blender
- parchment paper
Ingredients
Filling
- 8 ounces Cream Chee softend
- 2 cups Heavy Cream whipped
- ½ cup Sugar
- 1 ½ cups Powdered Sugar
- 1 teaspoon Vanilla
- Pinch Salt
Waffle Cones
- ⅔ cups Flour
- ¼ teaspoon Salt
- 2 Eggs
- ½ cup Sugar
- 4 Tablespoon Butter melted
- ¼ cup Milk
- 1 teaspoon Neon Hot Pink Food Coloring Gel more if needed
Strawberry Crunch Topping
- 15 Golden Oreo's crushed
- 3 ounces Strawberry gelatin mix
To Dip
- ½ cup White Chocolate
Instructions
For the waffle cones
- Plug in the Waffle Cone maker, and light will come on when ready.
- Mix together, Flour, and Salt in a small bowl, and set aside.
- Whisk together the Eggs, and Sugar for one minute.
- Add the Flour mixture, Butter and Milk, and stir well to combine.
- Add the Hot Pink Food Coloring Gel, and stir well to blend. (If the Batter isn’t a bright pink, add a few more drops at a time, and stir, until you get the desired shade of Hot Pink).
- Scoop 1/4 cup of the batter and pour it on the center of the Waffle Cone maker.
- Close the Waffle maker, and set a timer for 2 minutes.
- Use a Silicone Spatula to remove Waffle Cone, and IMMEDIATELY shape the warm Waffle Cone in a Waffle Cone Stand. You simply overlap the edges of the round cone, and shape it into a Waffle Cone shape, and place it in the stand to cool, and harden.
For the strawberry crunch
- In a Food Processor, or Blender, place the Oreo Cookies, and the Strawberry Jello, and pulse the Cookies into crumbs, mixing with the Jello, to make the Strawberry Crunch.
- Place the Strawberry Crunch in a bowl.
- When Cones are cool, melt the White chocolate in the Microwave, in a small shallow dish.
- Dip the tops of the Cones in the melted White Chocolate, and then dip in the Strawberry Crunch, and lay on Parchment paper to set/dry.
- When Crunch is set around the Cones, fill with the filling.
For the filling
- In the Mixing Bowl of a Stand Mixer, add the Heavy Cream, 1/2 cup of Sugar, and Vanilla, and mix with the Whisk attachment until the Cream is thick, and stiff peaks have formed, about 2 to 3 minutes on high speed.
- When the Cream is whipped, add the Cream Cheese, Powdered Sugar, and pinch of Salt, and mix until blended, and thick.
- Place the Tip in a Pastry Bag, and fill the bag with the Filling.
- When all the Waffle Cones have been made, cooled and hardened, pipe the filling into the Waffle Cones, filling the cone. Place a Strawberry in the center of the filling, and sprinkle the top with the Strawberry crunch.
- Serve, and Enjoy!
Notes
Disclaimer
Any nutritional data I provide is an approximation and actual dietary information can vary based on ingredients and proportion sizes.


