Bunny Butt Truffles

These Bunny Butt Truffles are a cute and delicious treat that is perfect for Easter parties or as a fun activity with the kids. Made with simple ingredients, these truffles are easy to make and can be customized with different flavors and decorations.
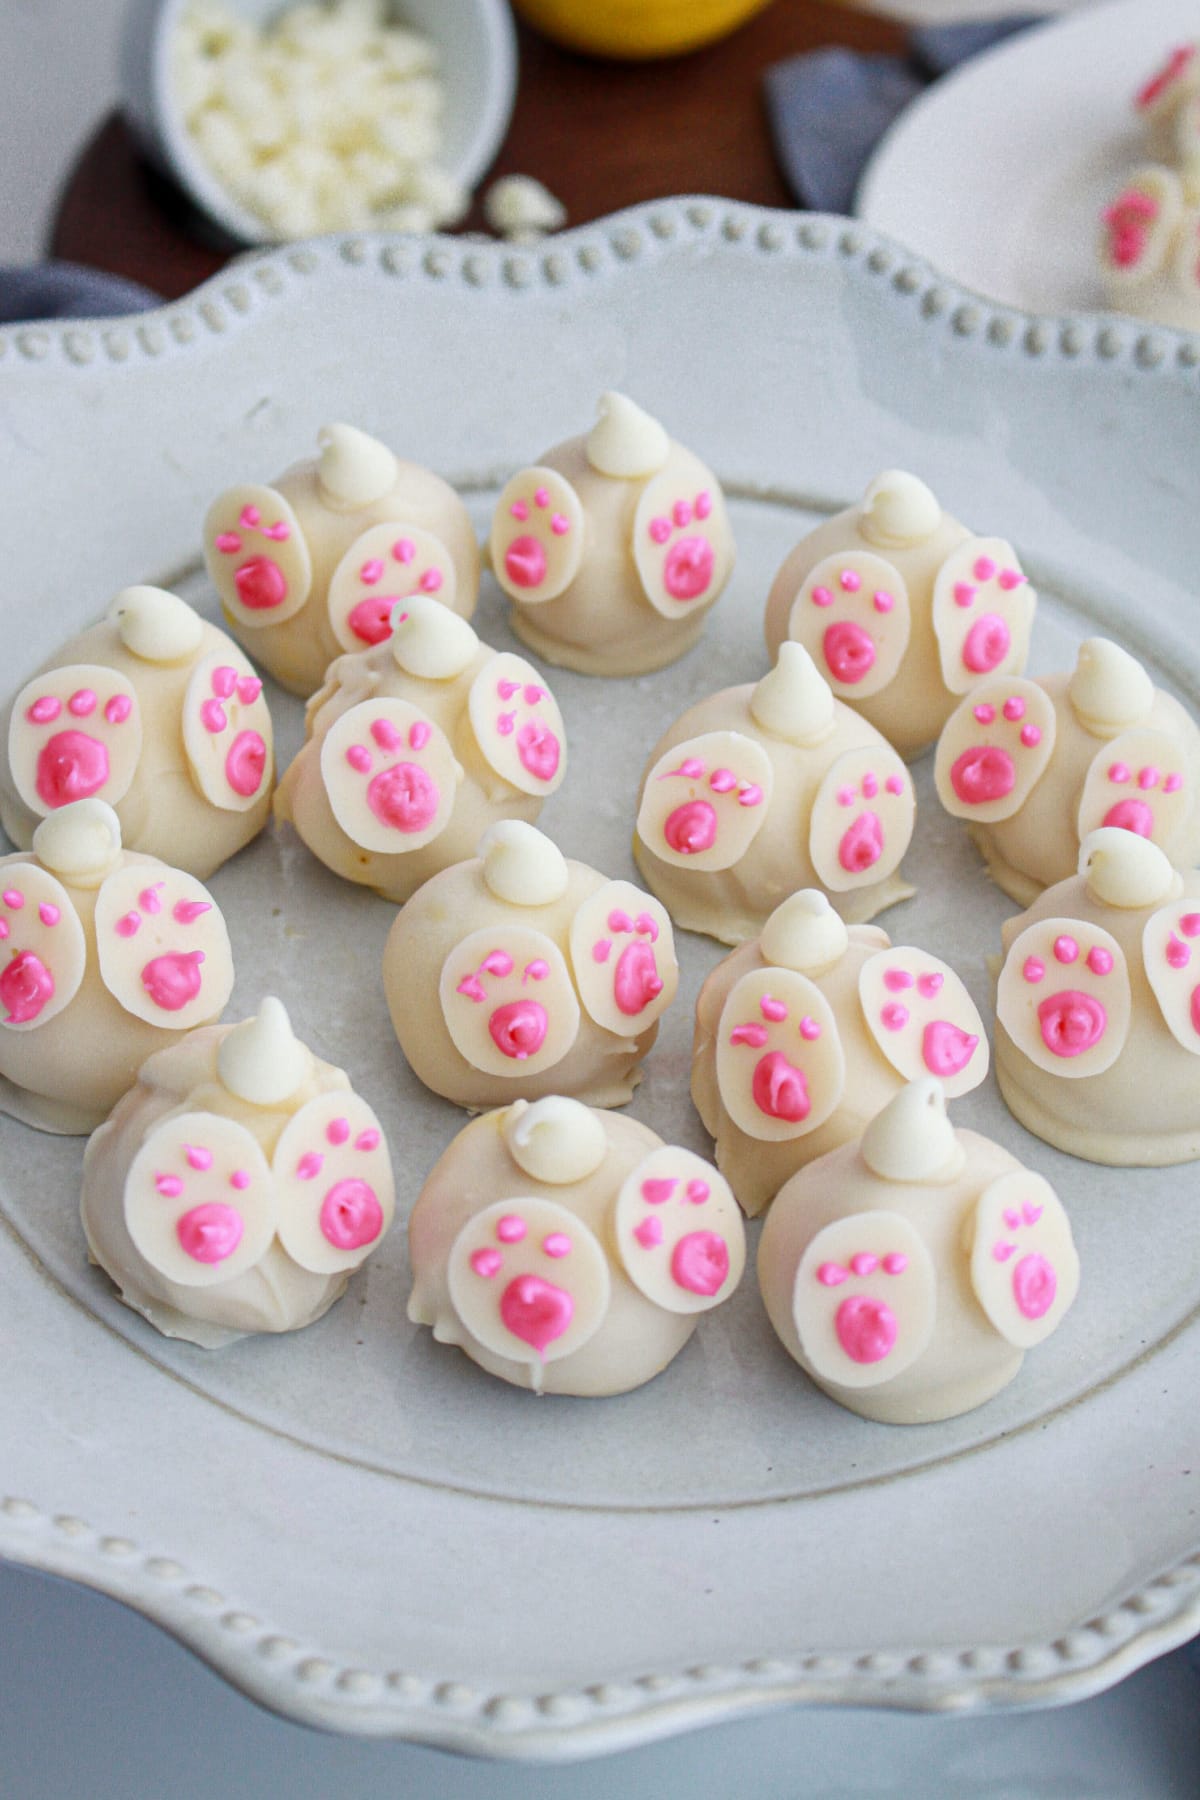
I don’t know about you, but we love everything bunny-related during Easter! These Easter Truffles are the perfect addition to any Easter celebration. Not only are they adorable, but they also taste delicious and are a fun activity to do with the kids.
Table of contents
❤️ Why You’ll Love This Recipe
- One of the best things about this recipe is that it doesn’t require an oven, making it a great option for cooks of all levels, including children who want to help out in the kitchen.
- Whether you prefer dark chocolate, milk chocolate, or even white chocolate, this recipe allows you to use your favorite. Plus, you can decorate them in various ways to make each bunny unique.
- Wrapped up in a cute box or a cellophane bag, these truffles make a heartfelt handmade gift for friends, family, and neighbors, spreading the joy of Easter.
🛒Ingredients
You only need a few simple ingredients to help you make these Easter truffles. So, next time you are in the grocery store pick up these ingredients so that you can share this delicious Easter dessert with your family and friends this year.
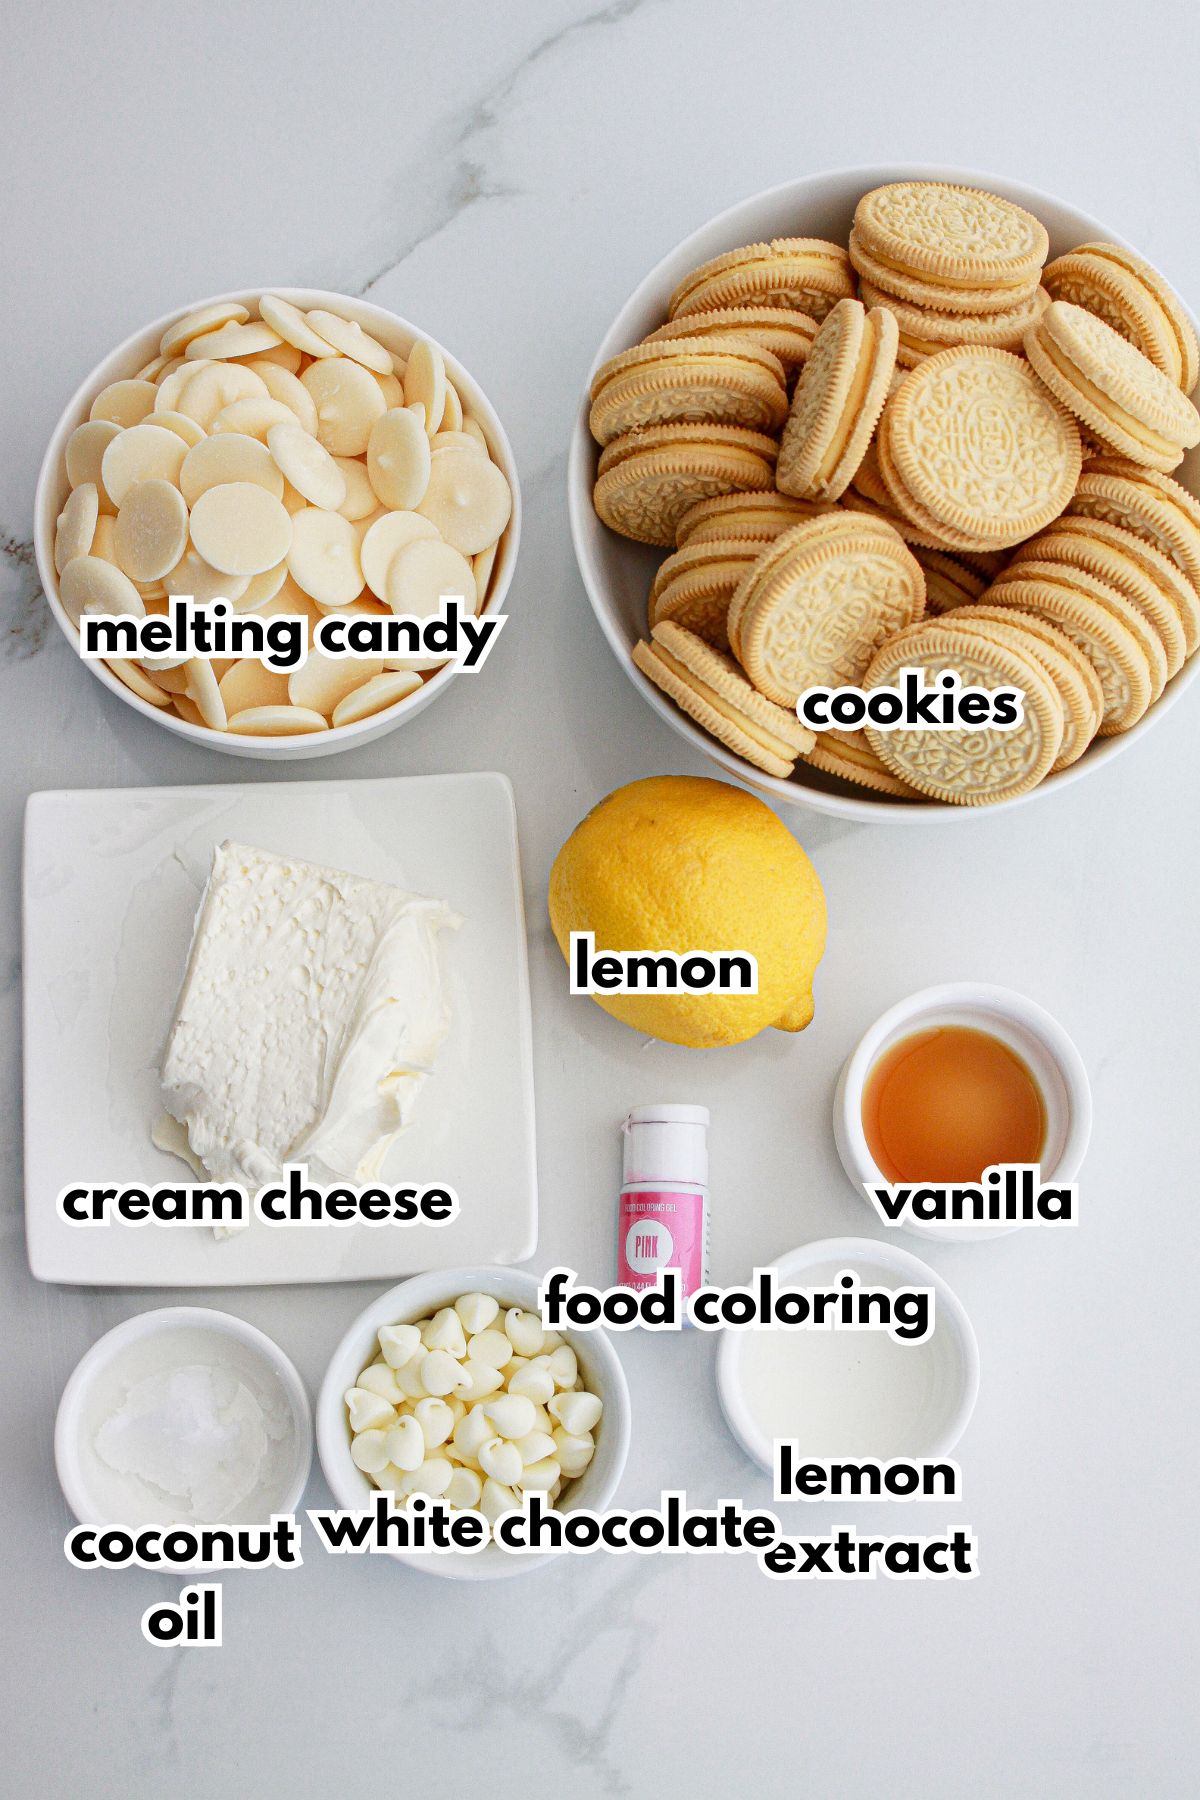
- lemon Oreos
- cream cheese
- lemon zest
- vanilla
- lemon extract
- white candy melts
- Pink food coloring
- coconut oil
- white chocolate chips
See the recipe card below for quantities.
🔪 How to Make Bunny Butt Truffles
Making these sweet Easter truffles so simple. Just follow these step-by-step directions or check out the recipe card at the bottom of this post and you will have a delicious recipe that your whole family will love in no time at all.
Step 1: Make the truffle mixture
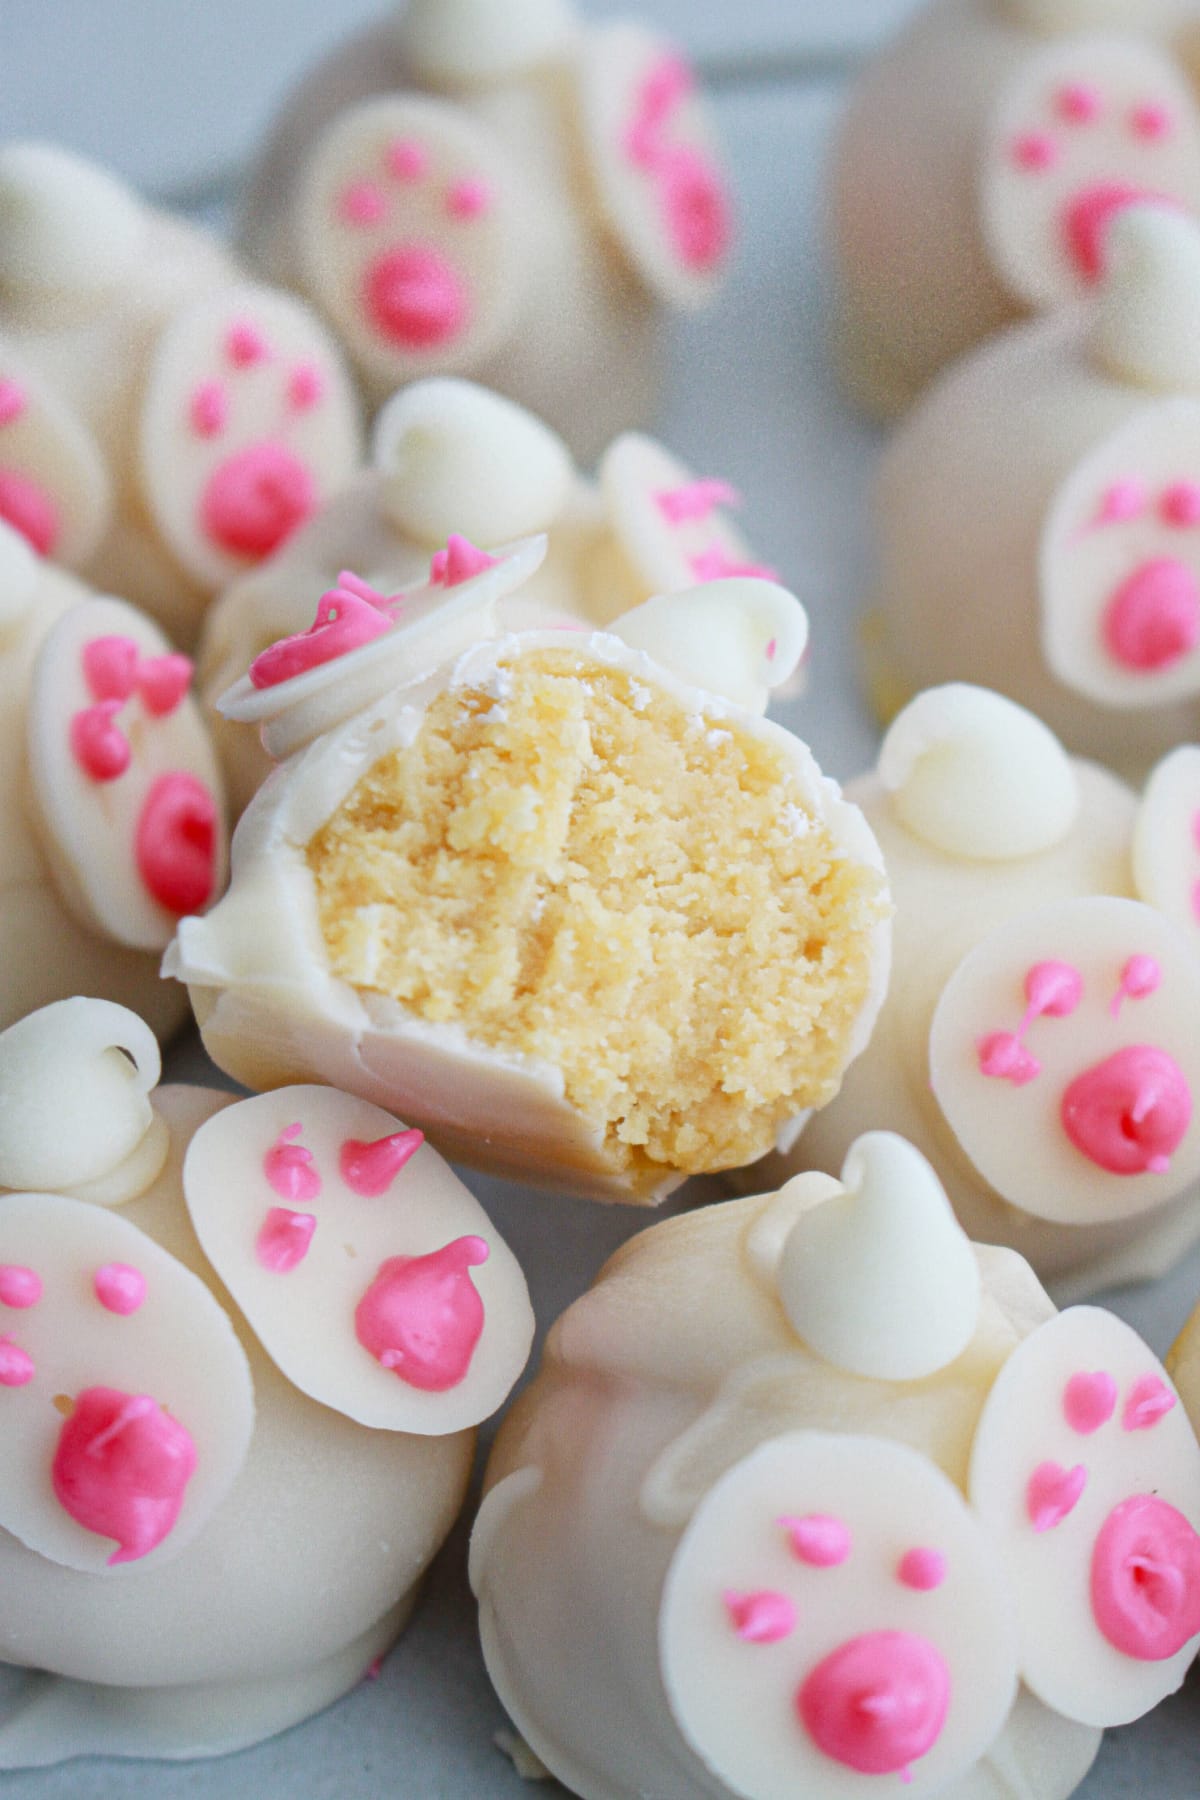
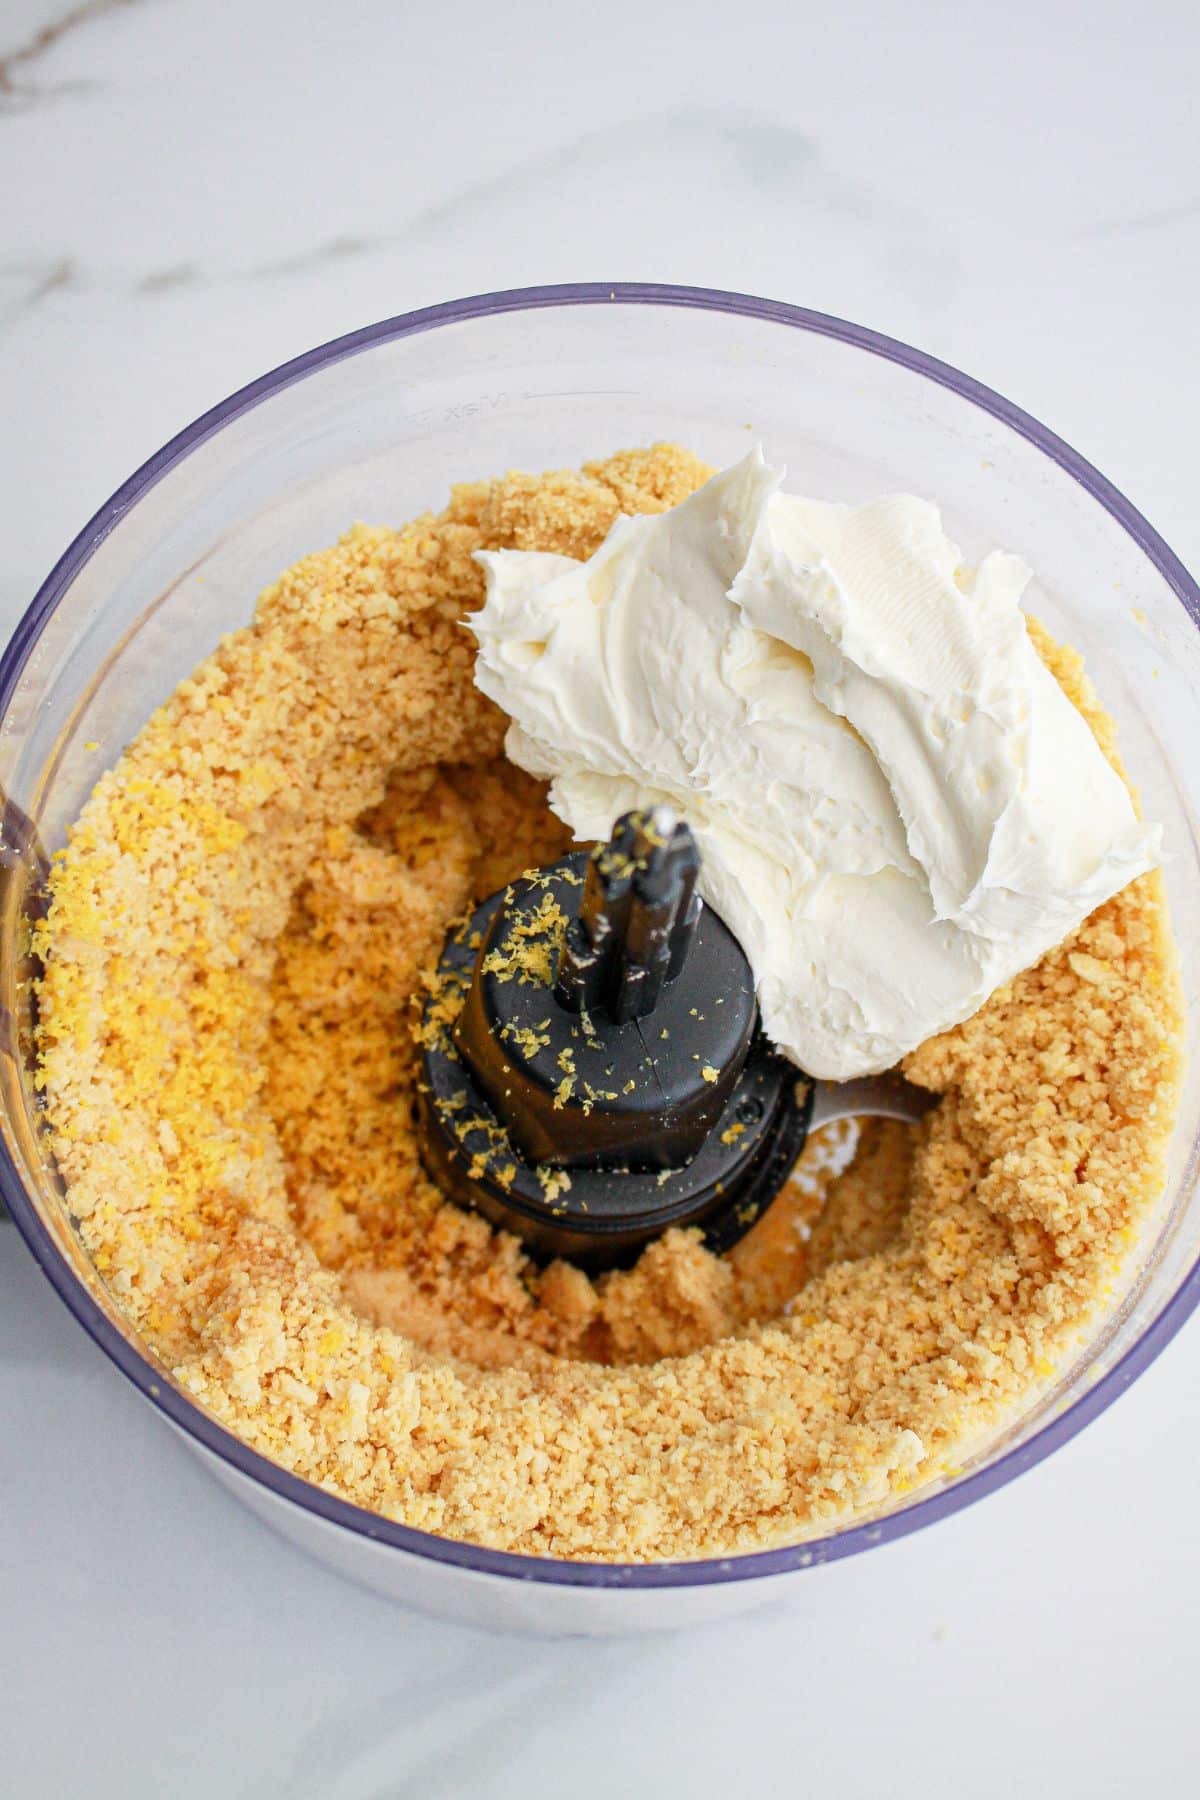
In a food processor, place all the oreos and grind them to a fine crumb. Add in the cream cheese, lemon zest, lemon extract, and vanilla. Pulse until it comes together and starts to form a ball.
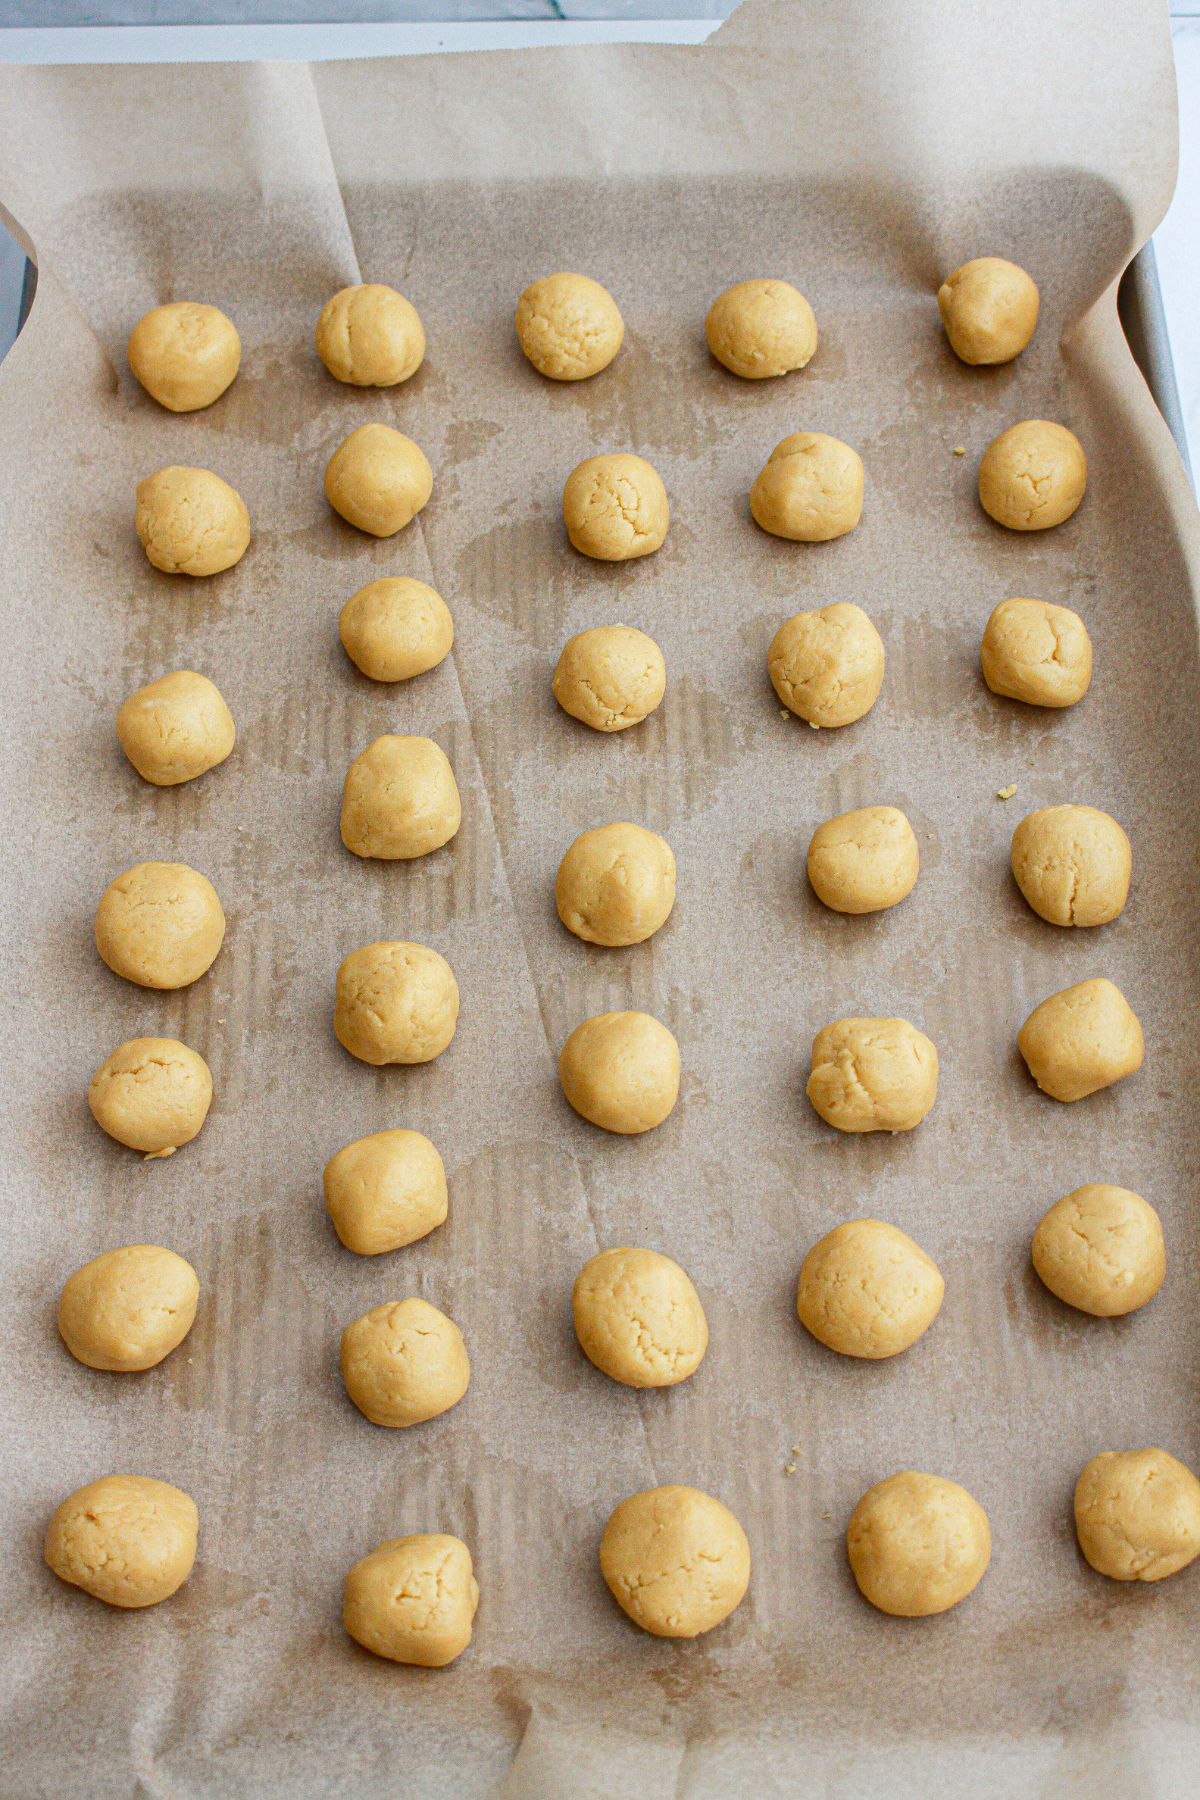
Step 2: Shape into balls
Scoop out small amounts and roll into a ball about the size of a teaspoon. Place on a baking tray lined with parchment paper. Place the balls in the freezer for about 30 minutes to harden.
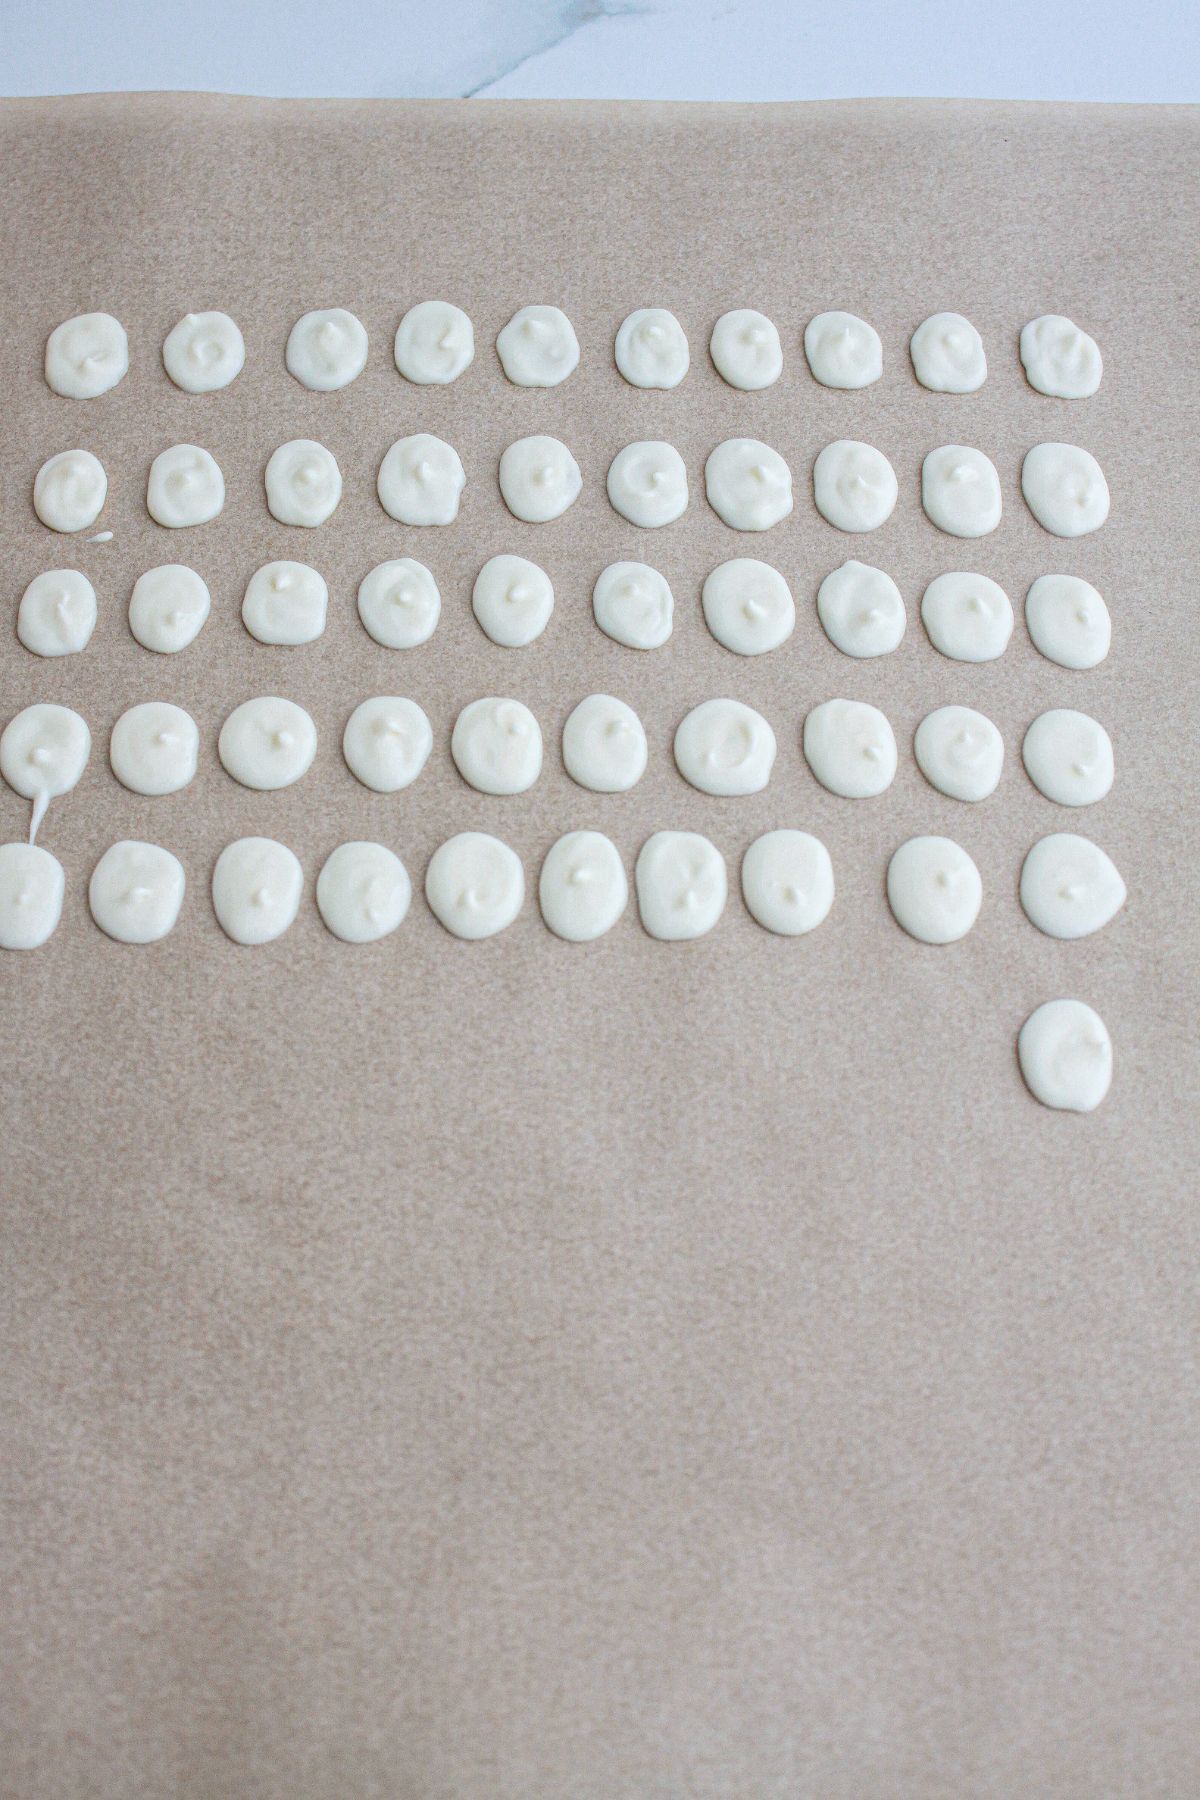
Step 3: Make the feet
In a measuring cup, melt about ¼ c of the candy melts pour into a piping bag and cut a very small hole at the end of the bag. On a parchment paper, pipe small ovals for the feet, about ½” long. Set aside and allow to harden.
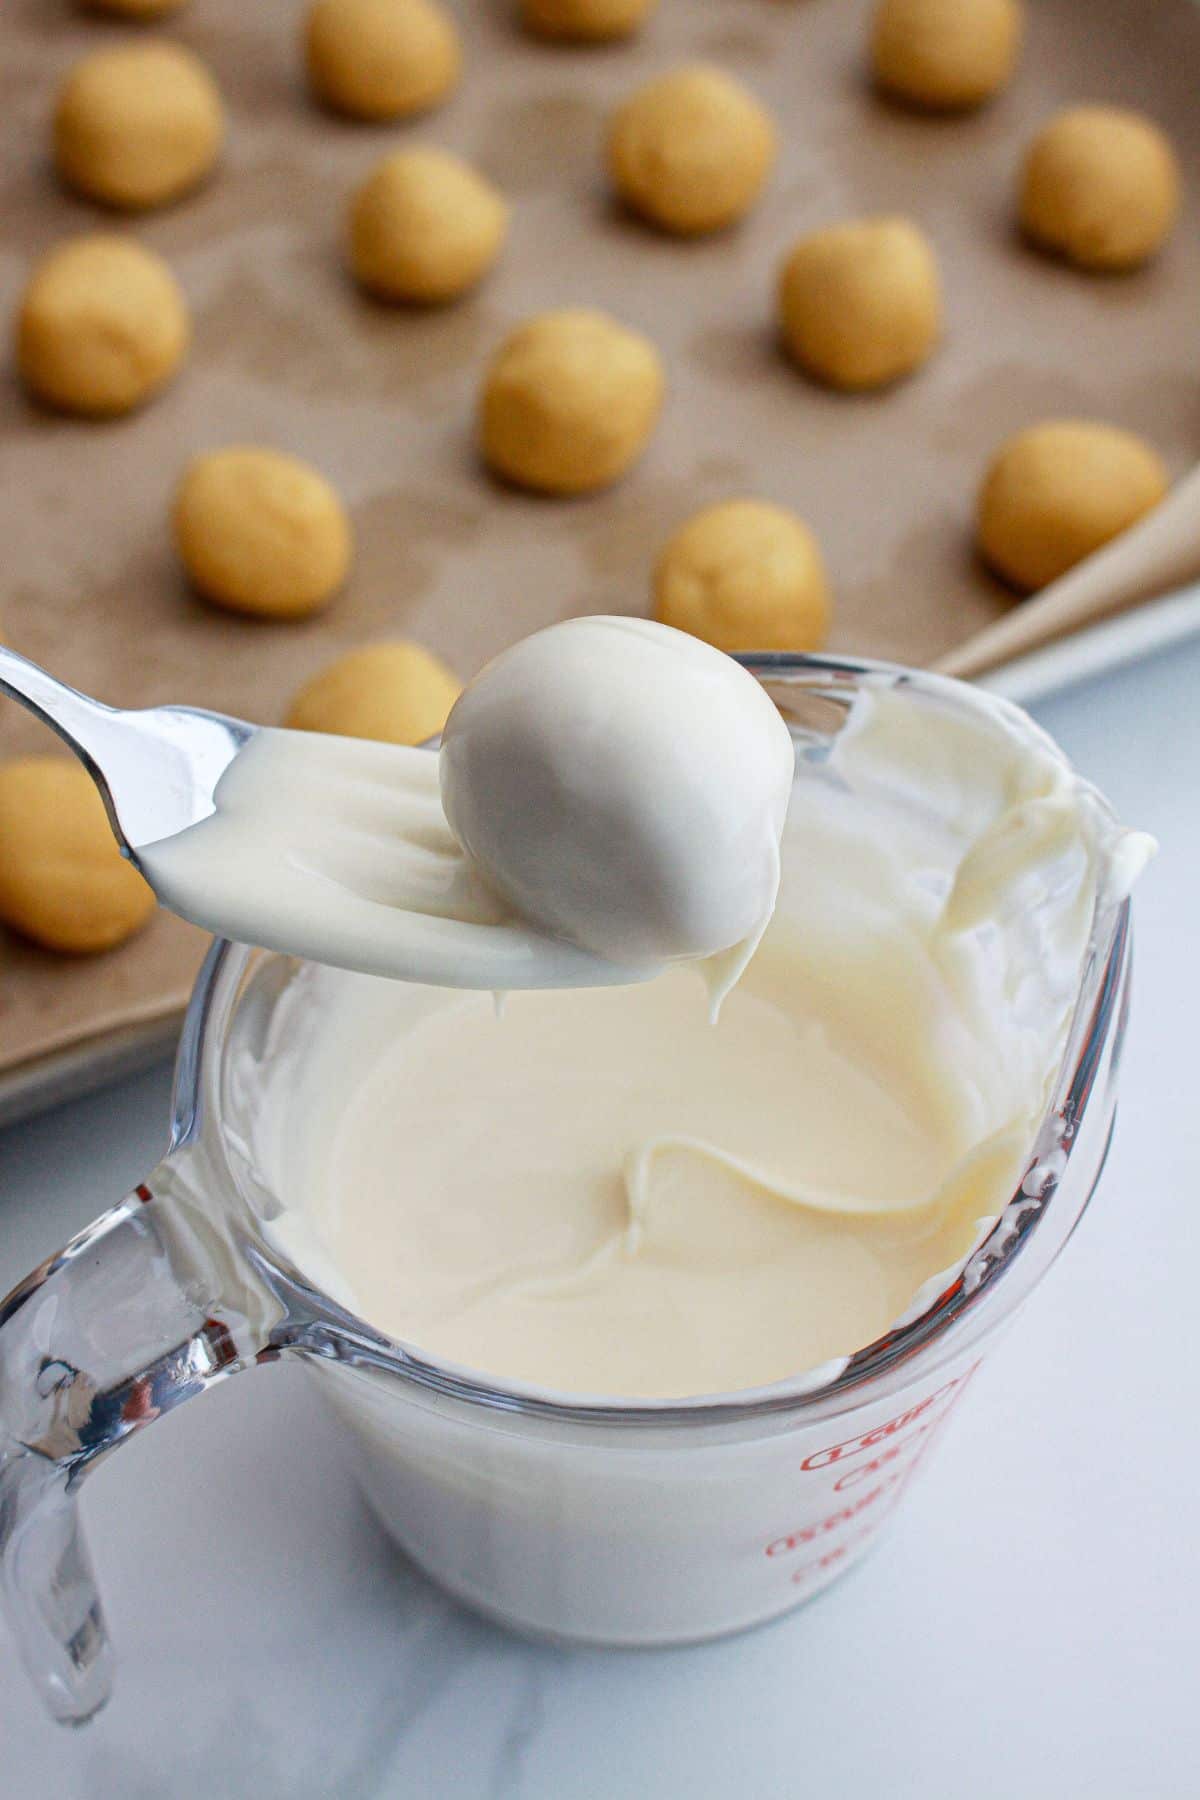
Step 3: Melt the chocolate for dipping
In a microwave safe container, place a little more than ½ of bag of the candy melts and the coconut oil and microwave until fully melted. Using a fork, dip each truffle into the candy melts to fully coat, gently shake off any excess, and place the truffle back on the tray to harden. Repeat until all are fully coated. Set aside to firm up.
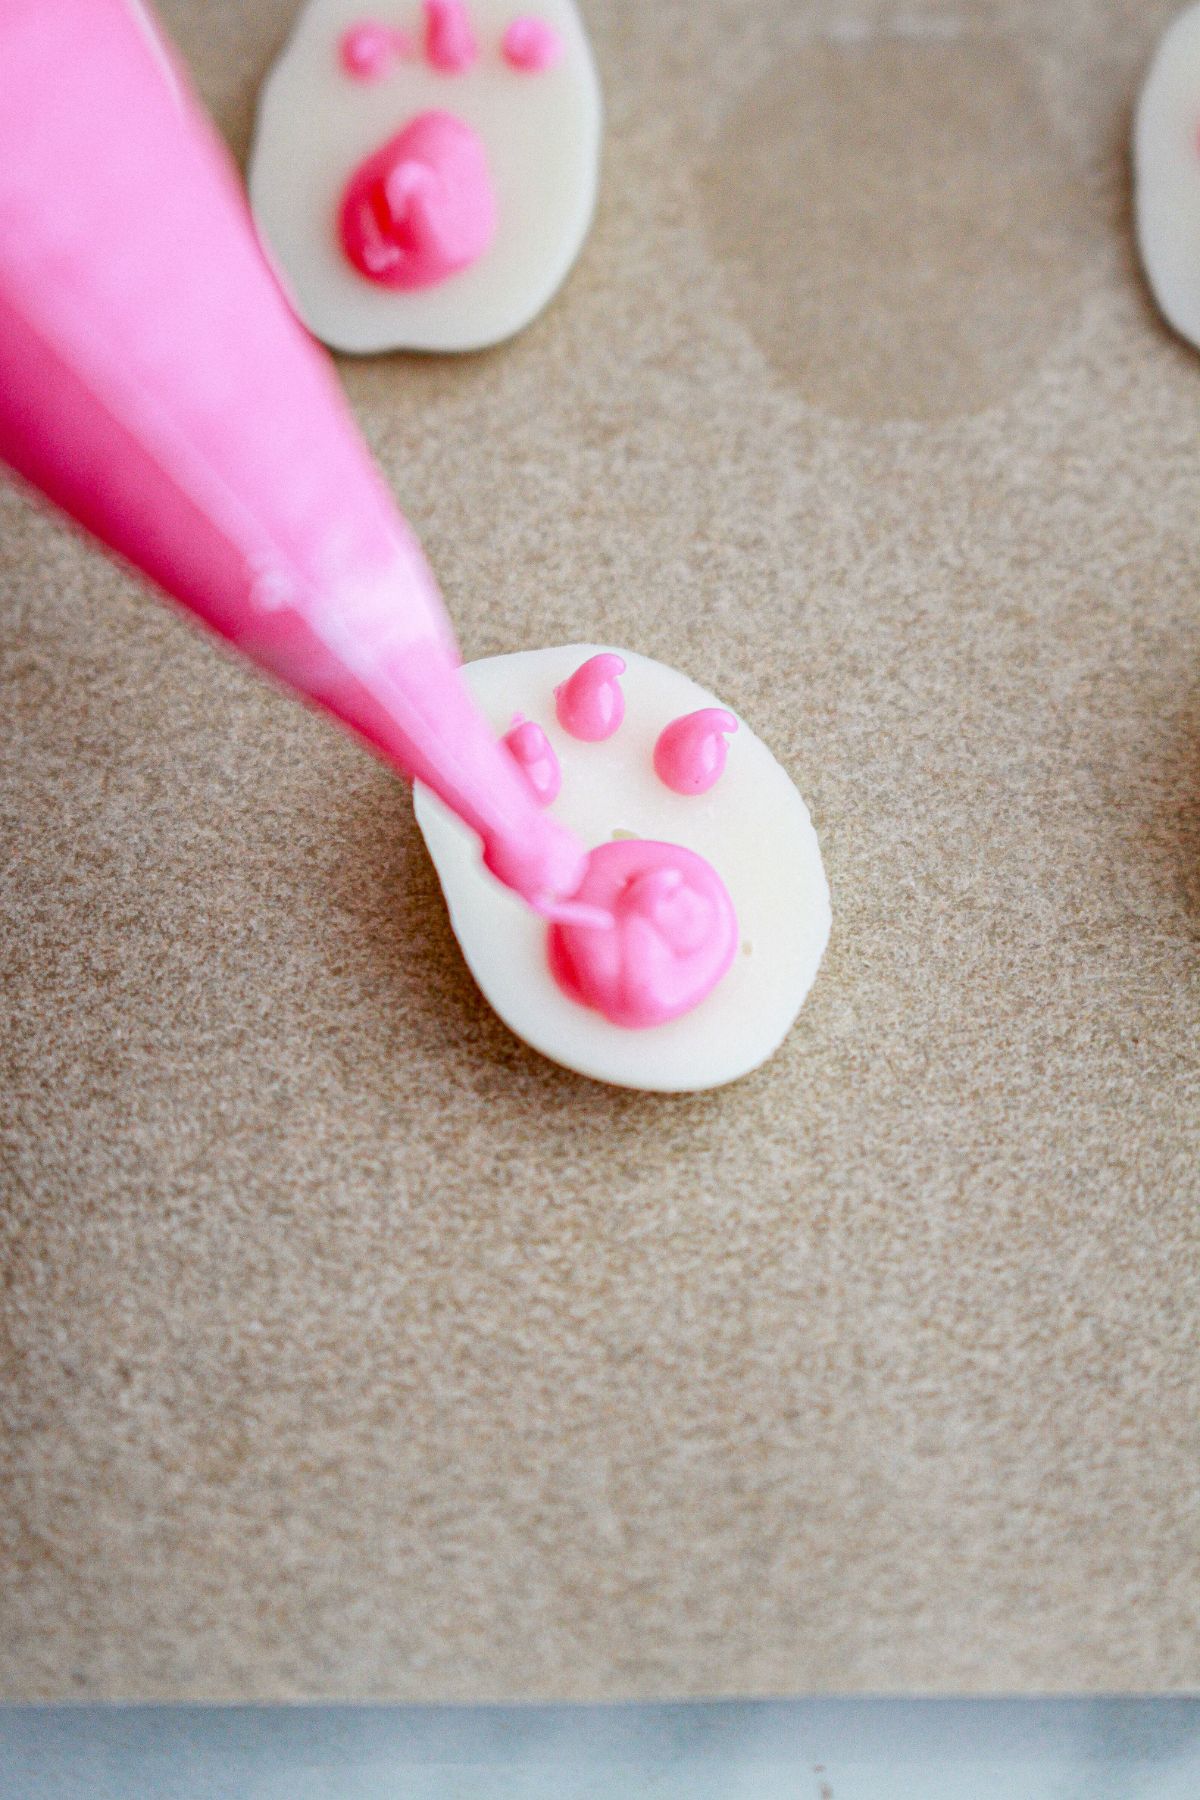
Step 4: Finish the bunny prints
Once the feet are dry, flip them over so the flat side is up. In a small container, melt about 2 tablespoons of the candy melts add 1 drop of pink food coloring, and pour into a piping bag. On the flat side of the “foot” pipe 3 small dots at the top and one larger circle underneath to create a bunny footprint. Repeat until all the feet are done.
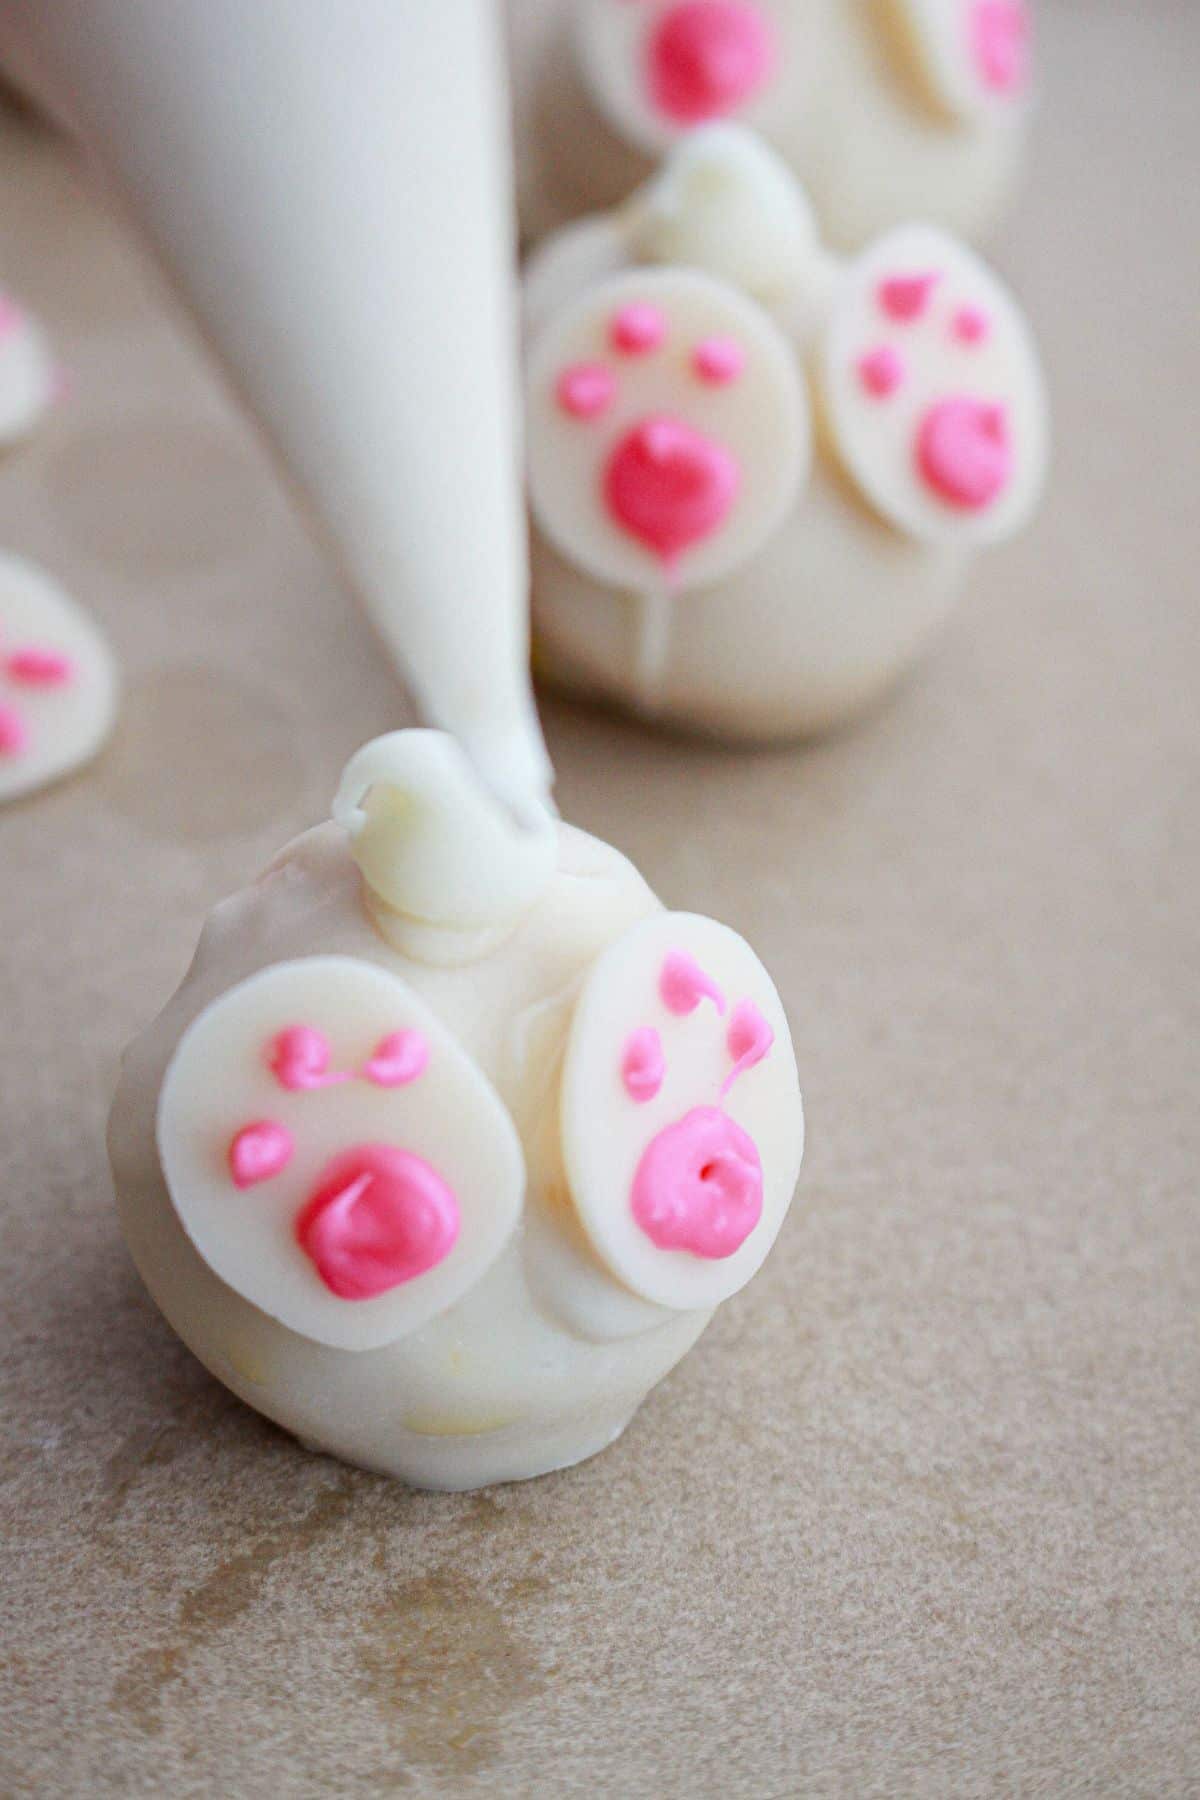
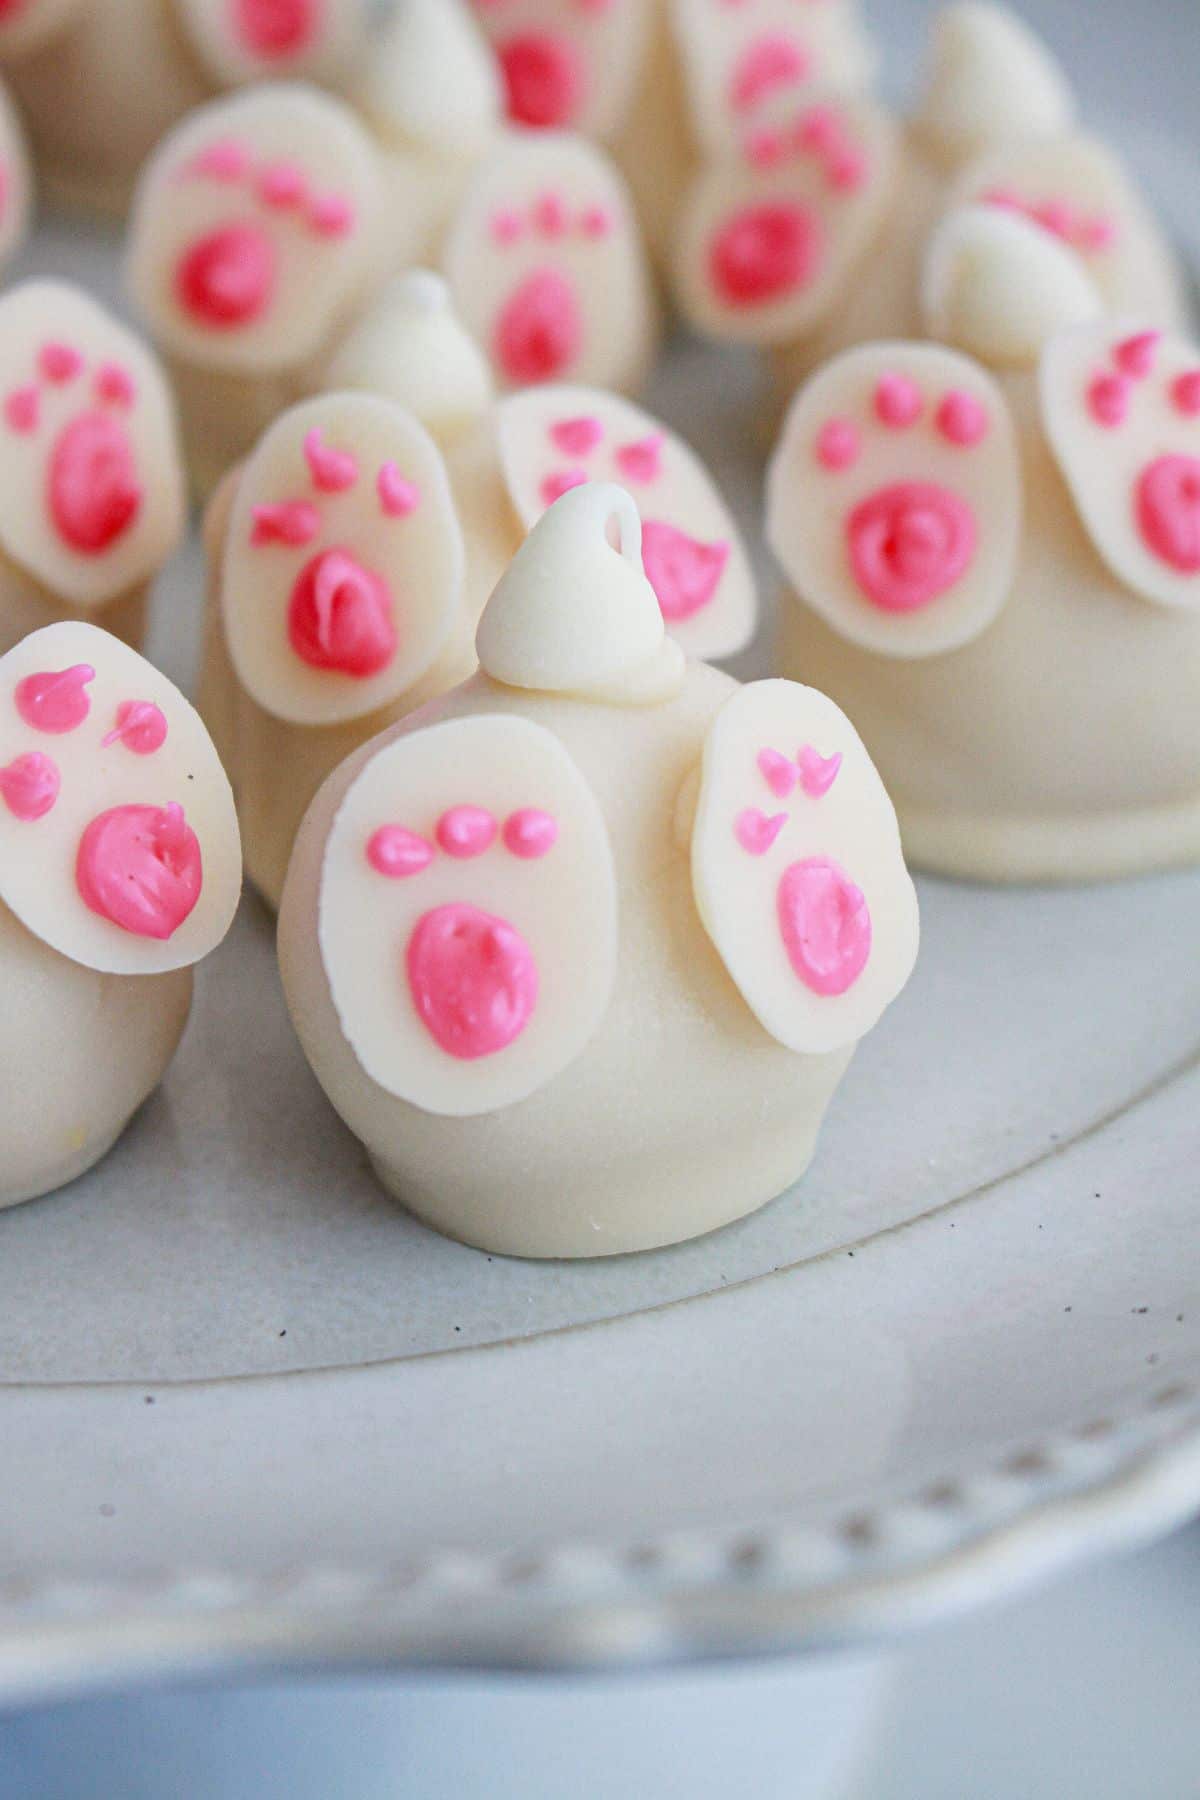
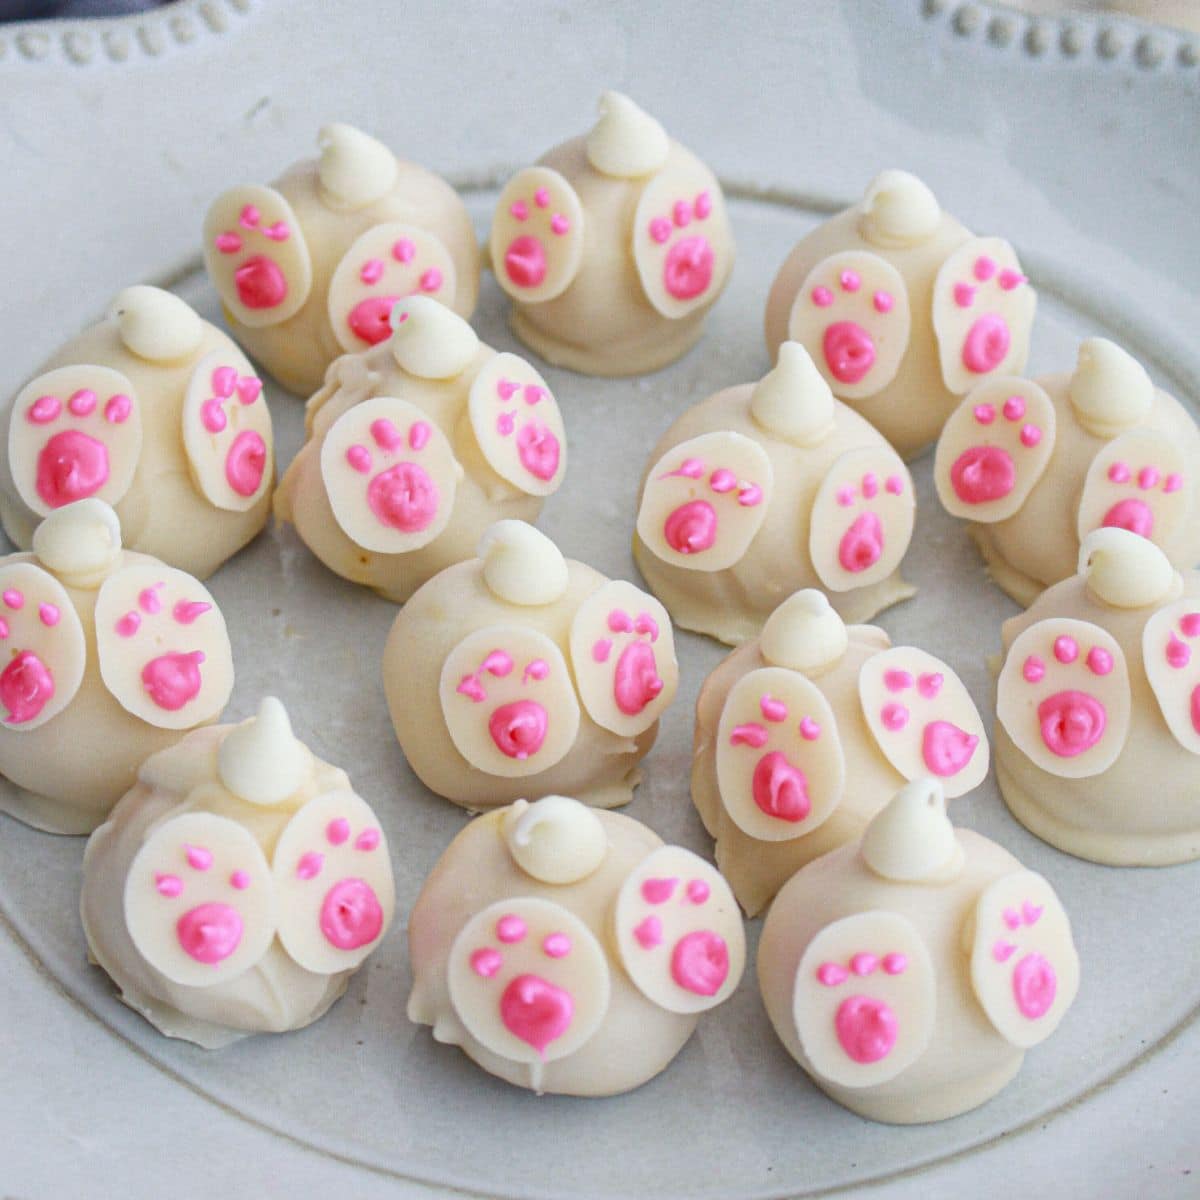
Step 5: Finish the Easter truffles
Gather the feet the truffles and the white chocolate chips to assemble. Melt the remaining candy melts for “glue”, and place them in a piping bag for ease of assembly. Using the melts as the glue, put a generous dot on the back of each foot and attach two feet to each truffle. Attach 1 white chocolate chip for the tail. Set the truffles aside to harden fully before serving.
📝Variations
- Cookies: Try using the chocolate cookies or even the vanilla ones instead of lemon.
- Toppings: You can also top these festive sprinkles, chopped nuts, or any other decorations that you enjoy.
- Flavorings: Experiment with various extracts to find the perfect match for your palate. Mint, almond, and orange extracts are fantastic alternatives that offer a distinct twist to the original recipe.
Are you looking for another fun and festive bunny butt dessert recipe to make for your Easter dinner? If so check out this Bunny Butt Cheesecake recipe.
🥄 Equipment
To make these Easter Truffles, you will need a few key pieces of equipment that are likely already in your kitchen. This equipment will help make the process smooth and enjoyable.
- Food Processor
- Microwave Safe Bowl
- Baking Sheet and Parchment Paper
- Fork or Chocolate Dipping Tool
🥫 Storage
These truffles need to be stored in an airtight container in the fridge at all times to keep them fresh. So, make sure that you don’t remove them from the fridge until you are ready to serve them.
Serve With Easter Truffles
Serve these delicious truffles with your favorite Easter staples like this Crock Pot Ham. Plus, you can’t have a holiday dinner without Creamy Baked Mac and Cheese.
💭 Tips
Here are a few additional tips to ensure your Easter truffles turn out perfectly every time:
- For smooth and even truffles, ensure your cream cheese is at room temperature before mixing with the Oreo crumbs. This makes the mixture easier to blend and roll.
- If the truffle mixture sticks to your hands while rolling, lightly dust your hands with powdered sugar or wear food-safe gloves.
- When dipping the truffles in melted candy, tap the fork on the edge of the bowl to remove excess coating. This helps achieve a smooth finish.
⁉️ FAQ
Do you have questions about this recipe? Here are the answers to the most commonly asked questions.
Absolutely! These truffles can be frozen for up to 3 months. To do so, place the fully assembled and hardened truffles in a single layer on a baking sheet to flash-freeze them. Once they are solid, transfer them to an airtight container or a zip-top freezer bag.
To prevent your Oreo balls from falling apart during the dipping process, ensure they are sufficiently chilled and firm. Keeping them in the freezer for at least 30 minutes before dipping them into the melted candy coating will help maintain their shape.
🍽 More Bunny Recipes
Do you enjoy cute bunny recipes? If so, give these recipes a try next time:
🧾Recipe Card
Want to make this recipe? Print the recipe card below, or pin this recipe, so you can find it later.
Bunny Butt Truffles
Equipment
- Food processor
- baking sheet
- mixing bowls
- Fork or dipping tools
Ingredients
- 18.75 ounces lemon Oreos
- 4 ounces cream cheese softened
- 1 teaspoon lemon zest
- ½ teaspoon vanilla
- 1 teaspoon lemon extract
- 11 ounces white candy melts
- Pink food coloring
- ½ teaspoon coconut oil
- ¼ cup white chocolate chips
Instructions
- In a food processor, place all the oreos and grind them to a fine crumb. Add in the cream cheese, lemon zest, lemon extract, and vanilla. Pulse until it comes together and starts to form a ball. Scoop out small amounts and roll into a ball about the size of a teaspoon. Place on a baking tray lined with parchment paper. Place the balls in the freezer for about 30 minutes to harden.
- In a measuring cup, melt about ¼ c of the candy melts and pour into a piping bag and cut a very small hole at the end of the bag.
- On a parchment paper, pipe small ovals for the feet, about ½” long. Set aside and allow to harden.
- In a microwave safe container, place a little more than ½ the candy melts and the coconut oil and microwave until fully melted.
- Using a fork, dip each truffle into the candy melts to fully coat, gently shake off any excess and place the truffle back on the tray to harden. Repeat until all are fully coated. Set aside to firm up.
- Once the feet are dry, flip them over so the flat side is up. In a small container, melt about 2 tablespoons of the candy melts and add 1 drop of pink food coloring and pour into a piping bag.
- On the flat side of the “foot” pipe 3 small dots at the top and one larger circle underneath to create a bunny foot print. Repeat until all the feet are done.
- Gather the feet and the truffles and the white chocolate chips to assemble.
- Melt the remaining candy melts for “glue”, place in a piping bag for ease of assembly.
- Using the melts as the glue, put a generous dot on the back of each foot and attach two feet to each truffle.
- Attach 1 white chocolate chip for the tail. Set the truffles aside to harden fully before serving.
Notes
Disclaimer
Any nutritional data I provide is an approximation and actual dietary information can vary based on ingredients and proportion sizes.


You have the feet upside down! 🤭
You think so? We put them so when you look at them the toes are on top