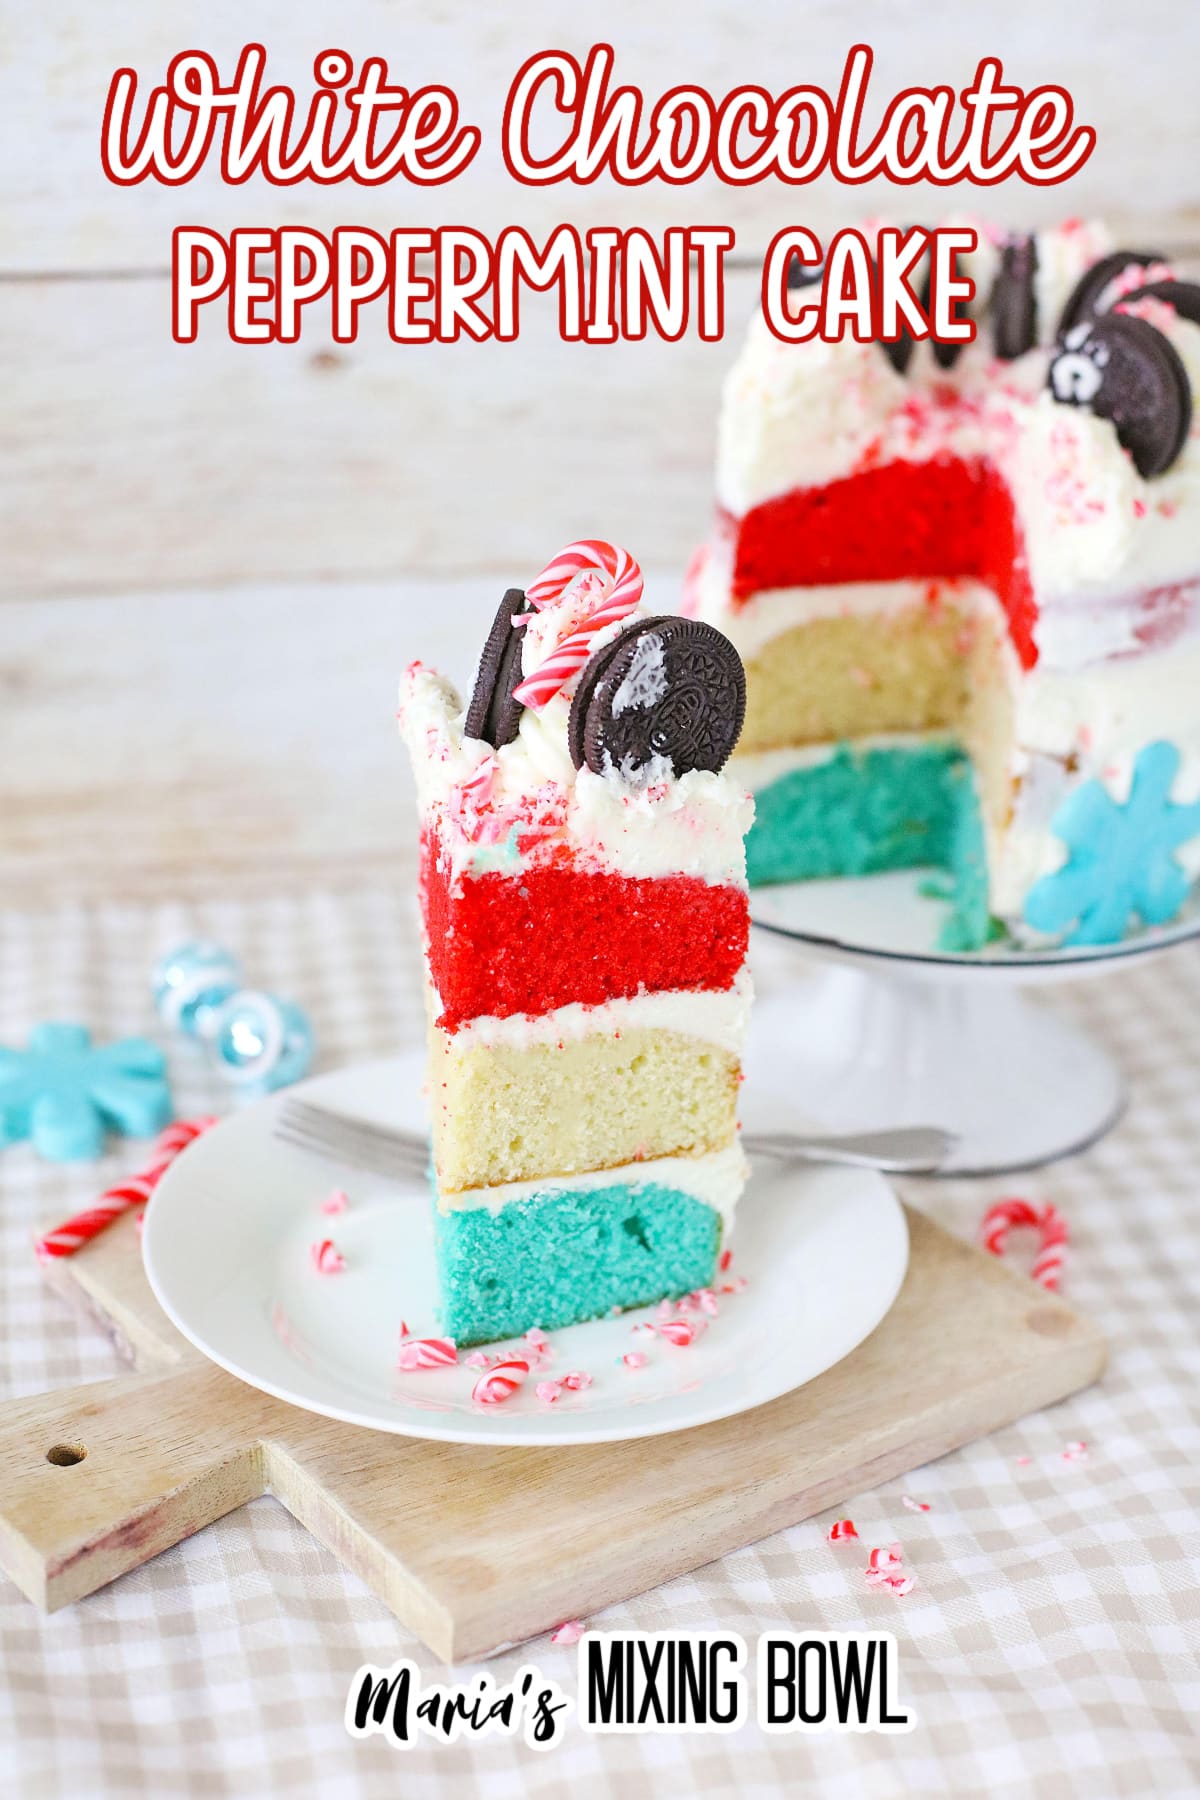
White Chocolate Peppermint Cake

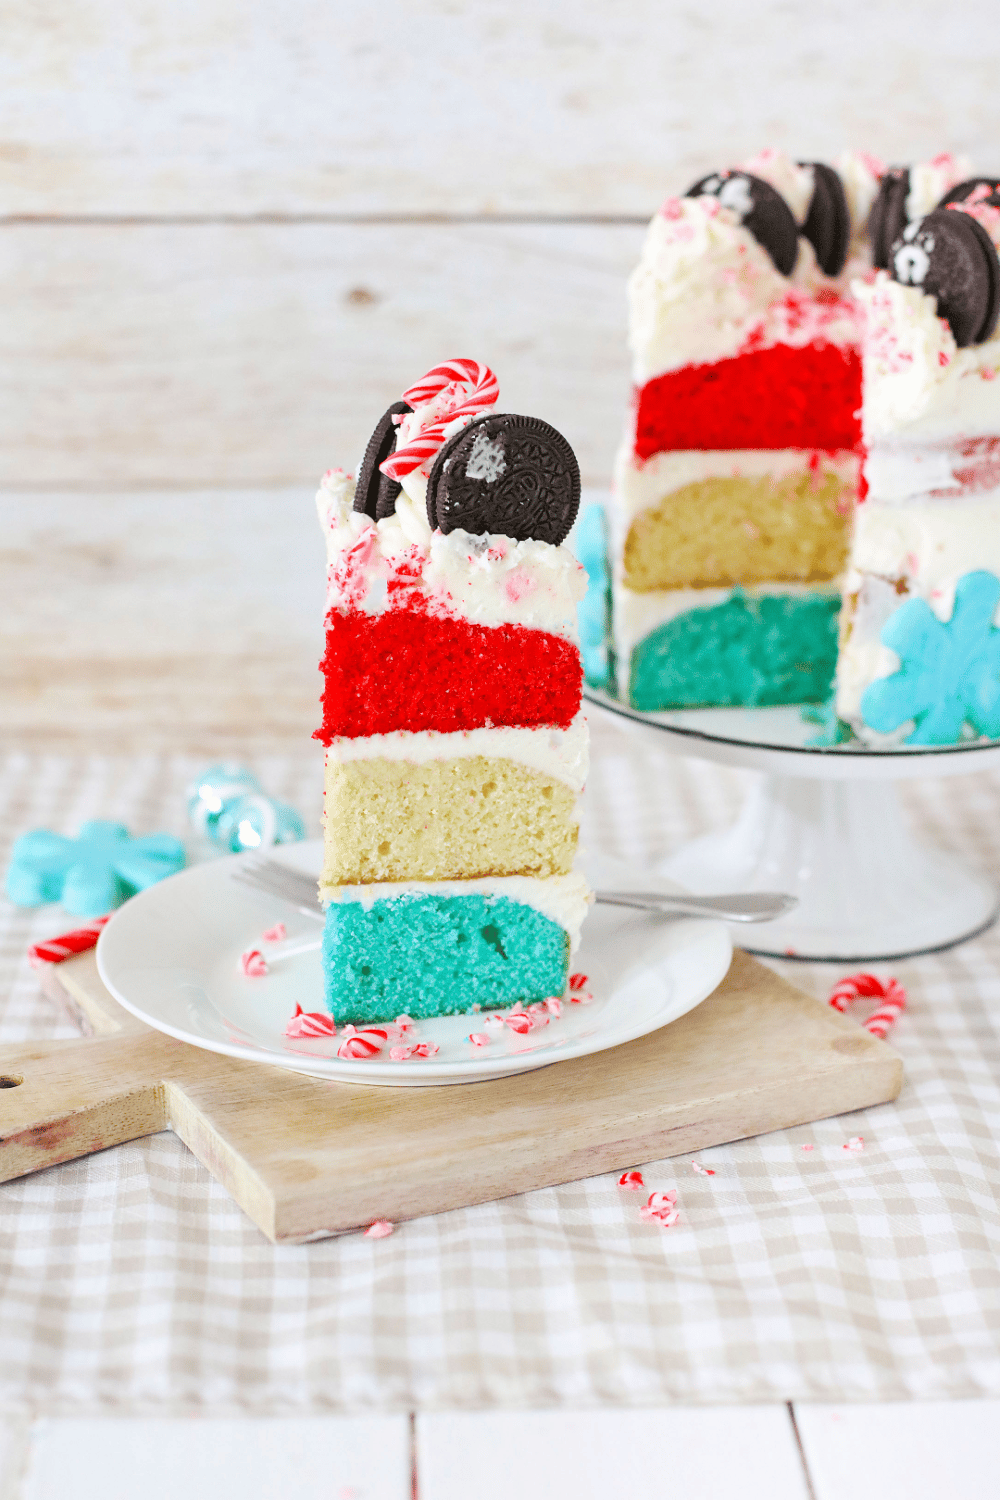
This White Chocolate Peppermint Cake is the ultimate winter or holiday treat. It’s 3 layers of tender cake, buttercream frosting, and Oreo and white chocolate snowflake decorations.
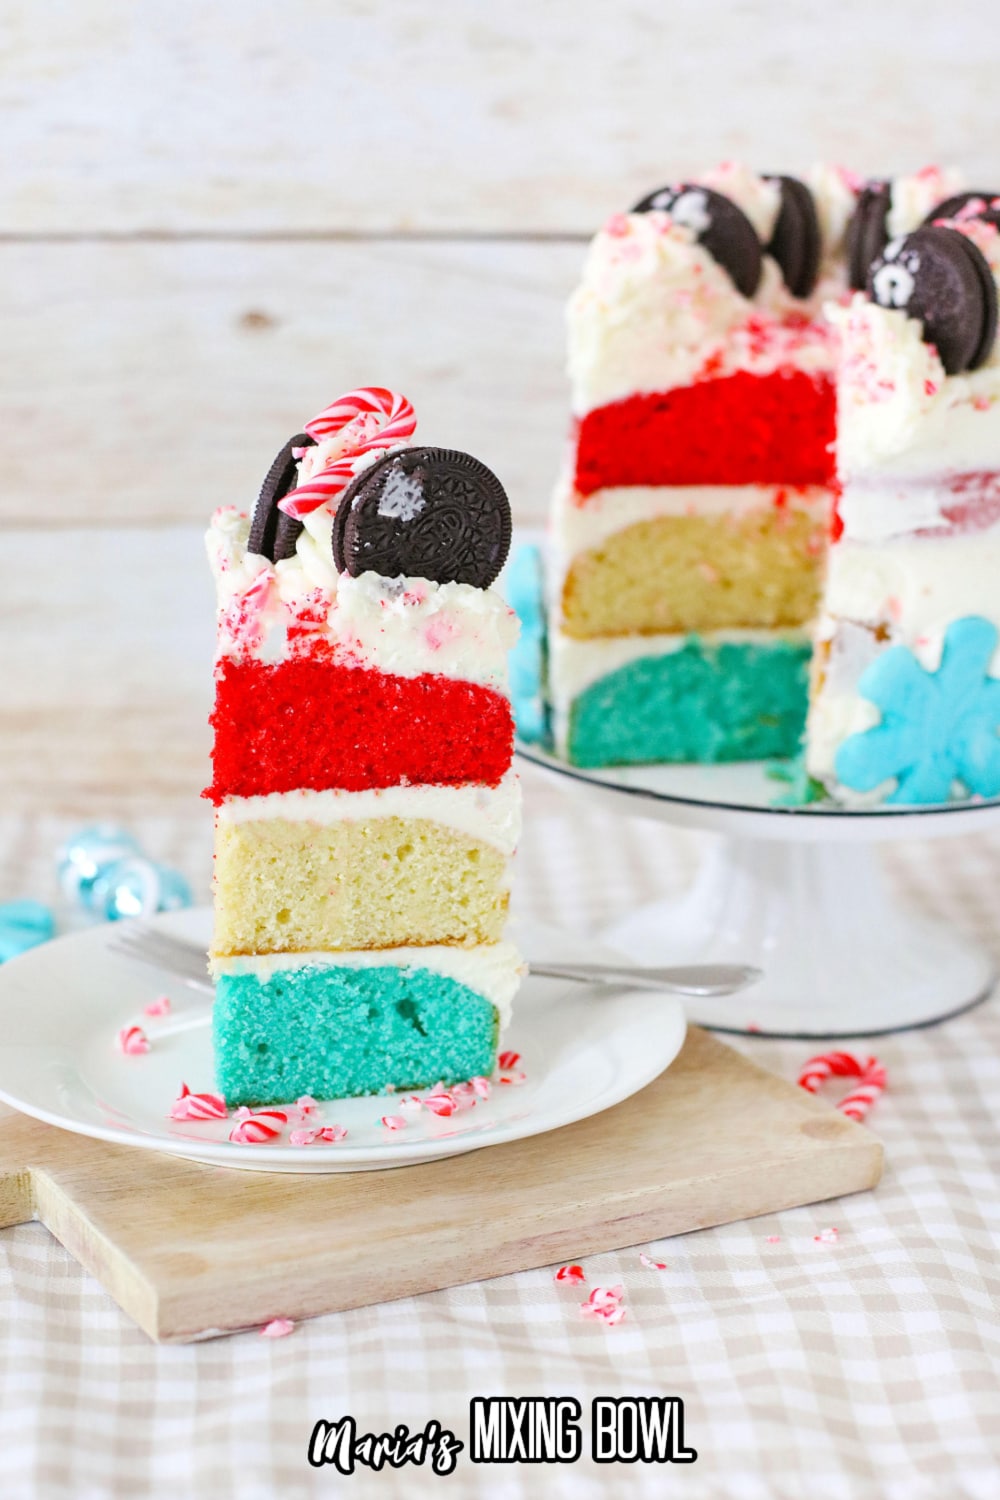
We’ve got an extra snazzy cake for you today, and we think you’re going to love it. It’s a layered cake that’s tasty enough to make any time of year and decorated to fit perfectly into any winter or holiday gathering.
Table of contents
❤️ Why You’ll Love This Recipe
- It’s 3 layers of tender cake and decadent cream cheese frosting.
- It looks fancy, but it’s easy to make.
- It features festive holiday colors.
- Everyone loves cake!
🛒Ingredients
The following are affiliate links. We are a participant in the Amazon Services LLC Associates Program, an affiliate advertising program designed to provide a means for us to earn fees by linking to Amazon.com and affiliated sites.
This recipe only uses basic baking ingredients, most of which are probably in your kitchen already. Anything you don’t have is easily found at your local grocery store. We’re including the highlights below, but you’ll find the complete ingredient list with amounts in the recipe card at the end of the post.
- Butter
- Sugar
- Vanilla
- Aqua and red food coloring gel
- Cream cheese
- heavy cream
- Powdered sugar
- White chocolate almond bark
- Oreos
- Mini candy canes
🔪 How to Make White Chocolate Peppermint Cake
There are a few steps to this cake, but they’re all very simple. Even beginner bakers should be able to easily make it.
Step 1: Make the Cake Batter
Blend butter, sugar, eggs, vanilla, and milk in a stand mixer until creamy. In another bowl, combine the flour, baking powder, and salt. Then, add the dry ingredients to the wet and mix on low speed until well blended. Scrape the mixing bowl down and mix on high until smooth and creamy.
Step 2: Color the Cake Batter
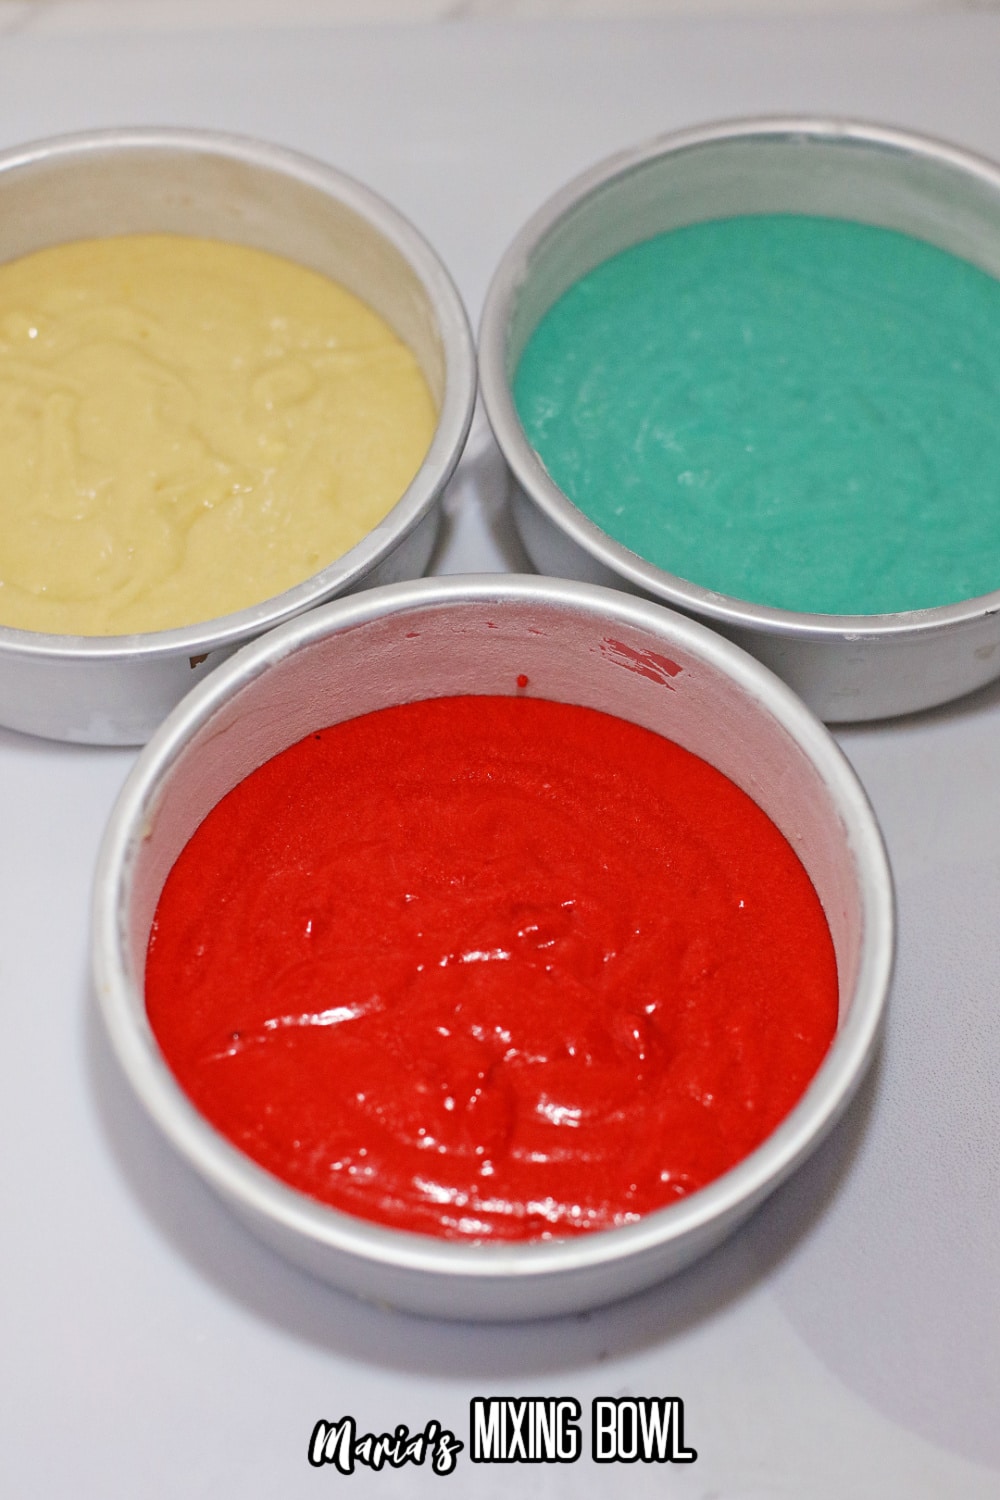
Divide the batter evenly into 3 bowls. Add several drops of aqua food coloring to one bowl and several drops of red food coloring to another bowl. Leave the third bowl of batter plain.
Step 3: Bake
Grease and flour three 6-inch cake pans and pour a bowl of batter into each cake pan. Bake at 350 degrees for 20 to 25 minutes until a toothpick inserted into the center comes out clean. Remove the cakes from the oven and let them cool completely in the pans.
Step 4: Make the Snowflakes
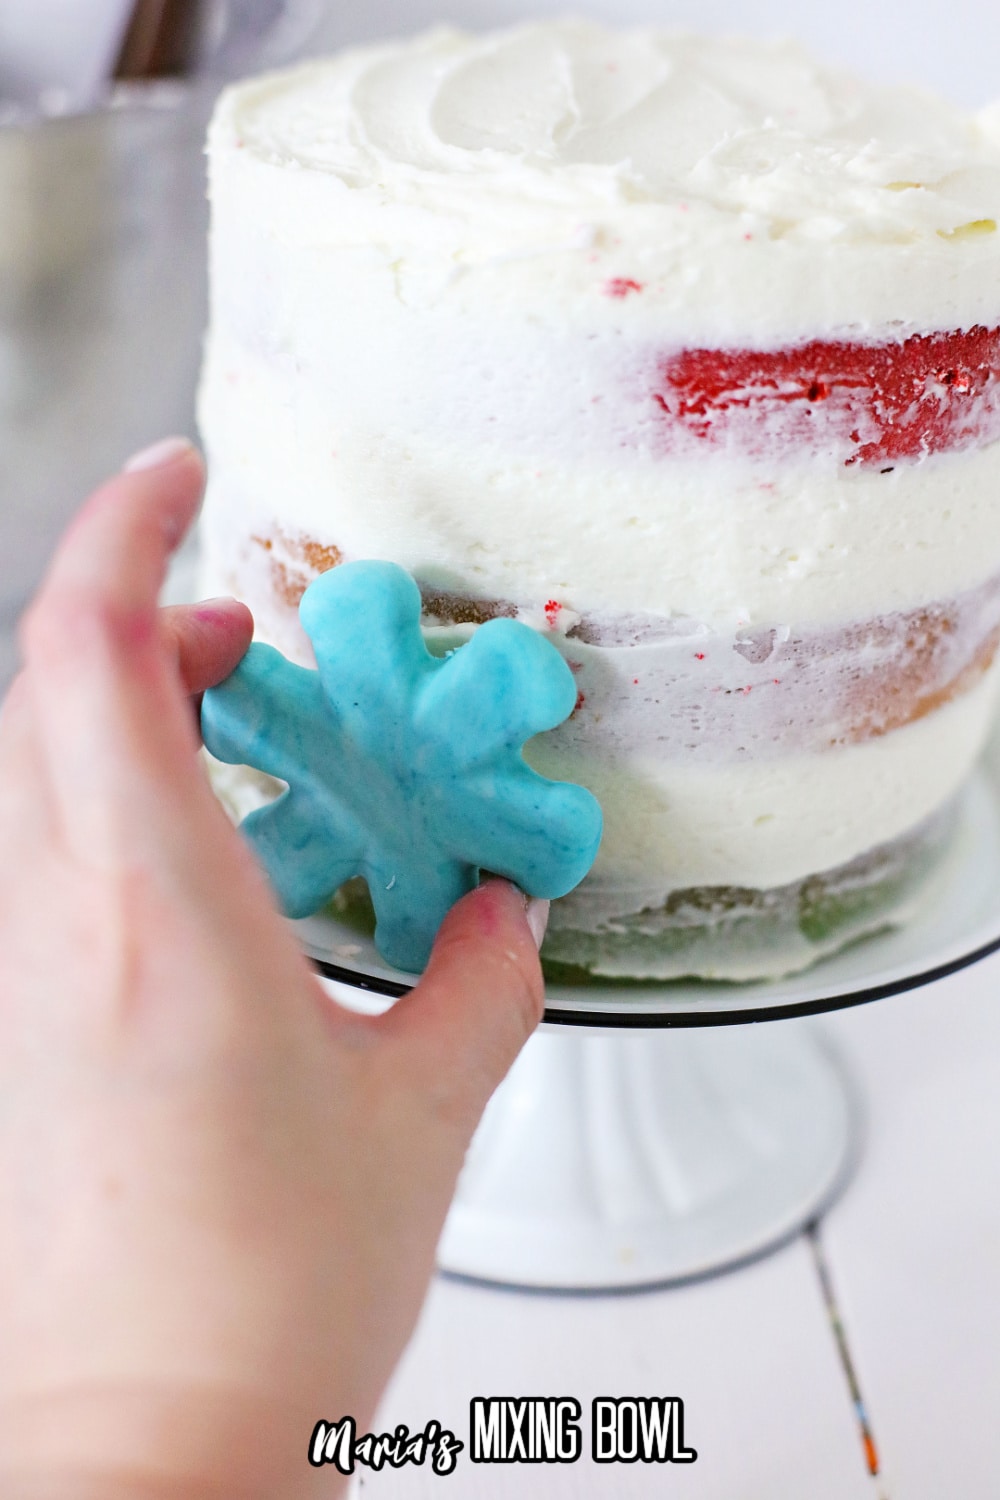
While the cakes are baking, melt the almond bark in the microwave until smooth. Add 2 to 3 drops of aqua food coloring to the melted chocolate and stir to blend. Then, pour about a 1/8-inch layer of melted chocolate into a snowflake mold. Let it sit for 15 minutes to harden.
Step 5: Make the Frosting
Cream the butter and cream cheese in a stand mixer with the whisk attachment until smooth and creamy. Then, add the vanilla and heavy cream and mix on low until blended. Finally, add the powdered sugar about a cup at a time, blending between each addition, until it’s all been added and the frosting is thick and creamy.
Step 6: Frost the Cake
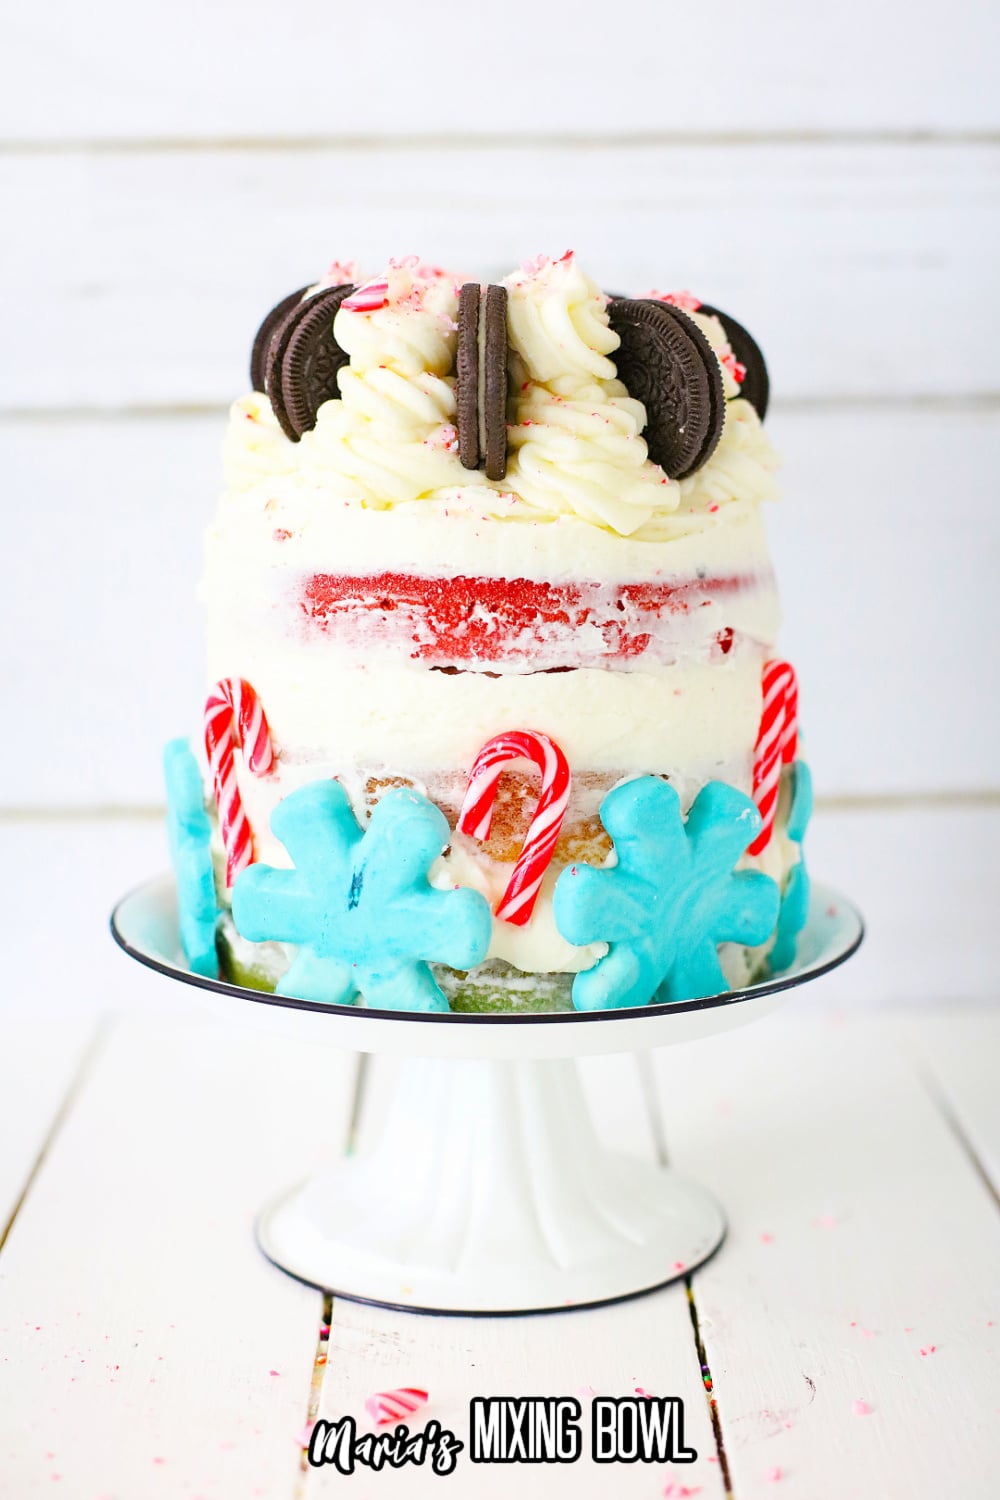
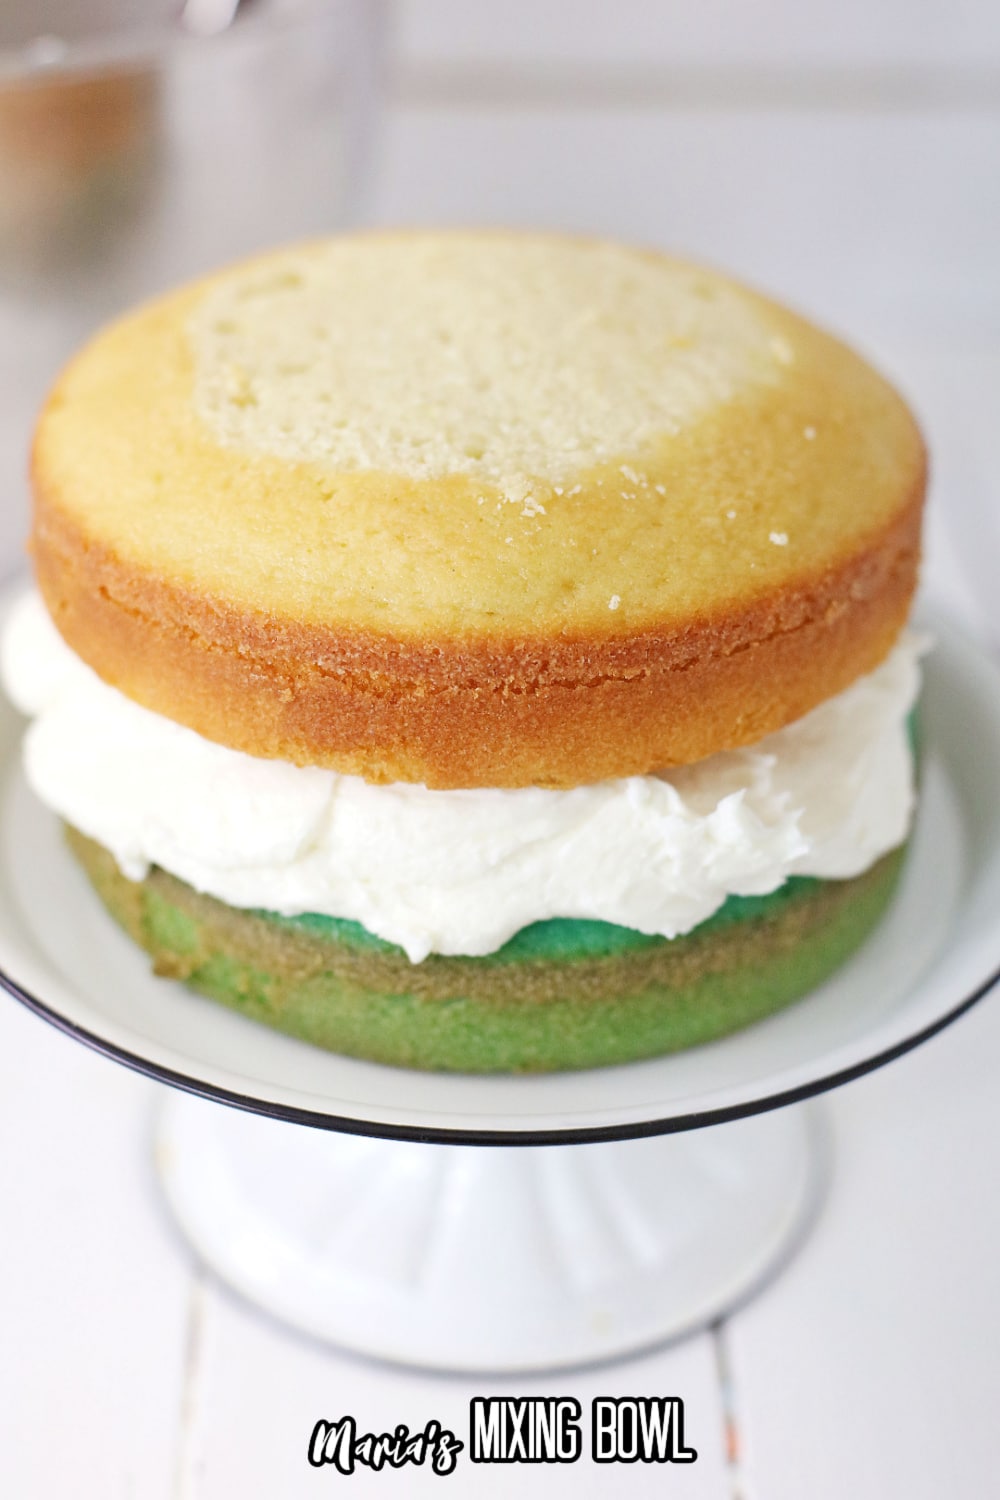
Place a teaspoon-sized dollop of frosting on a cake stand or plate and place the aqua cake layer on top of it. Frost the top of it generously and add the white cake layer. Frost the top of the white layer and the sides of both layers until the two layers are coated in a smooth layer of frosting. Add the red layer and frost the top and sides to get a smooth layer. Then, add the snowflakes around the bottom edge of the cake and chill for 2 hours.
Step 7: Decorate
When the cake is chilled, place the remaining frosting in a pastry bag with a medium star tip. Pipe the frosting in large dollops around the edge of the top of the cake, pulling them up to a point. Place an Oreo in between each dollop and stand a candy cane on each dollop of frosting. Then, crush the remaining candy canes and sprinkle them over the top of the cake. Chill until ready to serve.
📝Variations
Do you want to change up this recipe and make it your own? Here are some ways that you can do that!
- Sheet Cake – If you don’t want to make a layer cake, make a sheet cake version, decorating the top in the same way and adding snowflakes.
- Buttercream – You can use buttercream frosting if you like.
- Packaged Cake Mix – You can use cake mix and color it before baking if you like.
If you’re a fan of layered cakes, then check out this milk and cookie layered cake.
🥄 Equipment
For the most part, this recipe uses basic baking equipment. I’ve included a link for the snowflake molds.
- Measuring cups and spoons
- Stand or hand mixer
- Mixing bowls
- Cake pans
- Piping bag with star tip
- Cake plate or platter
- Snowflake mold
🥫 Storage
This cake will last for 5 to 7 days in the refrigerator in an air-tight container. For longer storage, open-air freezer the cake, wrap it in a double layer of plastic wrap then foil, and freeze it for up to a month.
💭 Tips
We have a handful of tips here to help you make this cake the best it can be.
- Be sure your butter is fully softened so it creams well for both the cake and the frosting.
- Be sure your cream cheese is fully softened so you don’t end up with lumpy frosting.
- DO NOT chill your leftover frosting before decorating your cake. It will be too hard to flow through the piping bag tip.
⁉️ FAQ
Do you have questions about this recipe? Here are the answers to the most commonly asked questions.
If you have a rotating cake stand, that’s the easiest way. You can turn the cake while frosting without having to move your frosting hand.
It’s frosted with cream cheese frosting, so it has to be refrigerated for safety.
If your cake isn’t completely and totally cooled, the frosting will simply slide right off the cake.
🍽 More Recipes
Do you enjoy cake? Then try these delicious recipes:
📌 PIN IT!!
🧾Recipe Card
Want to make this recipe? Print the recipe card below, or pin this recipe, so you can find it later.
White Chocolate Peppermint Cake
Equipment
- Measuring Cups and Spoons
- Stand or hand mixer
- mixing bowls
- Cake pans
- Piping bag with star tip
- Cake plate or platter
- Snowflake mold
Ingredients
FOR THE CAKE:
- 1 cup Butter softened
- 1 ½ cups Sugar
- 3 Eggs
- 1 Tablespoon Vanilla
- 1 cup Milk
- 2 ¼ cups Flour
- 2 ¼ teaspoons Baking Powder
- ½ teaspoon Salt
- Aqua Food Coloring Gel Red Food Coloring Gel
FROSTING:
- 8 ounces Cream Cheese softened
- 1 Stick of Butter softened
- 1 Tablespoon vanilla
- ¼ cup Heavy Cream
- 32 ounces Powdered Sugar
TO DECORATE:
- 2 cups White Chocolate Almond Bark melted
- Aqua Food Coloring Gel
- 15 ounces Oreo Cookies
- 16 ounces mini Candy Canes
- Crushed Candy Canes
Instructions
For the Cake
- In the mixing bowl of a stand mixer, place the Butter, Sugar, Eggs, Vanilla, and Milk, and blend until creamy.
- In a separate bowl, add the Flour, Baking Powder, and salt, and stir well to mix.
- Add them to the mixing bowl, and mix on low speed until blended.
- Scrape down the bowl, and mix on high until smooth and creamy.
- Divide the Cake Batter evenly into three bowls, and add several drops of the Aqua Food Coloring Gel to one bowl, and several drops of Red Food Coloring Gel to the other bow, and leave the third bowl plain – for the middle/White layer. Grease and flour three 6 inch Cake Pans, and pour the Cake Batter into the pans.
- Bake at 350 for 20 to 25 minutes, or until a toothpick inserted in the center comes out clean.
- Remove Cakes to a wire rack to cool completely.
WHILE THE CAKES ARE BAKING:
- Melt the White Chocolate in the Microwave, and stir until smooth.
- It takes about 6 squares of the White Chocolate Almond Bark for 2 cups of melted White Chocolate.
- When the Chocolate is melted, drop about 2 or 3 drops of Aqua Food Coloring Gel into the melted Chocolate, and stir well to blend.
- Place the Aqua colored Chocolate in the Snowflake Mold, about 1/8 of an inch deep (You’re not filing the Molds, just a thin layer on the bottom).
- Let the Chocolate set in the molds for about 15 minutes to harden – I used two molds, and made three sets, using 6 of the Aqua Snowflakes around the outside of the Cake.
Make the Frosting:
- Place the softened Butter, and Cream Cheese in the mixing bowl of a stand mixer, and mix with the whisk attachment until smooth and creamy.
- Add the Vanilla, and Heavy Cream, and mix on low until blended.
- Add the Powdered Sugar about a cup at a time, blending between additions, and scraping down the mixing bowl as needed, until all the Powdered Sugar has been added, and the Frosting is thick and creamy. (The Frosting should be able to be held upside down on a spoon, and not fall).
- If the Frosting needs to be a little thicker, add another cup of Powdered Sugar
- When Cake is completely cool, remove the cakes from the pans, and place a teaspoon size dollop of the Frosting on the Cake Plate, or Cake Stand you are going to serve this Cake on.
- Place the Aqua layer on the dollop of Frosting (this will help to keep the cake from sliding, or moving).
- Frost generously on top of the Aqua layer (see photo) and gently place the White/Middle layer on top of the Frosting. Frost the sides, and top of both Layers, until you have a good smooth coat of the Frosting on the Cake.
- Place the Red layer on top of the White frosted layer, and Frost the Red layer, top and sides, and place the Aqua Snowflakes around the outside bottom of the Cake.
- Place the Cake in the refrigerator for about 2 hours to allow the Frosting to set. Cover the Frosting, and leave on the counter – DO NOT REFRIGERATE THE FROSTING – it will be too hard to pipe – leave it at room temperature until time to finish the cake.
- After the two hours, place the remaining Frosting in a pastry bag with a Medium size Star Tip, and remove the Cake from the refrigerator.
- Pipe the Frosting around the edges of the top of the Cake, in big dollops, swirling them up to a point.
- Place an Oreo Cookie in between the dollops, standing them up all around the top of the Cake – see photo.
- Place Candy Canes on each dollop of Frosting.
- Crush the remaining Candy Canes, and sprinkle the crushed Candy Canes on top of the Cake to finish the top.
- Place the Cake back in the refrigerator until time to serve.
- When ready to serve, cut in two inch pieces, place more crushed Candy Canes, on dessert plates if desired. Serve, and Enjoy!
Notes
Disclaimer
Any nutritional data I provide is an approximation and actual dietary information can vary based on ingredients and proportion sizes.


