Christmas Lights Cookies

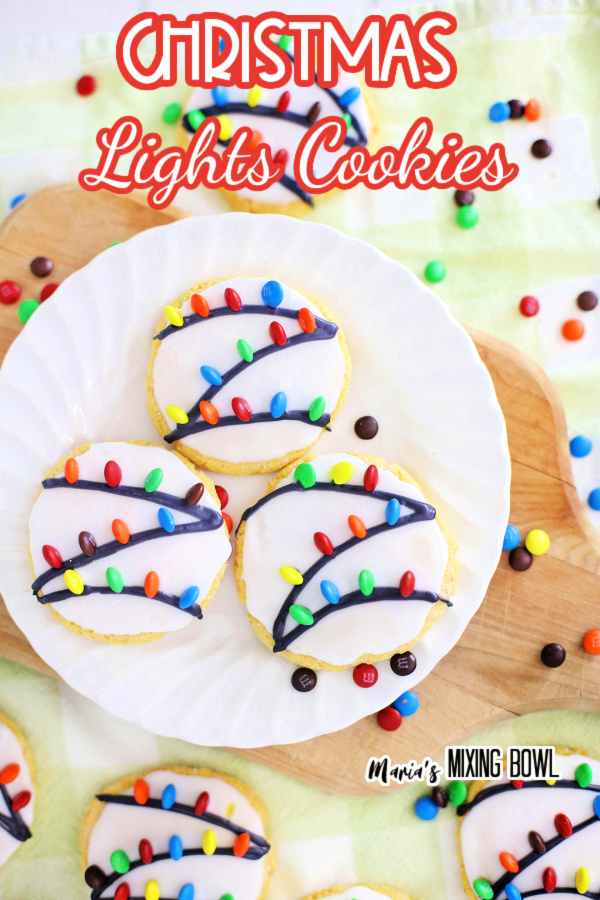
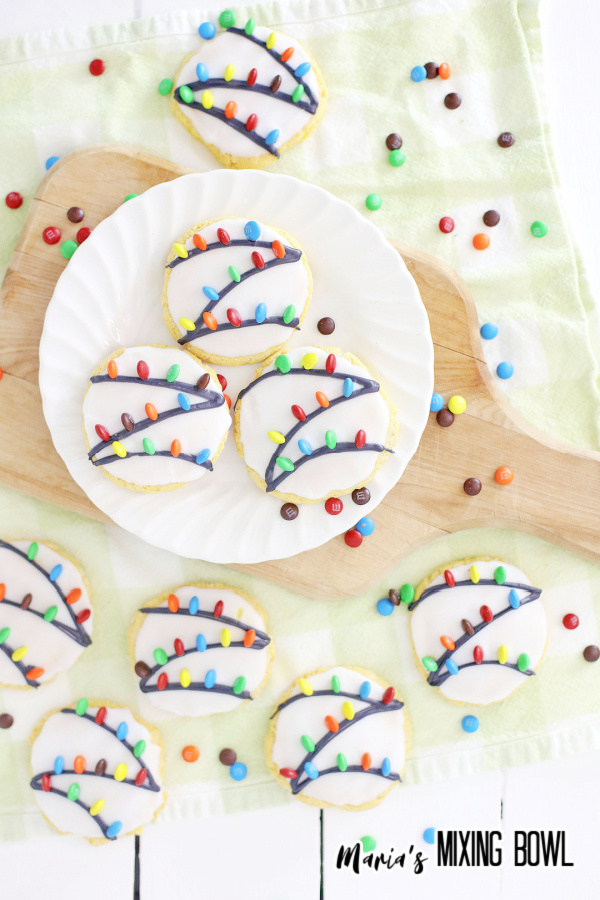
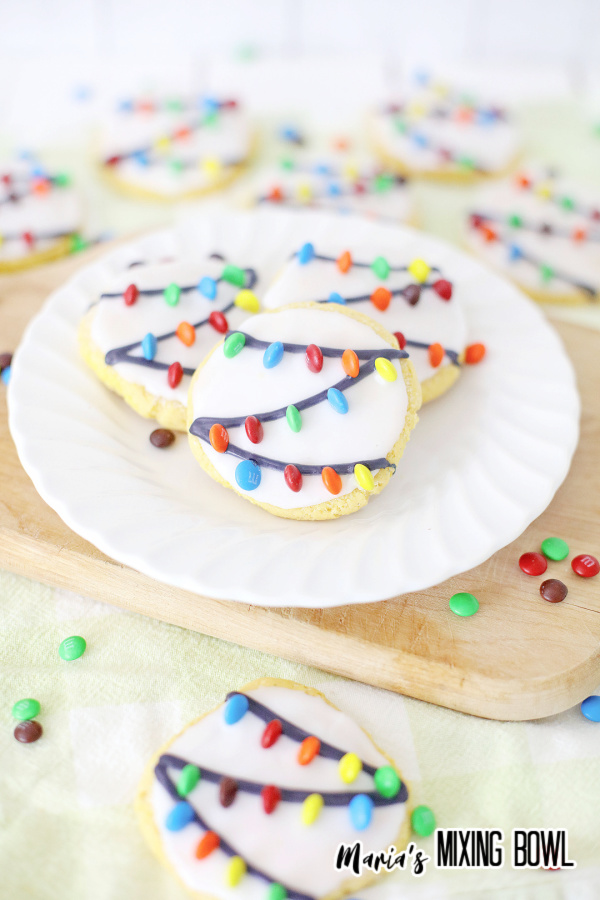
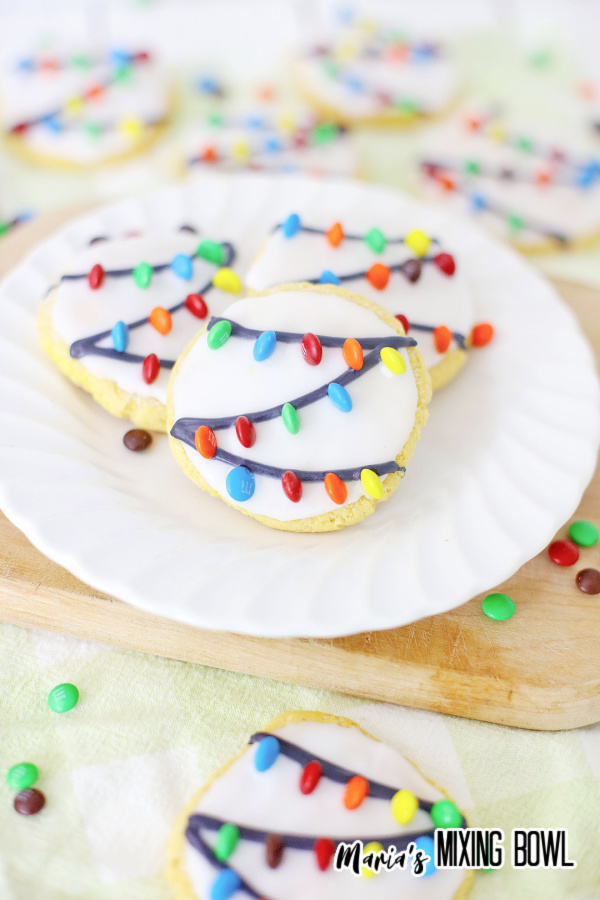
Christmas Lights Cookies start with a delicious sugar cookie base which is then iced with a white base and then strings of lights for a beautiful, Christmas-themed treat that everyone loves. Since we love Christmas lights and cookies this dessert is a must make!
We love to cook for the holidays. Halloween, Thanksgiving, Christmas, Easter, and the Fourth of July all make the perfect times to create beautiful recipes that are as much fun to look at as they are to eat. These Christmas lights cookies are a perfect example of that. We love to make these for holiday get-togethers as a fun treat for everyone to enjoy, especially the kids.
These Christmas Lights Cookies are so good, and they’re so easy to make, but look like they came from the Bakery. They’re really a pretty cookie to serve, and so festive they’ll dress up any party or buffet table. They’re crunchy and a little chewy, and the sweet frosting melts in your mouth. Everyone will love these. Make sure you keep this one in your favorites.
Christmas Lights Cookies
These cookies are always a hit because they’re so simple. It all starts with a classic sugar cookie foundation. It’s a cookie that almost everyone loves. A simple little circle of sweet, buttery goodness. From there, we add a layer of white icing to serve as our backdrop. We like to think of it as snow. Then, we finish it off with strings of lights made with food coloring gel and mini M&Ms to give the cookies a holly jolly feel that really captures the essence of the holiday season. They’re beautiful and delicious, and it doesn’t hurt that they’re easy, too!
Ingredients
You don’t need many ingredients to make these delicious cookies. In fact, you probably won’t have to shop for many of these ingredients at all. Outside of the gel food coloring and mining M&Ms, everything on this list is a kitchen staple if you do any sort of baking at all.
For the Cookies
- Softened butter
- Sugar
- Vanilla extract
- Egg
- Flour
For the Frosting
- Powdered sugar
- Milk
- Black food coloring gel
- Mini M&Ms
**See the recipe card at the end of the post for quantities and cooking times.
Instructions
Making these cookies is super easy, and the frosting isn’t hard at all, either. You might have to get your frosting legs at first if you’ve never done anything like this before, but you’ll fall into the groove of it all very quickly!
Step 1: Blend the Wet Ingredients
Using a stand mixer with a whisk attachment, blend the butter, sugar, vanilla, and egg until light and fluffy.
Step 2: Combine the Dry Ingredients
In a separate bowl, combine the flour and baking powder and stir well to combine.
Step 3: Combine the Wet and Dry Ingredients
Add the flour to the wet ingredients a little at a time and mix on low until all the flour is added. Remove then whisk attachment and attach the paddle. Then, continue to blend the dough until it’s completely blended and a smooth ball starts to form. Scrape down the sides as needed throughout the process.
Step 4: Bake
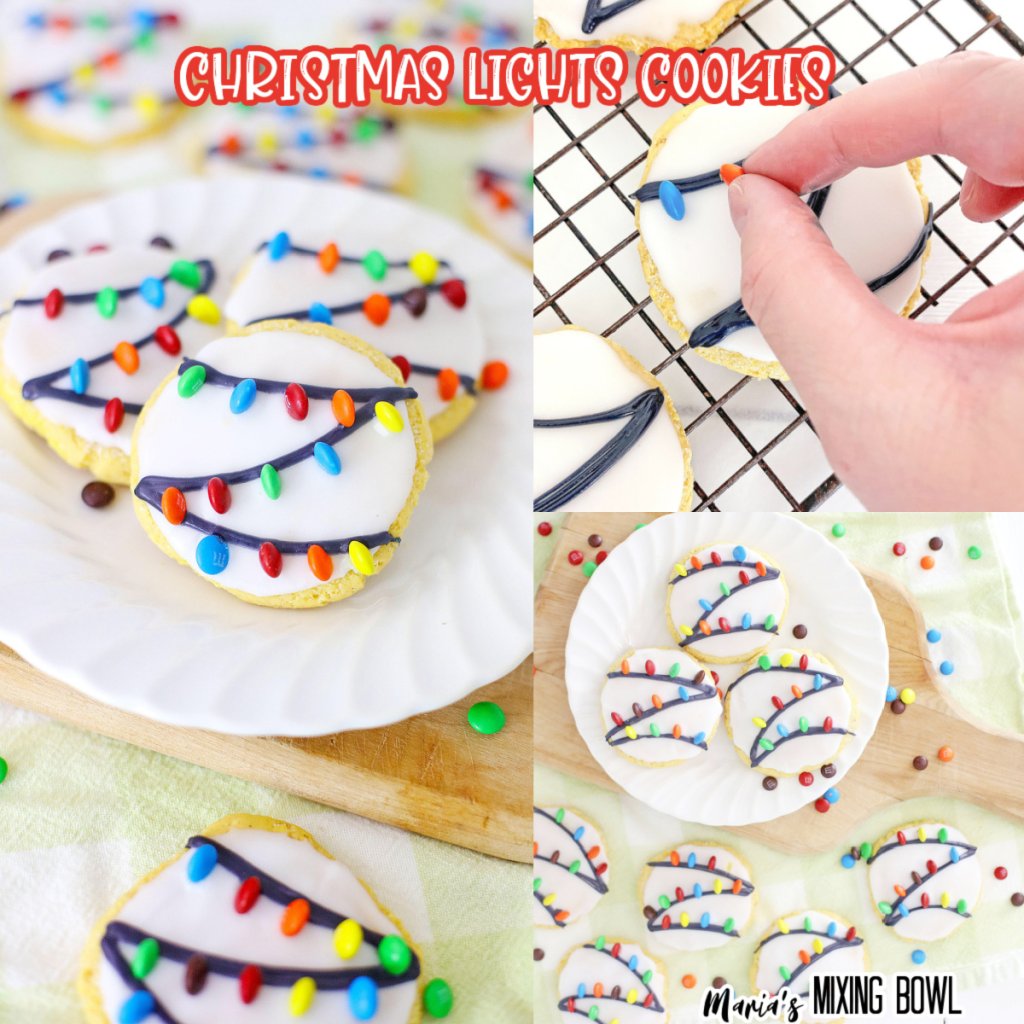
Line two cookie sheets with parchment paper and roll the cookie dough into small, 1-inch balls. Place the balls on the parchment paper and bake until the cookies just start to turn lightly golden brown around the edges. About halfway through baking, dip the bottom of a glass in sugar and lightly press the cookies down slightly, giving them a crinkly look.
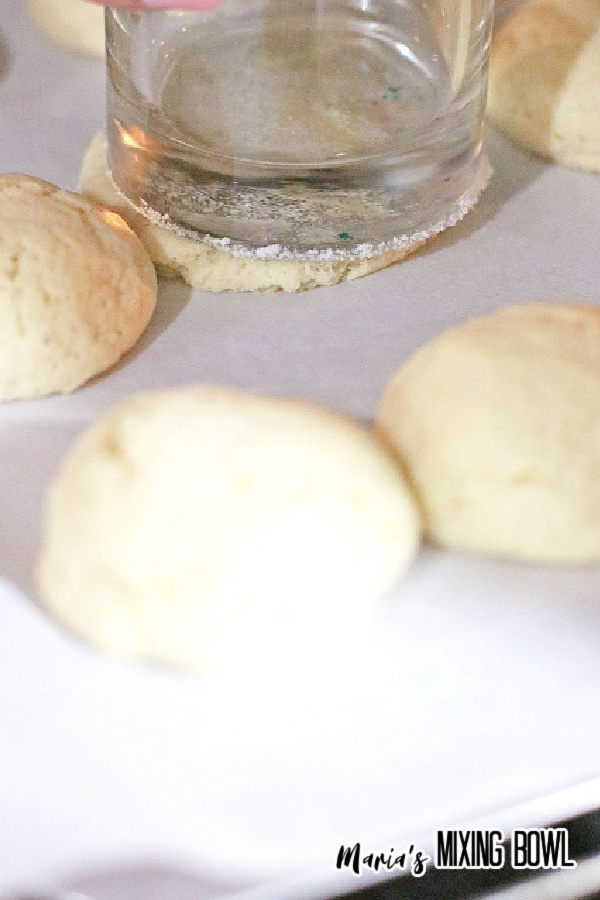
Remove the cookies from the oven and transfer them to a wire rack to cool completely.
Step 5: Make the Icing
While the cookies are cooling, make the icing. In a bowl, add milk a little at a time to the powdered sugar, stirring until smooth and no lumps are visible. Place a couple of tablespoons of the finished icing to a separate bowl and add a drop or two of black food coloring gel. Stir well to blend.
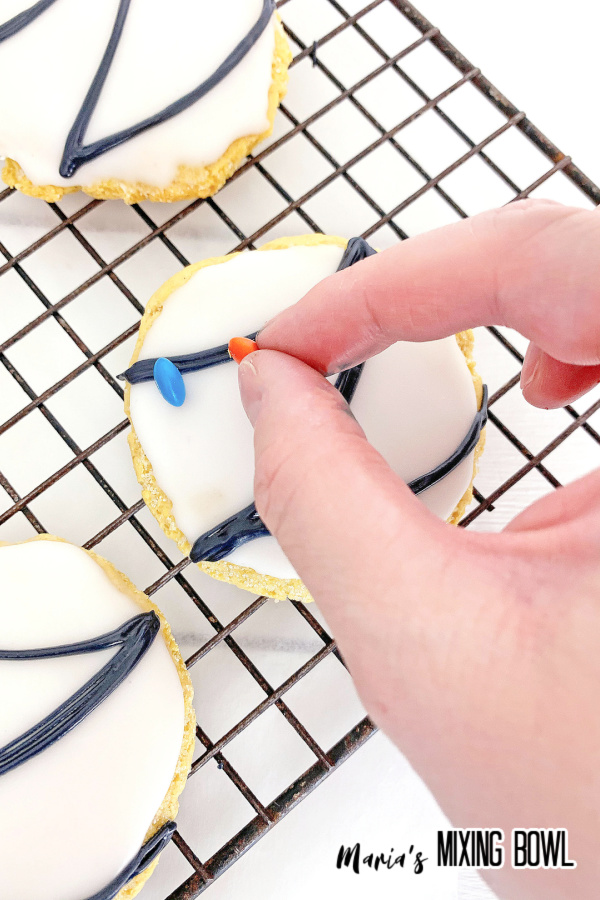
Step 6: Frost
Fully frost the cookies with a layer of white icing and let cool until the frosting is set. Then, place the black frosting in a pastry bag with a small tip and pipe it onto the white frosting to resemble light strands. Finally, place the mini M&Ms along the black frosting to create Christmas lights.
Hint: You can adjust the consistency of your icing by adding more milk to thin it out or more powdered sugar to thicken it.
Variations
If you want to personalize these delicious cookies, we have some ideas we think you’ll love.
Peppermint – For an extra zippy, holiday-themed flavor, add a little peppermint extract to the cookie dough.
Mini M&Ms in the Cookies – Try adding some mini M&Ms directly into the batter of the cookies for a little extra flavor in every bite.
Storage
These cookies will last for about a week in the refrigerator or a month in the freezer.
Tips
While this recipe is basically quite easy, the frosting can be a bit finicky when you first try it. We have some tips here that will help you make the best cookies possible from the sugar cookie base to the frosted finish.
Fully Softened Butter – Be sure to allow your butter to fully soften before using it. Fully softened butter will give you that fluffy texture you need for this recipe.
Use a Stand Mixer – If you have the option, use a stand mixer. This is a thick dough. You can do it by hand, but be prepared for a workout.
Adjusting the Icing on the Fly – You can easily adjust your icing to get the consistency you need as you make it. Simply add more milk to thin it out or more powdered sugar to thicken it up.
More Holiday Recipes
If you love cooking for the holidays, we have some great recipes here that we think you’ll love.
Holly Jolly Christmas Citrus Cocktail
PIN IT!!

FAQ
This FAQ answers some of the important questions regarding these Christmas lights cookies, so be sure to give it a read.
How long will these cookies last?
These cookies will keep in the refrigerator for about a week or in the freezer for up to a month.
Why do I have to refrigerate them?
The icing for these cookies is made with milk which means they have to be refrigerated.
How do I freeze these cookies?
Chill the cookies in the refrigerator, then wrap them individually in cling wrap. After that, place them in an air-tight, freezer-safe container or heavy-duty freezer bags.
Why is my icing thin?
You added too much milk. Just add a little more powdered sugar to thicken it up.
Why is my icing thick?
You didn’t add enough milk. Add a bit more to thin it out.
Christmas Lights Cookies
These Christmas lights cookies are so delicious and so pretty! They really bring the holiday spirit to any table. Plus, they’re easy to make. Even the frosting process is a snap once you get the hang of it. Give these cookies a try and get ready to watch everyone’s face light up when they take a bit.
MORE COOKIE RECIPES YOU WILL LOVE:
Maraschino Cherry Chocolate Chip Cookies
Triple Chocolate Cookies
Copycat DoubleTree Chocolate Chip Cookies
Caramel Pecan Thumbprint Cookies
Butter Pecan Snowball Cookies
Christmas Lights Cookies
Equipment
- Small Pastry Bag
- Small Frosting Tip
Ingredients
For the cookies:
- 2 Sticks of Butter – softened
- 1 cup of Sugar
- 1 Tablespoon of Vanilla
- 1 Egg
- 3 cups of Flour
- 1 Tablespoon of Baking Powder
For the frosting:
- 2 cups of Powdered Sugar
- 1 Tablespoon of Milk – and more if needed
- Black Food Coloring Gel
- Mini M & M's
Instructions
- In the mixing bowl of a stand mixer, using the whisk attachment, add the Butter, Sugar, Vanilla, and Egg, and blend until light and fluffy. You can also use a hand held mixer if you like.
- In a separate bowl, add the Flour, and Baking Powder, and stir well to blend. Add the Flour a little at a time and mix on low to blend, until all the Flour is added. Remove the Whisk attachment, and use the paddle. Continue to blend the Cookie dough until it's completely blended and a smooth ball starts to form. Scrape down the mixing bowl as needed.
- Line two cookie sheets with Parchment paper, and roll the cookie dough into small balls, about 1 inch balls, and place the balls on the Parchment paper.
- Bake at 350 degrees for about 15 minutes, or just until the cookies start to turn a light golden brown around the edges.
- Take a flat bottom glass, dip it in Sugar before lightly applying it to each cookie – smash the cookies very gently, and slightly, making them a little flatter, and spread out a little more. This will give the cookies a crinkle look.
- When the cookies are done, remove them from the oven to a wire rack to cool completely. While cookies are cooling, make the Frosting.
- Add the Powdered Sugar to a bowl, and add the milk a little at a time. Stir well while adding the Milk, until the Frosting is smooth, and no lumps are visible.
- If the Frosting is thin, add a little more Powdered Sugar until it's thick enough to ice the Cookies.
- When you have the right consistency, place a couple of Tablespoonfuls in a separate bowl, and add a drop or two of the Black Food Coloring Gel.
- Stir well to blend, and if the Black Frosting is thinned a little, add a little Powdered Sugar to achieve a thicker consistency.
- Frost the Cookies with the White Frosting, and allow them to sit for about 45 minutes until the Frosting is set on the Cookies.
- Place the Black Frosting in a pastry bag with the small tip, and pipe the Black Frosting onto the White Frosting, using a back and Forth motion, to resemble a string or strand for the Lights.
- Place the mini M & M's along the Black Frosting, so it appears as a strand of Colored Lights on the Cookies. Serve, and Enjoy!
- Makes about 40 Cookies
Disclaimer
Any nutritional data I provide is an approximation and actual dietary information can vary based on ingredients and proportion sizes.


One Comment