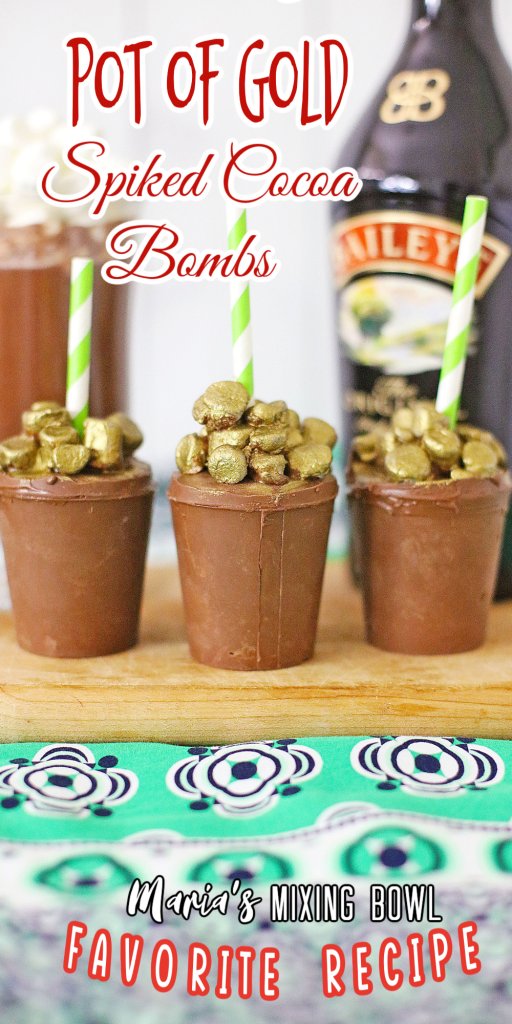
Pot of Gold Spiked Hot Chocolate Bombs
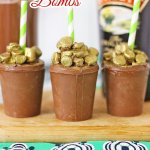
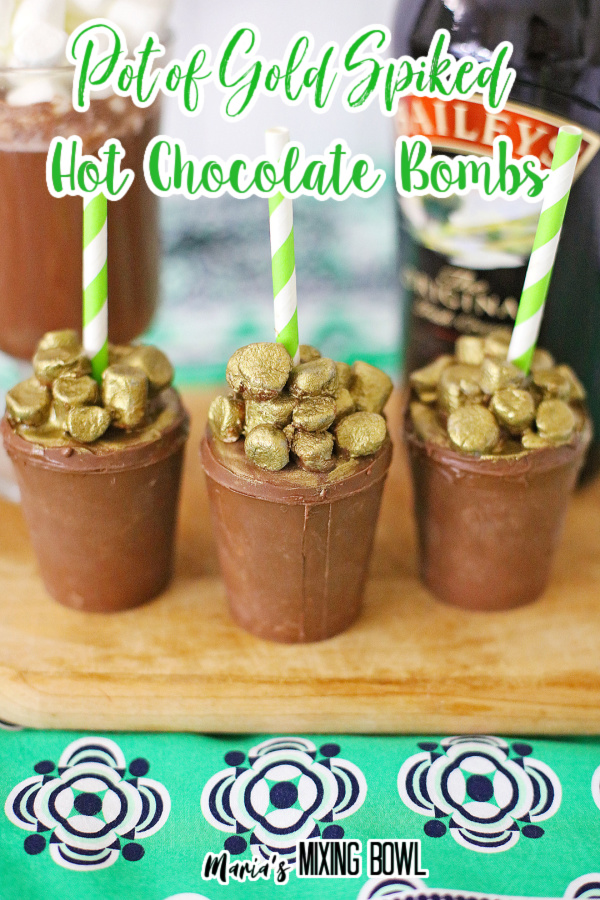
Baileys Pot of Gold Spiked Hot Chocolate Bombs make winter warm and fuzzy for everyone (21 and older). This delicious hot cocoa treat features a molded chocolate cup filled with hot cocoa mix, Baileys Irish Cream, and mini marshmallows painted to look like gold coins!
We love serving up simple dinners, desserts, and cocktails, but sometimes we also like to get a little fancy. In that case, we still like to keep it easy! These delicious pots of gold that we make every winter for our friends and family are actually just incredibly fancy-looking hot chocolate bombs! They’re great for serving up at any gathering during the winter months or for St. Patrick’s Day. Hey, the weather can still be pretty brisk at that time, too!
Baileys Spiked Hot Chocolate Bombs
These delicious spiked hot chocolate bombs have everything we love about hot chocolate with a boozy twist! A cup of of chocolate almond bark houses Baileys Irish Cream and hot cocoa. Then we seal the top of the cups with a lid of chocolate and decorate it with mini-marshmallows painted with edible gold paint to look like gold coins! They’re delicious cocoa treats that are as pretty as they are tasty.
The best part is that they aren’t that difficult to make! In fact, we find them easier than traditional cocoa bombs. They look so fancy people will think it took you hours, but in reality, you’ll be in and out of the kitchen in no time.
Spike Hot Chocolate Bombs Ingredients
It only takes a few simple ingredients to make these bombs. You’ll find them all easily at your local grocery store.
- Melted chocolate almond bark
- Gold edible art decorative cake paint
- Hot cocoa mix with mini marshmallows
- Baileys Irish Cream
- Mini marshmallows
- Milk
**See the recipe card at the end of the post for quantities
Equipment
Just like the ingredients, the equipment needed for this recipe is very simple.
- Food grade paint brush
- Paper cups
- Lime green and white striped paper straws
- Extra large mugs
- Scissors
Spiked Hot Chocolate Bombs Instructions
There are a few steps to this recipe, but when you break them down, they’re all very easy. Don’t be afraid of this recipe at all. It’s simple!
Step 1: Prep
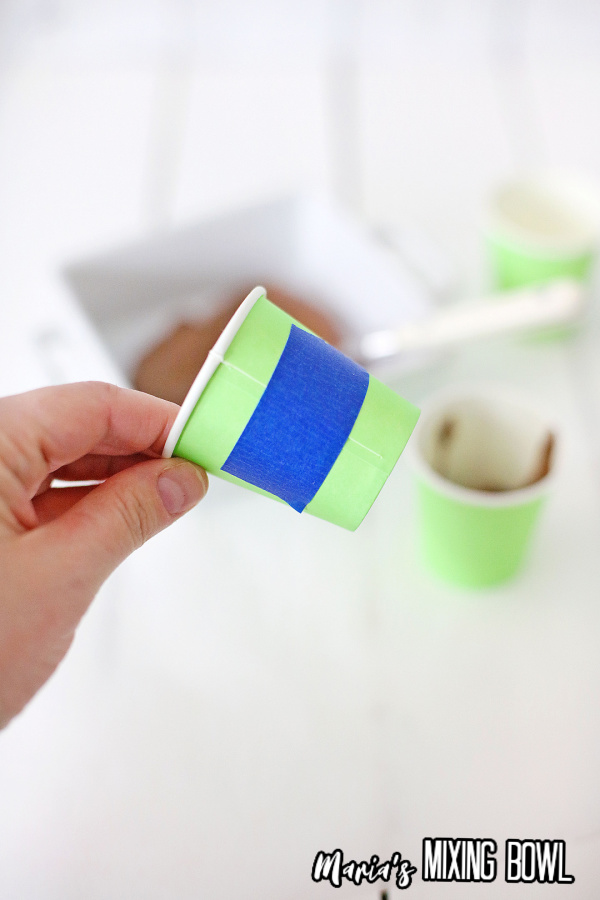
Cut 6 paper cups down their seam until you reach the bottom of the cup. Be sure not to cut the bottom of the cup. Then, use a piece of scotch tape or colored tape to tape the cup back together along the seam you just cut. These will be used to make the chocolate cups.
Next, cut the top portion off of 6 more paper cups. Cut them about an inch from the top to create six circles. These will become the chocolate lids for the cups.
Step 2: Microwave the Chocolate
Place the chocolate in a microwaveable bowl and heat it until the chocolate is melted. Stir well to blend.
Step 3: Make the Chocolate Cups
Spoon the melted chocolate into the bottom and down the sides of the paper cups by dripping it around the sides and bottom and smoothing it with a spoon.
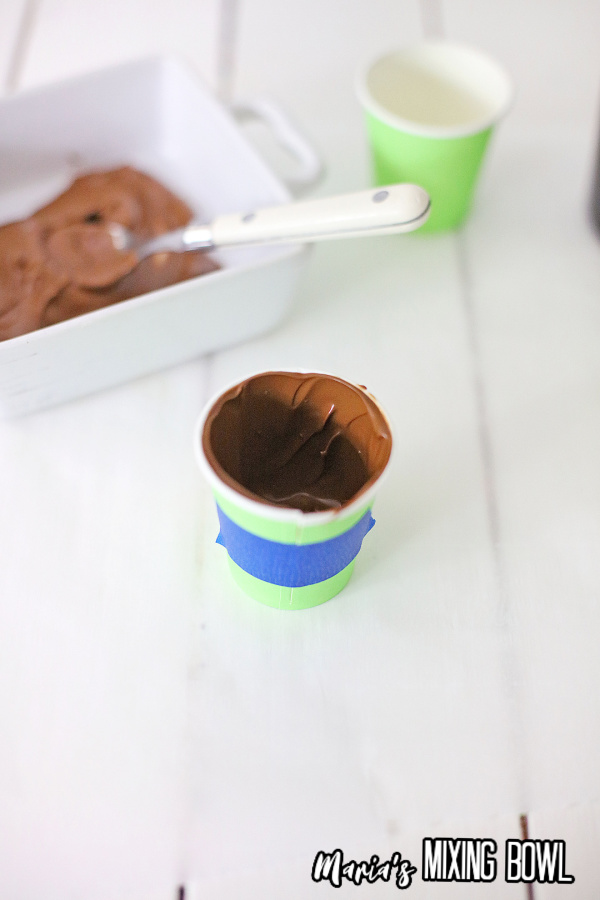
Place the cups upside down on parchment paper and allow them to sit for 30 minutes while the chocolate firms up. Then, add another layer of chocolate and leave the cups for a few minutes until the chocolate begins to dry. Finally, place the cups in the refrigerator for about 30 minutes or until firm.
When the chocolate is set, remove the tape from the side of the cups and gently remove them from the chocolate. Leave the chocolate cups on the parchment paper.
Step 4: Make the Chocolate Lids
Place the cup tops that you previously cut out onto parchment paper and spoon melted chocolate into them until they’re full.
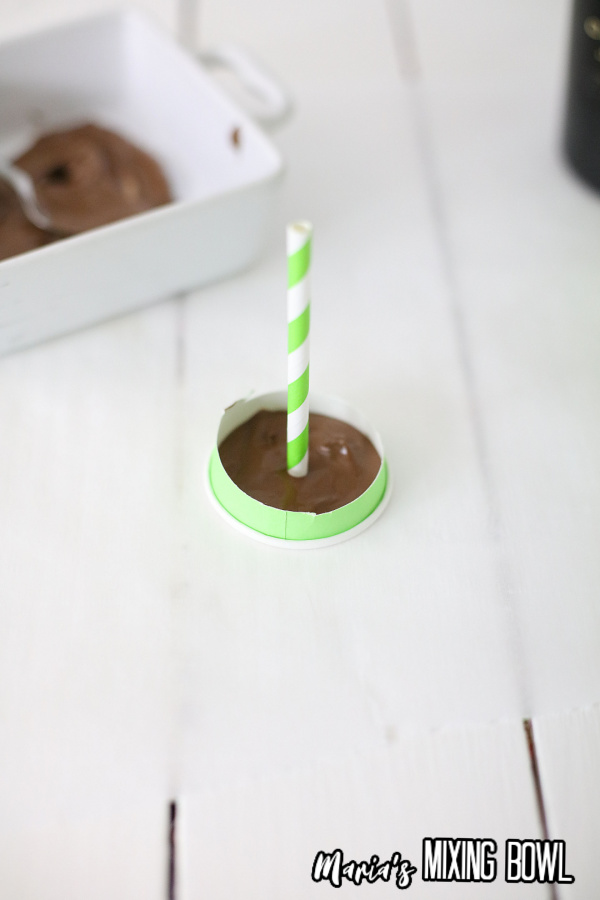
Then, cut three straws in half and place them in the melted chocolate circles. Be sure the straws don’t move for about 15 minutes so the chocolate has a chance to set up around them and hold them in place. Then, let the chocolate set for about 30 minutes and remove the paper cup circles.
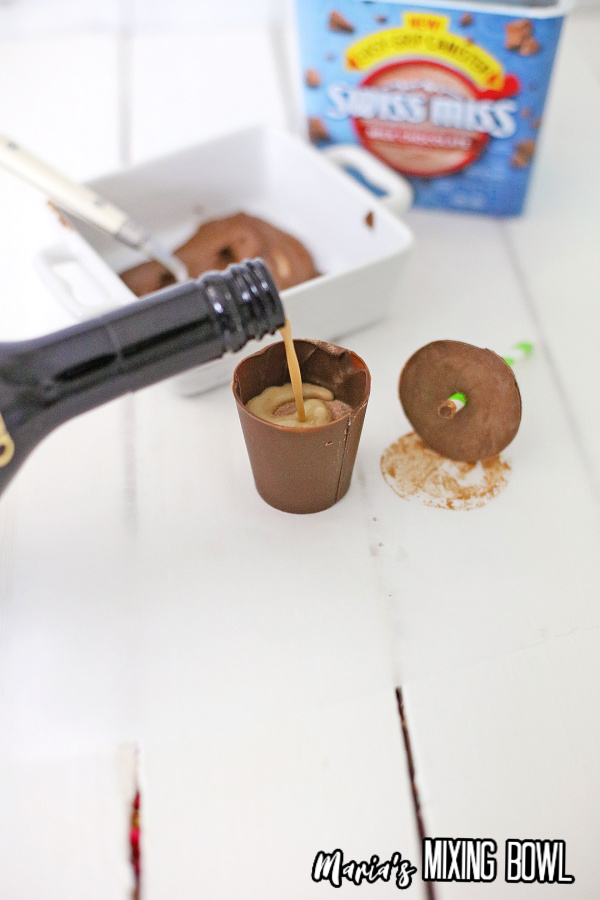
Step 5: Fill the Hot Chocolate Bombs
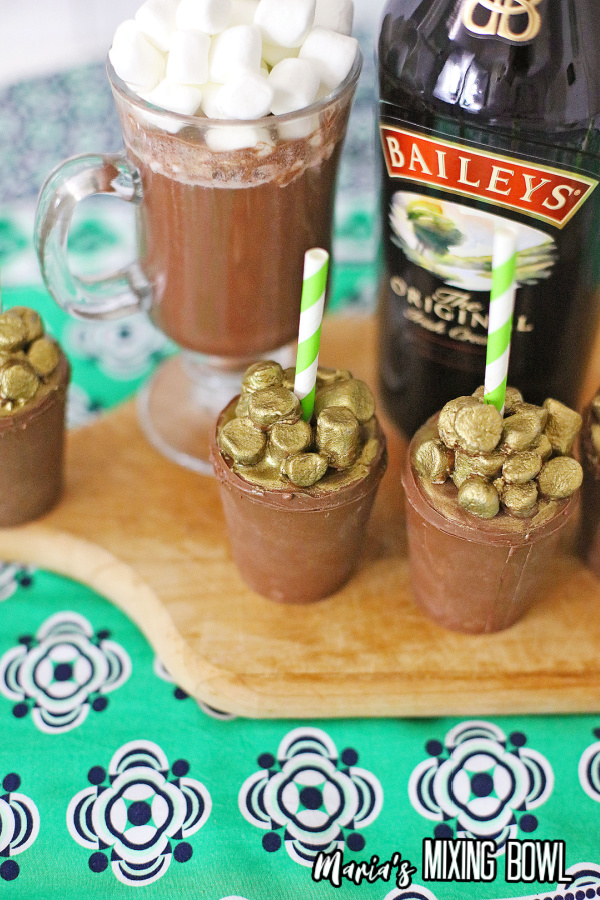
Fill each of the chocolate cups with hot cocoa and one jigger of Baileys Irish Cream. Then dip the bottom of the chocolate lids in more melted chocolate and place them on top of the cups to seal them.
Step 6: Add the Marshmallows
Dip one end of a mini marshmallow in melted chocolate and place it on top of the cups. Repeat this process, dipping and stacking until you have a pile of mini marshmallows on the lid surrounding the straws. Let the chocolate dry for about 30 minutes so the marshmallows are stuck in place.
Step 7: Paint the Marshmallows
Using your brush, paint the mini marshmallows with edible gold cake paint until they’re covered and look like gold.
Step 8: Serve
Place each of the Baileys spiked hot chocolate bombs in large mugs and pour one cup of steaming milk over them. Let your guests watch the cups transform into hot chocolate and enjoy!
Hint: When painting your marshmallows be gentle. You don’t want to dislodge them!
Storage
These spiked hot chocolate bombs aren’t designed to be stored, as they contain Baileys Irish Cream right in the cups themselves. Only make as many of these bombs as you’ll serve at your gathering.
PIN IT!!
Tips
This is a relatively simple recipe to make, but I do have some tips that will help ensure you make the best spiked hot chocolate bombs you possibly can.
Don’t Overtape the Cups – Only use a piece or two of tape to tape your cups back together. You want to gently remove the cups, which is harder to do if your cups are locked up like Fort Knox.
Don’t Rush the Chocolate – When letting your chocolate set, err on the side of more time rather than less. If you rush taking off your cup molds, you could damage your chocolate cups. The same holds true for the marshmallows sealed in place with chocolate.
Paint Gently – No matter how well you sealed your chocolate to the lids of your cups, if you are too vigorous with your painting, you could dislodge them. Use a light touch.
More Hot Chocolate Bomb Recipes
If you love hot chocolate bombs, we have some more recipes here we think you’ll enjoy.
Chocolate Hot Cocoa Bombs with Rolos
Spiked Hot Chocolate Bombs FAQ
If you have questions about these Baileys spiked hot chocolate bombs then we have answers. The follow FAQ answers the most commonly asked questions about hot chocolate bombs.
Where did hot chocolate bombs originate?
It might seem like they’ve been around forever, but they actually shot to fame in 2019 thanks to TikTok. The invention of a Boise Idaho resident, Eric Torres Garcia, hot chocolate bombs exploded into a viral sensation.
Why is almond bark used?
Almond bark is used instead of chocolate in these recipes because it needs no tempering or babying. It just melts and then sets right back up easily.
Can I add more Baileys?
Absolutely. You can make these as boozy as you like. Just remember that you’ll have to add more Baileys to the mug rather than the inside of the chocolate cup. There just isn’t enough room.
Can I make these ahead of time?
You can make the cups and lids ahead of time and then fill them when you’re ready. In fact, they’ll keep for about a month in a tightly-sealed container at room temperature.
Serve Up These Baileys Spiked Hot Chocolate Bombs
These Baileys spiked hot chocolate bombs are the perfect boozy treat for the cold winter or the crisp weather that’s often found around St. Patrick’s Day. These delicious little bombs are filled with rich chocolate, hot cocoa, and creamy Baileys, creating a sweet, chocolatey, boozy treat that all the adults at your next gathering will love.
MORE RECIPES YOU WILL LOVE:
Blueberry Meringue
Shamrock Shake
Cocoa Puffs Cheesecake
Mint Chocolate Chip Cheesecake Dip
Baileys Pot of Gold Spiked Hot Chocolate Bombs
Ingredients
- 2 Cups Chocolate Almond Bark – melted
- Edibleart Decorative Cake Paint – GOLD
- 1 small brush – food grade – for painting the Cake Paint
- 3 envelopes Hot Cocoa Mix with Mini Marshmallows
- 12 Three ounce Paper Cups
- 3 Lime Green and White Striped Paper Straws
- 1 Bottle Bailey's Irish Cream
- 1 package Mini Marshmallows
- 6 Cups Milk
- 6 Extra Large Mugs
Instructions
- Cut the Paper Cups down the seam, until you reach the bottom of the cup – do not cut the bottom of the cup.
- Take a piece of Scotch Tape and tape the cup together on the outside of the cup, where you just cut the seam.
- Place the chocolate in a microwave-safe bowl, and microwave until the chocolate is melted, and stir well to blend.
- Spoon the Chocolate into the bottom and sides of the paper cup, by dripping it around the sides and bottom, and smoothing with the spoon.
- Place the cups upside down on Parchment Paper, and allow to sit for 30 minutes, while the Chocolate sets/firms up.
- Add another layer of Chocolate, and leave the cups for a few minutes until the Chocolate begins to dry, then place in the refrigerator until firm, about 30 minutes.
- When the chocolate is set, remove the tape from the side of the Cup, gently remove the paper cup from the Chocolate, and leave the Chocolate Cups on the Parchment Paper.
- Cut off the top portion of 6 new Paper Cups, about an inch from the top; cut them to make a circle, and this will form the tops to your Chocolate Cups.
- Place tops of Cups on Parchment Paper and spoon melted Chocolate into the circles until full.
- Cut three Straws in half, place them in the Melted Chocolate Circles, and leave them to dry in the Chocolate, for about 15 minutes. Let sit for 30 more minutes, and then remove the Paper Cup circles from the Chocolate, with the Straw dried in place.
- Fill each Chocolate Cup with the Cocoa, and 1 jigger of Bailey's Irish Cream, and dip the bottom of the Chocolate Top in melted Chocolate to seal the lid onto the Chocolate Cup.
- Dip one end of a Mini Marshmallow in melted Chocolate, and place Mini Marshmallows on top of the cups, stacked around the straw (See Photo).
- Let the Chocolate dry, for about 30 minutes, and then use a small food-grade paintbrush, paint or brush on the Edibleart Gold Cake Paint on the Mini Marshmallows, until they're covered in the Gold colored paint.
- Allow paint Cake Paint to dry before serving – about 30 minutes.
- In an Extra large Mug, heat one cup of milk in the mug, until steaming hot, and place the Chocolate Cup in the hot Milk.
- Hot Cocoa Cup will melt in the Mug. Serve, and Enjoy!
Notes
Disclaimer
Any nutritional data I provide is an approximation and actual dietary information can vary based on ingredients and proportion sizes.


